Rosters
A roster is a list that shows the order in which a group of people will perform a duty or job. For example, "a duty roster".
Adding a New Roster
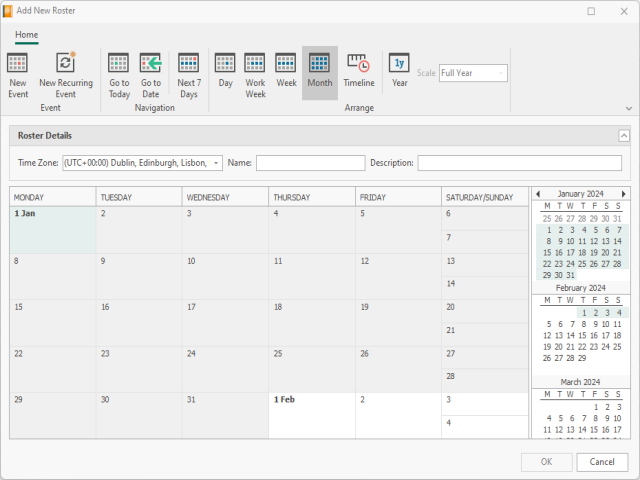
From the Instant Alert Address Book select Add and then Roster from the drop-down menu. The Add New Roster dialog is displayed.

Options on the Add New Roster display
Options on this display allow you to add, view and group events.
Roster Details
These settings contain the parameters that define the Roster within the Address Book.
Time Zone
Use the drop-down menu to select the World time-zone in which this Roster operates.
Name
Enter a unique name for the Roster.
Description
Enter a description that identifies and explains the purpose of the Roster.
Adding New Events to a Roster
There are two types of event that can be added to a roster.
-
A single, one-off event
-
A recurring event that repeats every day, week, month or year over a specified time period.
Adding a New Event
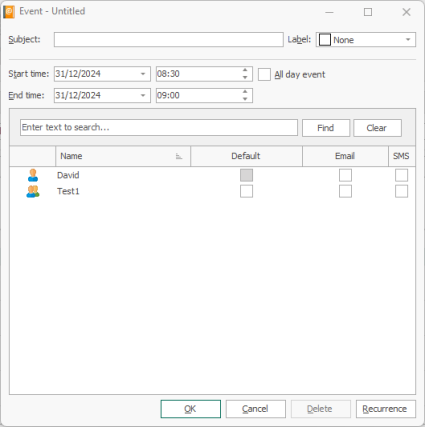
Click New Event to add a single event to the roster. The Event - Untitled dialog is displayed.

Subject
Enter the unique alphanumeric name of the event to be added to the roster.
Label
If required, use the drop-down menu in the Label field to identify what type of event this is, based on specific time elements, such as Out of Hours, Morning, Weekend and so on.
Start time
Enter the date on which the event is to start. Use the drop-down arrow to display a calendar which can then be used to select the required date.
Enter the time of day at which this event is due to start. Use the Up and Down arrows in this field to change the hour at which the event starts. Also see All Day Event.
End Time
Enter the date on which the event is to finish. Use the drop-down arrow to display a calendar which can then be used to select the required date.
Enter the time of day at which this event is due to end. Use the Up and Down arrows in this field to change the hour at which the event ends. Also see All Day Event.
All Day Event
Click All Day Event to specify that the event lasts all day and therefore no actual start and end times need to be entered.
Selection
From the main panel on this display, select the Contacts, Call Schedules and Broadcast Groups and the method of contact which this event uses in the Roster.
-
Default: The default contact method for this selection is used.
-
Email: Email is used as the contact method
-
SMS: Short Message Service is used as the contact method.
Recurrence
Click Recurrence to open the Event Recurrence dialog. See Adding a New Recurring Event.
Click OK to create the new event for the Roster.
Adding a New Recurring Event
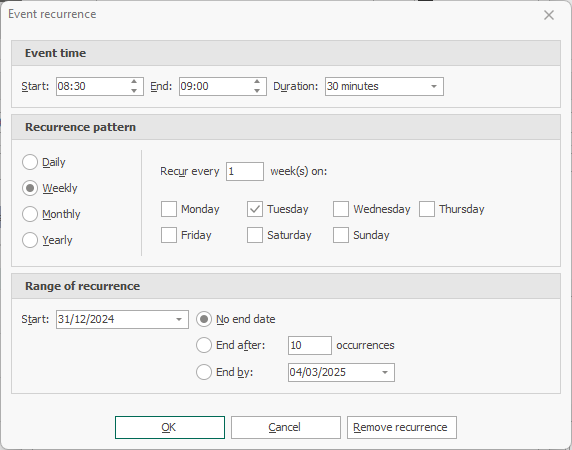
Click New Recurring Event to add a recurring event to the roster. The Event recurrence dialog is displayed.

Event time
Use the options in the Event time section to specify the time dynamics of the recurring event
-
Start: Enter the time at which the event is to start. Then enter one of the following:
-
End: Enter the time at which the event is due to end. The entry in the Duration field changes accordingly.
-
Duration: Enter the duration of the event. The entry in the End field changes accordingly.
Recurrence pattern
The recurrence over which the event can be defined in one of four ways. Subsequent criteria change in this section depending on the selection made:
-
Daily: Select this option to specify that the event occurs on a daily basis. The following options are available:
-
Every n day: Enter the daily interval at which this event occurs. The default is every day.
-
Every weekday: Select this option to specify that the event occurs on every weekday (not weekends).
-
-
Weekly: Select this option to specify that the event occurs on a weekly basis. The following options are available:
-
Recur every n week on: Enter the number of weeks between which this event occurs. The default setting is every week.
-
Days: Specify the days of the week on which the event occurs. Multiple selections are allowed.
-
-
Monthly: Select this option to specify that the event occurs on a monthly basis. The following options are available:
-
Day: Specify on which day of which month this event occurs. The default setting is the first day of every month.
-
The n day of every n month: Use this option to generate a more detailed occurrence of the event by specifying:
-
The first, second, third, fourth or last...
-
Day, Weekday, Weekend Day, Specific Day...
-
Of every single or every number of months.
-
-
-
Yearly: Select this option to specify that the event occurs on a yearly basis. The following options are available:
-
Every Month and Date. The default setting is the first of January.
- The n day of a month: Use this option to generate a more detailed occurrence of the event by specifying:
The first, second, third, fourth or last...
Day, Weekday, Weekend Day, Specific Day...
Of a specified month.
-
Range of recurrence
Fields in this section specify the number of times that the event reoccurs before ending. The following options are available:
-
Start: Specify on which date of the year this event starts
-
No end date: The event continues infinitely
-
End after: Specify the number of occurrences of the event that must run before it ends. The default setting is 10 occurrences.
-
End by: Specify the actual date on which the event stop recurring.
Click OK to add the recurring event to the Roster.