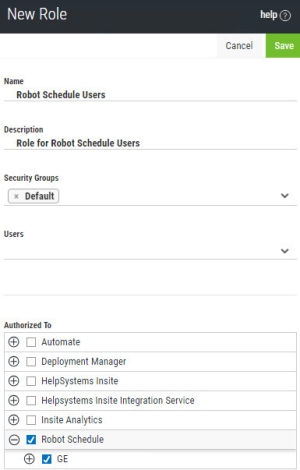
Adding a Role
To ensure your users only access the areas of Insite they are authorized to, you can create and assign them to roles.
Follow these steps to create a role:
- In the Navigation Panel, click Roles under Settings. If the menu is hidden, click
 .
. -
Click Add.
-
Enter a Name for the role you want to create.
-
Enter a Description for the role.
-
Select any security groups you want to add the role to. For example, if you create a role with permissions to the Robot Schedule production system (like in the image above), you could add a security group for all Robot Schedule users to it.
NOTE: If you haven not created any security groups yet, see Security Groups. -
If you want to add users to the role (outside of users who are assigned to any security groups this role is a part of, as they will get this role's permissions automatically), type their username into the field or select them drop the drop-down.
-
Click the products and areas of Insite you want to apply to this role. The current products and areas available are the following:
 Multi-Factor Authentication
These are the areas of the product that can be chosen when defining a role.
- Agents
- Managers
- Product Settings
- Reports
- Users and Groups
 Automate
These are the areas of the product that can be chosen when defining a role.
Insite - Automate Licensing
 Deployment Manager
These are the areas of the product that can be chosen when defining a role.
- Enterprise License Agreement
- <active product connections>
- Licensing Products
- Installing Products
 Insite
These are the areas of the product that can be chosen when defining a role.
- Authentication
- Dashboards
- Logging
- Product Connections
- Role Based Security
 Insite Integration Service
These are the areas of the product that can be chosen when defining a role.
- Change and Remove Product Instances
- Enable Disable Healthcheck
- Renew Certificates
- View All Product Instances
- Allowed and Blocked Products
 Insite Analytics
These are the areas of the product that can be chosen when defining a role.
- Data Connections
- Licensing
- Query Builder
 Password Self Help
These are the areas of the product that can be chosen when defining a role.
- All Product Functions
 Powertech Event Manager
These are the areas of the product that can be chosen when defining a role.
- Event Analysis
 Powertech Network Security
These are the areas of the product that can be chosen when defining a role.
-
<active product connections>
- All Product Functions
 Robot Network
These are the areas of the product that can be chosen when defining a role.
-
<active product connections>
- All Product Functions
 Robot Schedule
These are the areas of the product that can be chosen when defining a role.
- <active product connections>
- All Product Functions
 Vityl IT & Business Monitoring
These are the areas of the product that can be chosen when defining a role.
- All Product Functions
NOTE: Some products will only display in the Authorized To list if there is an active Product Connection. -
Click Save.
When you are finished, the new role will show up on the Roles page.
