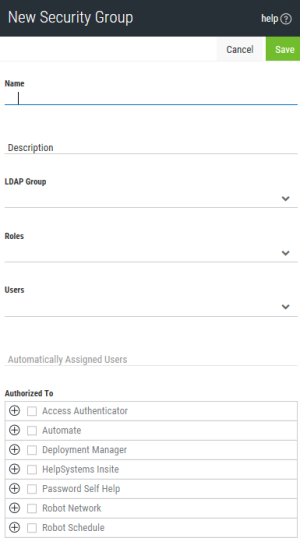
Adding a Security Group
Before you can assign users and Roles to a Security Group, you need to create one. Insite comes with a default Security Group, but it has no basic authorization added and should only be used to catch users that aren not assigned to a Security Group (or Role).
Follow these steps to create a Security Group:
-
In the Navigation Panel, click Settings > Security Groups. If the menu is hidden, click
 .
. -
Click Add.
-
Enter the Name and Description of the Security Group you want to create.
-
If you are using LDAP as your Authentication method, enter the distinguished name (DN) for your LDAP Group. This DN is used to search for users in your LDAP server and add them (if they match) to this Security Group when they first log on to Insite. This field does not appear if you are not authenticating with LDAP.
-
Select the Role you want to add to the Security Group.
NOTE: If you haven not created any Roles yet, see Roles. -
If you want to add specific users to the Security Group, select them from the drop-down.
-
Ensure the Security Group is authorized to the correct Insite areas and products. These boxes will be automatically checked with whatever authorities the Roles and Security Groups you have selected are assigned to.
NOTE: You can only add authorities through a Role. Permissions are additive if multiple Roles are assigned to the Security Group. -
Click Save.
When you are finished, the new Security Group will show up on the Security Groups page.
