How to Get There
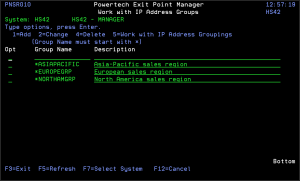
From the Exit Point Manager Main Menu, select option 5 to display the Work with IP Address Groups panel.
What it Does
The Work with IP Address Groups panel is used when a number of IP addresses need the same group filter rules applied. To add a new Address Group, enter the information on the blank line below the column headings. Once an Address Group is created a range of IP addresses may be associated to it. Option 5 displays a list of IP addresses associated to the group. Type an option next to a specific group and press Enter. You can type option numbers next to more than one group at a time. This allows you to do more than one task at a time. If you see ‘More...’ in the lower right corner of your display, there is more information to be listed.
Press the Page Down (Roll Up) key to move toward the end of the Address Groups.
Options
You can select from the following options:
1=Add
Add an Address Group. Valid for line one only.
After you create an IP address group, you can assign a range of locations to the address group using option 5.
2=Change
Change an Address Group.
4=Delete
Delete an Address Group.
5=Work with IP Address Groupings
Work with the IP Addresses associated with the group. See Work with IP Address Groupings panel.
Field Descriptions
Group Name
The name of a group of IP addresses. It must begin with special character "*".
Description
The description of the Address Group. It is a required entry.
Command Keys
F3 (Exit): Exit the panel without processing any pending changes.
F5 (Refresh): Refreshes the panel and resets all available text fields.
F7 (Select System):Use this command key to work with data from a different System.
F12 (Cancel): Exit the panel without processing any pending changes.
