Work with Exit Point Manager Activation
How to Get There
To display these options, from the
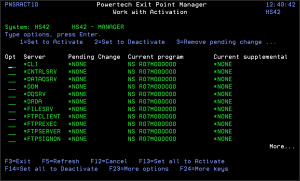
The following describes the parameters and allowable values for each field on the Work with Activation panel.
What it Does
The work with Activation panel is used to prepare servers to be protected by Powertech's Exit Point Manager product or to remove that protection. The activation process can be run immediately or scheduled to run the next time you IPL the system. A server may be selected for activation (begin protection) or for deactivation (end protection). All pending changes take effect during the next activation operation. The process of activating protection for a server also "activates" this version of the product. This is only a concern when you have been running a prior version of Exit Point Manager and are upgrading to a new version. Part of making this version the active version involves ending the SUMCAPTRAN job running for the other version and starting it for this version. This will only happen if the SUMCAPTRAN job is running at the time you activate this version.
Field Descriptions
Opt
Select servers with one of the options listed to perform that action on the selected server. Press Help on the options line for more information on the available options.
Server
A Server in Exit Point Manager is a controlled entry point into your system. These entry points are determined and defined by IBM. Exit Point Manager has assigned easy—to—remember names to these controlled entry points.
Pending Change
The Pending Change column shows the action that Exit Point Manager will take on the server the next time the activation process is run.
The following values may appear for Pending Change:
Current program
The Current program column displays the program registered to protect the server.
Current supplemental
*YES in this field indicates the exit program currently is registered to the exit point as supplemental to Exit Point Manager's exit program. However, a Powertech Exit Point Manager exit program cannot be supplemental to itself. This shows the program currently set up within Powertech Exit Point Manager as the supplemental exit program for that exit point. If an exit point is deactivated with the Reinstate supplemental option, the supplemental program will be registered as the exit program at activation time. *NONE indicates there is no supplemental exit program for the exit point.
You may see values that are not program names here. They will be formatted as follows: The first two characters are always "NS" (Exit Point Manager) and the version of the product in which that program exists follows. If you see *ERROR for the version, the library containing that version is damaged and the version is not available.
If a server is activated with the "retain supplemental" option, this exit program will, at activation time, be made supplemental to the Exit Point Manager exit program. Supplemental exit programs are executed after Exit Point Manager has processed the server transaction.
Options
You can select from the following options on the Work with Activation panel:
1=Set to Activate
Will begin protection of the server at the next activation.
2=Set to Deactivate
Will end protection of the server at the next activation.
3=Remove pending change
Select option 3 to remove a pending change from a server so that no changes are made to the server when you run activation. Use this option if you've already set an exit point to activate (or deactivate), and want to remove the pending change for the exit point.
11=Set to Activate/Retain supplemental
Select option 11 to flag the exit point for activation and retain the existing exit program, making it supplemental to the Exit Point Manager exit program.
12=Set to Deactivate/Reinstate supplemental
Select option 12 to flag the exit point for deactivation (remove the Exit Point Manager exit program) and reinstate the supplemental program as the exit program. Use the following function keys to activate the selected exit points:
Command Keys
F3 (Exit):
Exit the program without processing any pending changes.
F5 (Refresh):
Refresh the panel.
F12 (Cancel):
Exit the panel without processing any pending changes.
F13 (Set all to Activate):
Select all servers to begin protection, with the exception of the sockets-related servers. These can potentially render your system unreachable via TCP and need to be treated with the utmost caution. They can still be activated by selecting them with a '1'.
F14 (Set all to Deactivate):
Press F14 to set all servers to *DEACTIVATE.
F15 (Reset all):
Press F15 to reset all fields to default settings of *NONE.
F18 (Add silent activation):
Press F18 to specify a silent activation. Use this if you plan to schedule an IPL during evening hours or on a weekend. When you select silent activation, you accept the activation setup so it is ready to be applied at the next system IPL. A message displays at the bottom of the panel confirming the silent activation request. See Using Silent Activation.
F19 (Remove silent activation):
Press F19 to remove a silent activation request. The confirmation message, Silent activation canceled, displays at the bottom of the Work with Activation panel.
F20 (Run activation):
For an Interactive activation:
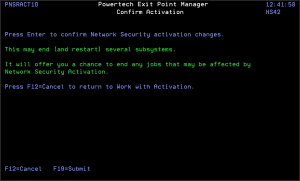
- Press F20 to run the activation request. You can run the activation after you've set one or more exit points to activate (by selecting option 1, Set to Activate, F13, Set all to Activate, or option 11, Set to Activate/Retain supplemental). The Confirm Activation panel displays when you press F20.
- Press Enter to confirm the Exit Point Manager activation or press F19 to submit the activation to batch.
- If you don't want to accept the current activation setup, press F12 to return to the Work with Activation panel.
If the activation request finds active server jobs, the Server Jobs to End panel displays with a list of the jobs. We recommend that you end all active server jobs to complete the activation. Follow the instructions on the panel to end the jobs.
When the activation completes, a confirmation message displays at the bottom of the Work with Activation panel.
WRKACTJOB SBS(QSERVER) JOB (QZLSSERVER)
If the QZLSSERVER job is not active, you must restart the NetServer. Use the following command to start the NetServer:
STRTCPSVR *NETSVR

