Monitoring NT Services with the Windows NT Services Probe
InterMapper can monitor and send notifications for NT Services running on another computer. InterMapper uses the Service Control Manager facilities of the underlying Windows host to communicate with a remote computer to track the state of its services.
Note: This NT Services monitoring is only available if the InterMapper server is running on a Windows XP, or 2003 computer. You cannot use this facility if you're using a Macintosh or Unix/Linux computer to host the InterMapper server.
|
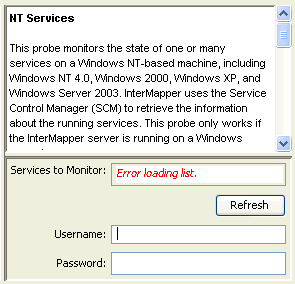
The NT Services configuration window displays the full list of services that are running on a remote host. You can check off one or many services to monitor; InterMapper will then give an alert if any of them fails. The parameters to the probe are:
- A list of NT services on the target machine. This list has red and green marks to indicate whether the service is currently running. Checking the box for the service will cause InterMapper to send an alert if that service ever stops running.
- The Username and Password required to log onto the target machine.
Authentication for NT Services Probe
The NT Services probe opens the Service Control Manager (SCM) on the target machine; hence, some authentication is required before this can happen. There are several ways to do this.
- Using built-in username and password:
InterMapper has the built-in ability to solicit from you a username and
password for authentication. When you choose the NT Services probe, it
will prompt you for a username and password before attempting to connect
to the target machine. If you have not used one of the methods below,
fill in a username and password at that point and click OK. This will
be all you need to do for authentication; the username and password will
be saved.
Note: For this to work, InterMapper must be running as an administrator, as only administrators are empowered to make the required network connections. You can do this in one of two ways:
- The first way is by adjusting the account under which InterMapper is run. InterMapper is normally installed under the LocalSystem account, which does not have administrator privileges. To change the account under which it runs, follow this procedure: Go into the SCM and stop the InterMapper service if it is running. Right-click and choose "Properties". Choose the "Log On" tab. Under "Log On As...", click the radio button next to "This account:", and click "Browse..." to list the accounts; choose an account with administrator privileges. Fill in the password for the account in "Password:" and "Confirm Password:". Click "OK".
- The second way is to let InterMapper be an administrator when it
needs to be by supplying it with an administrator's username and password,
so that it can elevate its privileges when it needs to. You can do this
using the NT Services item in the Server Settings list.
Note: In either scheme, the
administrator you supply must have been given the "Logon as a service"
right in the local security policy of the machine you are monitoring.
- The NET USE command: Another way
to authenticate is to use the NET USE command to create a connection between
the host machine and the target. For instance, to monitor the services
on a host at 192.168.1.140, enter the following:
NET USE \\192.168.1.140\ipc$ /USER:Administrator
You will be prompted for the password, and the connection will be made. (If you have done this, when prompted for a username and password for NT Services by InterMapper, you can leave them blank and click OK.)
Note: You must use the IP address and not the network name for the machine. That is important, as the Windows OS will not see the DNS name or the domain name as being the same as 192.168.1.140 when checking the connections, and will not recognize that there is a connection when InterMapper tries to query the services by IP address, returning an "access denied" error instead.
- Synchronizing Users: A third way
to authenticate is to make sure that the user and password under which
the InterMapper service is running exists on the target machine as well.
When InterMapper is first installed, it is installed running under the user "LocalSystem", as most services are. It is necessary to create a new user on your machine; let's name it InterMapper and give it a password. Make sure it is a member of Administrators. (If you already have a username and password that exist on all machines that are to be targeted by the NT Services probe as well as the InterMapper host and which has Administrator permissions everywhere, you can skip the previous step and substitute it for InterMapper in the following.)
Go into the SCM and stop the InterMapper service if it is running. Right-click and choose "Properties". Choose the "Log On" tab. Under "Log On As...", click the radio button next to "This account:", and click "Browse..." to list the accounts; choose InterMapper. Fill in the password for the account in "Password:" and "Confirm Password:". Click "OK".
On the target machine, create a new user, also named InterMapper, with the same password, and also a member of Administrators.
Start InterMapper from the SCM on the original machine. You should now be able to use NT Services probes. (When prompted for a username and password for NT Services by InterMapper, you can leave them blank and click OK.)
A Note About Windows XP Professional
Windows XP uses a "simple" network scheme by default. In this scheme, all remote connections are mapped to "guest", which has very few permissions, as you might expect. This is the case even if there are other authenticated connections between the two computers. This default configuration prevents InterMapper from opening the SCM on a remote Windows XP machine. Even with correct username and password information, you will get an "access is denied" error.
To turn off this simplified networking: On the remote XP machine, choose Start Menu->My Computer. In the window that opens, choose Tools->Folder Options. Click the View tab. In the Advanced Settings list, scroll to the bottom. Uncheck the box next to "Use simple file sharing (Recommended)". Click Apply or OK. InterMapper should now be able to open the SCM on this machine from afar if you've followed one of the methods above to provide proper authentication.
A Note About Windows XP Home
The NT services probe does not work with an XP Home computer.
A Note About Windows XP SP2 and Firewalls
If you have Windows XP SP2 or have installed your own firewall on the target machine, you will need to make sure that there are holes in the firewall for the probe. If you are using a default installation of Windows XP SP2, then in the Windows Firewall settings, there is a probably a default exception for File and Printer Sharing. If there is, you can simply check this exception, and you will be done.
If there is not, or if you are using different firewall software, you will need to add exceptions for port 137 (UDP), port 138 (UDP), port 139 (TCP) and port 445 (TCP).
Note that if your host machine is Windows XP SP2 or has a firewall, the same holes need to be open for NT Services probes to work.
A Note on Error Messages
InterMapper may encounter authentication errors when attempting to connect. Here is a list of the messages and ways you might work around them:
- Error attempting to elevate privileges. InterMapper is not running as an administrator, and thus needs to elevate its privileges in order to be able to execute the NT Services probe. It could not do so. Make sure a correct username and password for the InterMapper host machine have been supplied in the NT Services panel of the Server Settings dialog. Make sure the user given has the right to log on as a service in your Local Security Policy. If host machine is Windows Server 2003 or newer, make sure the user has the right to impersonate another user.
- Could not establish Windows Networking connection to probe target. When a username and password have been supplied for the target machine, InterMapper attempts to use them to create a connection between the host and the probe target. This attempt failed for some reason. Will be followed by more specific error information. See below.
- Could not open SCM on probe target. InterMapper could not open the Service Control Manager on the target machine. Will be followed by more specific error information. See below.
The following errors might be appended to the messages above:
- Access is denied. Make sure InterMapper is running as an administrator, or that an administrator username and password have been provided in the NT Services panel in the Server Settings dialog. Make sure a valid administrator username and password have been supplied for the probe target. If the probe target is running Windows XP, make sure that "Simple Networking" is turned off.
- The network name cannot be found. and The network path was not found. The device you have specified does not appear to exist on the network. If you are sure that it does, make sure it is a Windows machine with File and Print Sharing turned on, and that any firewall has exceptions for File and Print Sharing.
- An extended error has occurred. A network-specific error has occurred. It should be followed by more information about the nature of the error. You may need to consult your network administrator.
- The specified network password is incorrect. The password you supplied doesn't match the username.
- No network provider accepted the given network path. and The network is not present or not started. No network is present, or a component of the network has not been started. Consult your network administrator.
- The RPC server is unavailable. Make sure that probe target is a Windows machine with File and Print Sharing turned on, and that any firewall has exceptions for File and Print Sharing.