Debugging With the SNMPWalk Command
Intermapper provides a simple SNMPWalk command, available from the Monitor menu, that allows you to perform an SNMPWalk on a specified OID. In some cases this may not be sufficient. You can also execute SNMPWalk as a server command, and include specific arguments as described below.
The Intermapper server implements a simple snmpwalk facility in its debug mode.
snmpwalk -v [1|2c|3] -c community -o filename [-e] [-n num-OIDs] -p 161 -r 3 -t 10 IP-address startOID
where:
- -v [1|2c|3] is the version of SNMP to use: SNMPv1, SNMPv2c, or SNMPv3
- -c community indicates the SNMP read-only community string (see note for SNMPv3)
- -e if present, means to proceed to the end of the MIB
- -n num-OIDs if present, indicates the number of OIDs to display (-e and -n are mutually exclusive)
- -o filename is the name of a SQLite-format file saved in the Intermapper Settings/Temporary directory. For more information see Using the SNMPWALK -O Option.
- -p destination port (default is 161)
- -r number of retries that Intermapper will attempt if a response does not return (default is 3)
- -t timeout in seconds that Intermapper waits for a response (default is 10 seconds)
- IP-address is the IP address of the device to query
- startOID if present as the final argument, indicates the first OID to request
The command starts an SNMP walk on device with the specified IP-Address, starting from the given startOID. The walk ends when the specified number of OIDs are received. The walk also ends if the OID received from the device does not have the specified start OID as its prefix unless -e is specified. If -e is specified, the walk continues until the end of the MIB or the specified maximum OIDs are received.
username:[md5|sha|none]:authpassword:[des|none]:privpassword.
To perform an SNMPWalk on a probe
- In a map's List view, expand the probe group to view the individual probes.
- Right-click the probe you want to perform the SNMPWalk and select SNMPWalk. The SNMPWalk window appears.
- Complete the dialog as appropriate and click OK.
Examples
Example
SNMP walk of the ifTable of a device with IP address 192.168.1.1 using SNMPv2c with community string public:
snmpwalk -v 2c -c public 192.168.1.1 1.3.6.1.2.1.2.2
Example
SNMP walk of the ifXTable of a device with IP address 10.10.2.20 using SNMPv3 with user name user, authentication protocol MD5, authentication password auth, privacy protocol DES and privacy password priv:
snmpwalk -v 3 -c user:md5:auth:des:priv 10.10.2.20 1.3.6.1.2.1.31.1.1
Example
SNMP walk of the ifTable of a device with IP address 192.168.1.2 using SNMPv3 with user name test, authentication protocol MD5, authentication password pass, and no privacy protocol:
snmpwalk -v 3 -c test:md5:pass:none: 192.168.1.2 1.3.6.1.2.1.2.2
Example
Walk starting from the ifTable until the end of the device is reached or until 10,000 OIDs are received:
snmpwalk -v 1 -c public -e -n10000 192.168.1.1 1.3.6.1.2.1.2.2
Invoking the snmpwalk Command
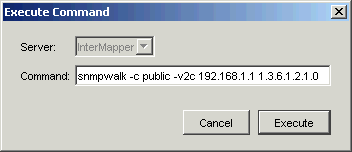
You execute the snmpwalk command as a Server command (available from the Help menu's Diagnostics menu)
To use this command:
- Select Help > Diagnostics > Server Command. The Server command window appears as shown above.
- Enter the snmpwalk command, and click Send.
-
The output of the SNMPwalk is written to the Debug file, which is at this path: InterMapper Settings : InterMapper Logs : Debugyyyymmddhhmm.txt
NOTE:You can use snmpwalk's -o option to direct the output of snmpwalk to an SQLite database. For more information, see Using the SNMPWALK -o Option.
-
The output of the SNMPwalk will also appear in the Debug window, as shown below:
SNMPWalk 192.168.1.1: prefix 1.3 (maximum number of OIDs: 2000)
-- 9/16/2005 13:04:56
SNMPWalk on 192.168.1.1 started
SNMPWalk 192.168.1.1: 1.3.6.1.2.1.1.1.0 = OctetString: ExampleOS
SNMPWalk 192.168.1.1: 1.3.6.1.2.1.1.2.0 = OID: 1.3.6.1.4.1.9.1
SNMPWalk 192.168.1.1: 1.3.6.1.2.1.1.3.0 = TimeTicks: 11058776
SNMPWalk 192.168.1.1: 1.3.6.1.2.1.1.4.0 = OctetString: support@example.com
SNMPWalk 192.168.1.1: 1.3.6.1.2.1.1.5.0 = OctetString: Example.com Router
SNMPWalk 192.168.1.1: 1.3.6.1.2.1.1.6.0 = OctetString: http://www.example.com
SNMPWalk 192.168.1.1: 1.3.6.1.2.1.1.7.0 = Integer: 72
SNMPWalk 192.168.1.1: 1.3.6.1.2.1.1.8.0 = TimeTicks: 413
SNMPWalk 192.168.1.1: 1.3.6.1.2.1.1.9.1.2.1 = OID: 1.3.6.1.2.1.1.9.1
SNMPWalk 192.168.1.1: 1.3.6.1.2.1.1.9.1.3.1 = OctetString: See RFC2580
SNMPWalk 192.168.1.1: 1.3.6.1.2.1.1.9.1.4.1 = TimeTicks: 413
SNMPWalk 192.168.1.1: 1.3.6.1.2.1.2.1.0 = Integer: 2
SNMPWalk 192.168.1.1: 1.3.6.1.2.1.2.2.1.1.1 = Integer: 1
SNMPWalk 192.168.1.1: 1.3.6.1.2.1.2.2.1.1.2 = Integer: 2
...
SNMPWalk 192.168.1.1: Finished (end of MIB reached) -- 9/16/2005 13:09:48
snmpwalk stopall Command
To stop all SNMPwalks for a particular server, you can enter this command in the Server command window.
snmpwalk stopall
Error Conditions
Intermapper detects the following error conditions:
- When Intermapper walks to the end of the MIB, it displays a Finished (end of MIB reached) message
- When Intermapper fails to receive a response after the specified number of retries, it displays a Finished (No response received) message
- The snmpwalk expects that the OIDs received are increasing. When Intermapper receives an OID that is out of order, it would terminate the walk with an error message that indicates that a loop is detected in the walk.
Telnet Command-Line Help
There is also documentation in the Intermapper's telnet help. Typing help snmpwalk in the telnet window displays a summary of the command.