This topic will show how to set up and define a GET, PUT, POST and DELETE request to the JAMS REST API using Python. The four examples below will utilize an Agent to demonstrate the functionality of the API requests.
 |
Note: To call another controller in the API, such as Job, Batch Queue, etc., are defined in the same way, however you will need different parameters other than Agent and include a different URL. The documentation and Swagger links becomes available from the JAMS Server once the REST API is installed. |
|
Note: This documentation only covers JAMS and does not include setting up the Python development or Eclipse environment. For more information on Python configuration using Eclipse go to: http://www.vogella.com/tutorials/Python/article.html |
Authentication using a Post Request
You must first authenticate with JAMS in order to define other requests to the JAMS REST API. To get started with the authentication POST request, follow the description below.
Copy the following code and paste into your .py and make sure to enter your JAMS username and password.
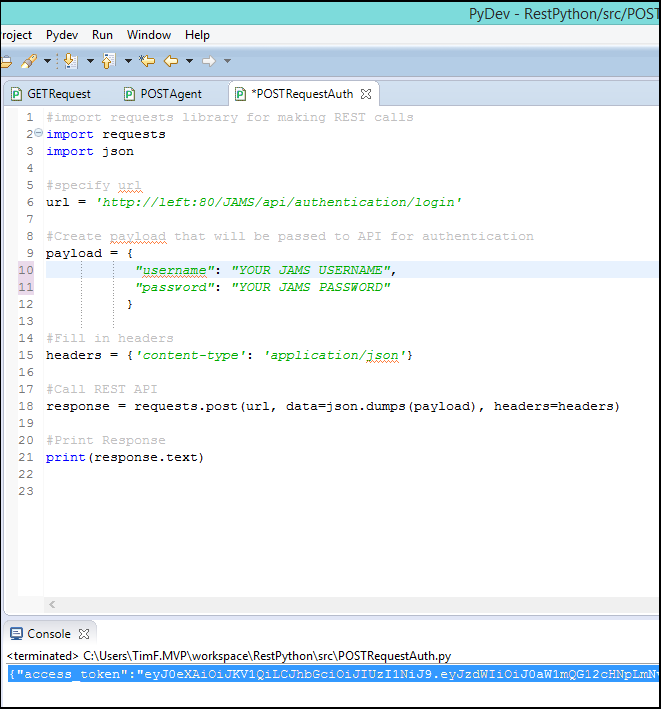
#import requests library for making REST calls
import requests
import json
#specify url
url = 'http://left/JAMS/api/authentication/login'
#Create payload that will be passed to API for authentication
payload = {
           "username": "#Your JAMS Username",
           "password": "#Your JAMS Password"
          }
#Fill in headers
headers = {'content-type': 'application/json'}
#Call REST API
response = requests.post(url, data=json.dumps(payload), headers=headers)
#Print Response
print(response.text)
If your username and password is authenticated, a token will appear in the Console as shown in the screenshot below (highlighted in blue).
|
Important: Make sure to copy this token because it will be needed for every request to the API going forward. However, do not copy the “expires in” variable located at the end of the token. If this portion is included it will invalidate the token when pasted into another request. |
|
Note: If you receive a “401” console error it indicates that the token has expired and you must repeat the login and authentication process as describe above. |
Setting up a GET Request
Once you have been authenticated and received a token you can issue other requests. In this example, let’s begin with a GET request that will display a list of all JAMS Agents located on a server called “LEFT”.
- To begin, copy and paste the following code into your .py fil
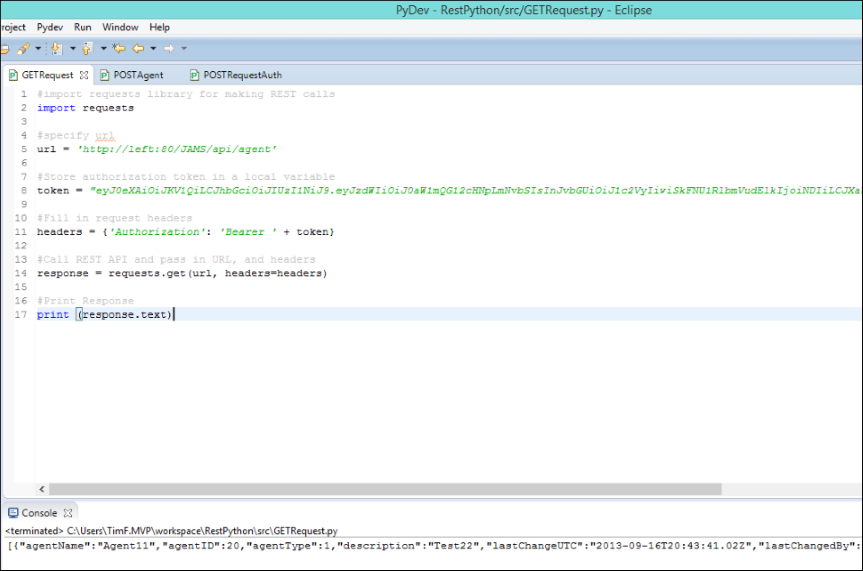
#import requests library for making REST calls
import requests
#specify url
url = 'http://left/JAMS/api/agent'
#Store authorization token in a local variable
token = "eyJ0eXAiOiJKV1QiLCJhbGciOiJIUzI1NiJ9.eyJzdWIiOiJ0aW1mQG12cHNpLmNvbSIsInJvbGUiOiJ1c2VyIiwiSkFNU1RlbmVudElkIjoiNDIiLCJXaW5kb3dzSWRlbnRpdHkiOiJ0aW1mQG12cHNpLmNvbSIsImlzcyI6Ik1WUFNJIiwiYXVkIjoiSkFNU0FEQ2xpZW50SWQiLCJleHAiOjE0NDQ4ODY0NjQsIm5iZiI6MTQ0NDg0MzI2NH0.NRP6o3dMy9WJxXe8zYEznxZN9by6zrrGqo7_yOnyVhA"
#Fill in request headers
headers = {'Authorization': 'Bearer ' + token}
#Call REST API and pass in URL, and headers
response = requests.get(url, headers=headers)
#Print Response
print (response.text)
- Remember to copy the token that you received from your authentication request.
- If the GET request was successful you should see a listing of all the Agents on the LEFT server in the Console window as shown in the screenshot below.
Setting up a PUT Request
Using the token you can also issue a PUT request. In this example let’s demonstrate how to change the description of an Agent called “Agent 11”.
|
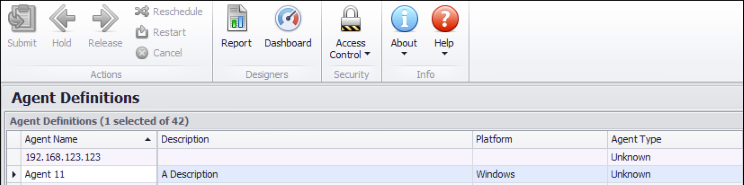
Note: Agent 11’s currently uses a generic description (“A Description”) as shown below. To change the description, follow the steps below. |
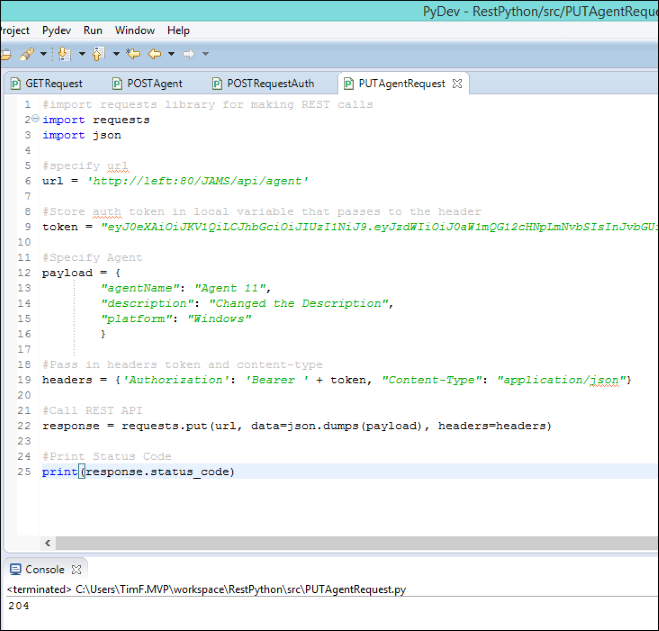
- To initiate the PUT request, copy and paste the following code into your .py file.
#import requests library for making REST calls
import requests
import json
#specify url
url = 'http://left/JAMS/api/agent'
#Store auth token in local variable that passes to the header
token = "eyJ0eXAiOiJKV1QiLCJhbGciOiJIUzI1NiJ9.eyJzdWIiOiJ0aW1mQG12cHNpLmNvbSIsInJvbGUiOiJ1c2VyIiwiSkFNU1RlbmVudElkIjoiNDIiLCJXaW5kb3dzSWRlbnRpdHkiOiJ0aW1mQG12cHNpLmNvbSIsImlzcyI6Ik1WUFNJIiwiYXVkIjoiSkFNU0FEQ2xpZW50SWQiLCJleHAiOjE0NDQ4ODY0NjQsIm5iZiI6MTQ0NDg0MzI2NH0.NRP6o3dMy9WJxXe8zYEznxZN9by6zrrGqo7_yOnyVhA"
#Specify Agent
payload = {
        "agentName": "Agent 11",
        "description": "Changed the Description",
        "platform": "Windows"
        }
#Pass in headers token and content-type
headers = {'Authorization': 'Bearer ' + token, "Content-Type": "application/json"}
#Call REST API
response = requests.put(url, data=json.dumps(payload), headers=headers)
#Print Status Code
print(response.status_code)
- Remember to copy the token that you received from your authentication request.
- Populate the payload. If you are modifying an Agent description, as shown in this example, you must set an agentName and platform along with the description.
|
Note: You can use the same format with any other controller on the API, such as job or batch queue. However, you may need to pass additional values to the payload for different controllers. In addition, you will need to change the url to represent which controller you are modifying, for example, a job would be …/api/job. |
- A successful request will display a “204” code in the console as shown below.
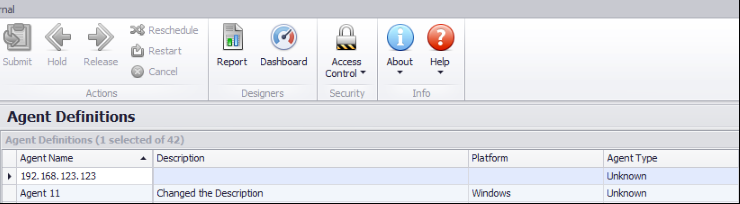
- To verify the description change, open the Agent definitions in the JAMS Client.
Setting up a POST Request to Create a New Agent
For this example let’s post a new Agent called “NEW AGENT”.
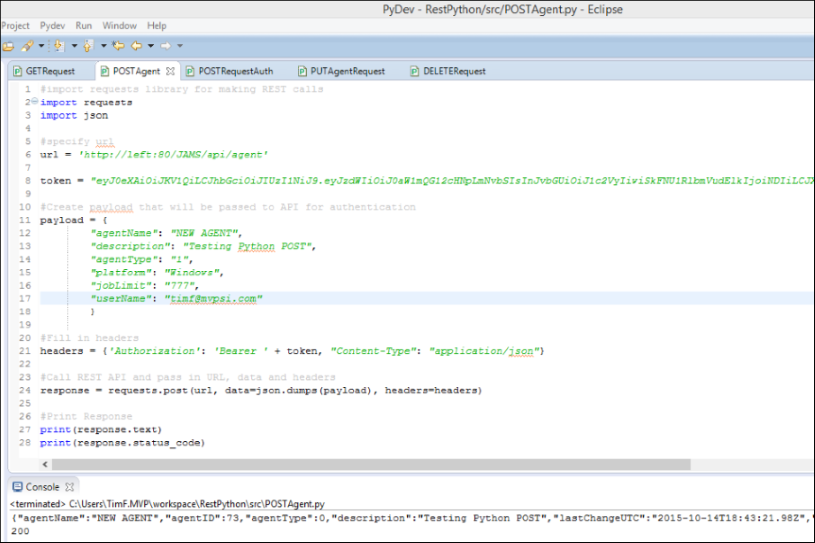
- First, copy and paste the following code into your .py file.
#import requests library for making REST calls
import requests
import json
#specify url
url = 'http://left/JAMS/api/agent'
token = "eyJ0eXAiOiJKV1QiLCJhbGciOiJIUzI1NiJ9.eyJzdWIiOiJ0aW1mQG12cHNpLmNvbSIsInJvbGUiOiJ1c2VyIiwiSkFNU1RlbmVudElkIjoiNDIiLCJXaW5kb3dzSWRlbnRpdHkiOiJ0aW1mQG12cHNpLmNvbSIsImlzcyI6Ik1WUFNJIiwiYXVkIjoiSkFNU0FEQ2xpZW50SWQiLCJleHAiOjE0NDQ4ODY0NjQsIm5iZiI6MTQ0NDg0MzI2NH0.NRP6o3dMy9WJxXe8zYEznxZN9by6zrrGqo7_yOnyVhA"
#Create payload that will be passed to API for authentication
payload = {
        "agentName": "NEW AGENT",
        "description": "Testing Python POST",
        "agentType": "1",
        "platform": "Windows",
        "jobLimit": "777",
        "userName": "#Your Username"
        }
#Fill in headers
headers = {'Authorization': 'Bearer ' + token, "Content-Type": "application/json"}
#Call REST API and pass in URL, data and headers
response = requests.post(url, data=json.dumps(payload), headers=headers)
#Print Response
print(response.text)
print(response.status_code, response.headers)
- As in the previous examples, replace the token above with the token that you received from your authentication POST.
- Populate the payload. Since you are creating an Agent in this example, you must also set an agentName, description, platform, jobLimit and username. If you are modifying an Agent description, you must include an agentName and platform along with the description. Make sure to replace the agentName with your agent’s name along with all of the other values.
|
Note: You can use the same format with any other controller on the API, such as job or batch queue. However, you may need to pass additional values to the payload for different controllers. In addition, you will need to change the url to represent which controller you are modifying, for example, a job would be …/api/job. |
- If the request is successful, your console should output your new Agent in json format and display a status code of “200” in the console, as shown in the example below.
Deleting an Agent using a DELETE Request
For this final example we’ll show how to delete an Agent using a DELETE Request on the sample agent (“Agent 11”).
- First, copy and paste the following code into your .py file
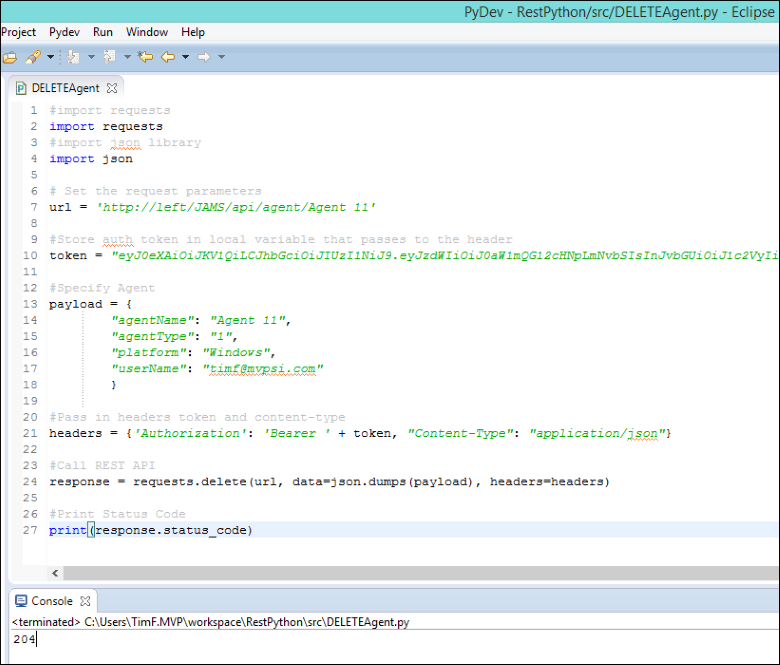
#import requests
import requests
#import json library
import json

# Set the request parameters
url = 'http://left/JAMS/api/agent/Agent11'

#Store auth token in local variable that passes to the header
token = "eyJ0eXAiOiJKV1QiLCJhbGciOiJIUzI1NiJ9.eyJzdWIiOiJ0aW1mQG12cHNpLmNvbSIsInJvbGUiOiJ1c2VyIiwiSkFNU1RlbmVudElkIjoiNDIiLCJXaW5kb3dzSWRlbnRpdHkiOiJ0aW1mQG12cHNpLmNvbSIsImlzcyI6Ik1WUFNJIiwiYXVkIjoiSkFNU0FEQ2xpZW50SWQiLCJleHAiOjE0NDQ4ODY0NjQsIm5iZiI6MTQ0NDg0MzI2NH0.NRP6o3dMy9WJxXe8zYEznxZN9by6zrrGqo7_yOnyVhA"

#Specify Agent
payload = {
        "agentName": "Agent11"
        }

#Pass in headers token and content-type
headers = {'Authorization': 'Bearer ' + token, "Content-Type": "application/json"}
#Call REST API
response = requests.delete(url, data=json.dumps(payload), headers=headers)
#Print Status Code
print(response.status_code)
- As in the previous examples, replace the token above with the token that you received from your authentication POST.
- The Agent name now appears in the url. Modify the agentName to match the Agent you want to delete.
- In this instance you won’t need a payload for delete as long as you have inserted the Agent’s name in the url.
- If the DELETE request was successful your console should output a status code of “204” as shown in the example below.