Documentation Items
Documentation Items are user-defined sections of content included in a Job's notification or in the Documentation tab of a Job or Folder. Documentation Items let you include important information for a Job and format it as needed. You can also add a link to websites, such as an internal Wiki, or the contact information for the team to call if there is an issue with the Job. You can add multiple Documentation Items to a Job or Folder to keep records of any new or updated text.
If you add a Documentation Item in the parent Folder, any Jobs within that Folder will inherit the same Documentation Item. You can view which Items are inherited by hovering over each Item in the Documentation Entries and Links section on the Documentation tab. A tooltip displays if the Item is inherited.
Two options are available when adding a Documentation Item:
- A Documentation Entry - You can enter notes and information about a Job and format it using Markdown or HTML tags.
- A Link – You can enter a link to a website.
The Documentation tab displays the Documentation items assembled from the Job and any parent Folders. Job Documentation may be edited from the Job or Folder where the Documentation is inherited from.
Adding a Documentation Entry Item to a Job or Folder
- Click Definitions from the Shortcuts menu.
- Right-click a Job or Folder and select Properties.
- Click the Documentation tab.
- Click +.
- Select Add | a documentation entry.
- In the Documentation Type field, select an option. See the table below for more information.
- In the Section field, enter a number to identify the section for the next. For example, you can enter a multiple of 10 so you can insert information between sections without editing all section numbers.
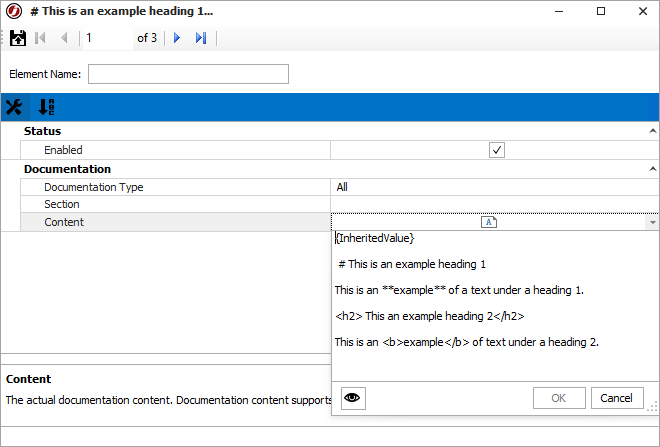
- In the Content field, enter the text for the Documentation Entry after {InheritedValue} and click OK. You can format this text as needed using Markdown or HTML.

- Click Finish. The Documentation Entries and Links section on the Documentation tab displays the new item.
- Click Save and Close.
Adding a Documentation Link to a Job or Folder
- Click Definitions from the Shortcuts menu.
- Right-click a Job or Folder and select Properties.
- Click the Documentation tab.
- Click +.
- Select Add | a link.
- In the Documentation Type field, select an option. See the table below for more information.
- In the Section field, enter a number to identify the section for the next. For example, you can enter a multiple of 10 so you can insert information between sections without editing all section numbers.
- In the Link Target field, enter the URL for the link.
- In the Link Text field, enter the text to display for the link.
- In the Link Template field, enter the format for displaying the link.
- Click Finish. The Documentation Entries and Links section on the Documentation tab displays the new item.
- Click Save and Close.
Modifying a Documentation Item on a Job or Folder
- Click Definitions from the Shortcuts menu.
- Right-click a Job or Folder and select Properties.
- Click the Documentation tab.
- In the Documentation Entries and Links section, double-click a Documentation Item.
- Make the desired changes.
- Click Save and Close.
Removing a Documentation Item from a Job or Folder
- Click Definitions from the Shortcuts menu.
- Right-click a Job or Folder and select Properties.
- Click the Documentation tab.
- In the Documentation Entries and Links section, click a Documentation Item.
- Click X.
- When you are prompted to confirm the deletion, click Yes.
- Click Save and Close.
Documentation Properties
Each documentation item has a list of associated properties used to define how the documentation is handled. Reference the tables below for a description of the properties available on each documentation element.
Documentation Entry
| Documentation | Description |
|---|---|
| Documentation Type |
Select one of the following options:
|
| Section | Enter a number to identify the section for the information. You can use multiples of 10 to allow you to add more information at a later time. For example, you can have information in section 10 and 20 and later add content in section 15. When documentation is assembled from Jobs and Folders, the parts of each section are merged in order. |
| Content | Enter the actual Documentation content. You can use Markdown or HTML to add formatting to the text. |
Documentation Link
| Documentation | Description |
|---|---|
| Documentation Type |
Select one of the following options:
|
| Section | Enter a number to identify the section for the information. You can use multiples of 10 to allow you to add more information at a later time. For example, you can have information in section 10 and 20 and later add content in section 15. When documentation is assembled from Jobs and Folders, the parts of each section are merged in order. |
| Link Target | Enter the URL of the hyperlink. |
| Link Text | Enter the text to display for the hyperlink. |
| Link Template | Enter the template for used for displaying the link. By default, {0} will be replaced with the defined link target and {1} will be replaced by the defined Link Text. |