Informatica Cloud In JAMS
The InformaticaCloud Execution Method allows users to automate any existing Informatica Cloud task, using the Informatica REST API.
NOTE:
If you are using JAMS V7.2.632 or older for the InformaticaCloud Execution Method, it is recommended that you upgrade the JAMS Client and JAMS Scheduler to the latest version to use the new optimization improvements. To edit Informatica Cloud Jobs, the JAMS Client must be upgraded if it connects to a JAMS Scheduler that has been upgraded to the latest version. After you upgrade, you will need to edit each existing Informatica Cloud Job as follows:
- Reselect your task in the Task drop-down on the Source tab. (Select a different task, and then select the original task.)
- Save the Job.
Installing the Informatica Cloud Integration Pack
- Run the JAMS installer.
- Follow the prompts until you see the Integration Packs page.
- Select the Informatica Cloud Integration Pack.
- Click Next.
- Follow the remaining prompts in the installer to complete the installation.
NOTE: Clearing the checkboxes for components will uninstall those components.
Configuring the Informatica Cloud Execution Method
- Run the JAMS Client as an administrator.
- Select the Execution Methods shortcut from the JAMS Shortcuts menu.
- Double-click the InformaticaCloud Execution Method to open the Execution Method dialog.
- Select the Parameters tab.
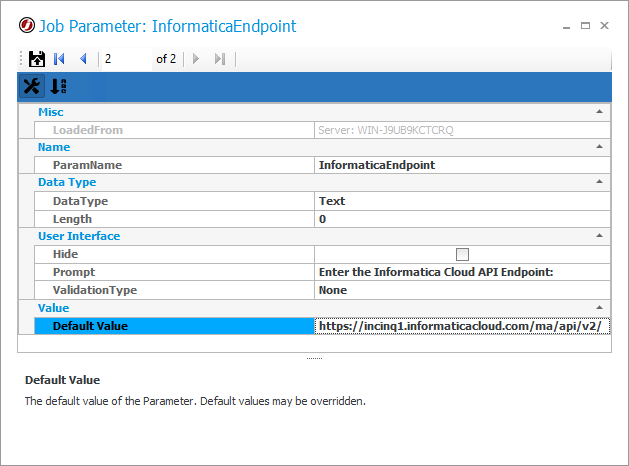
- Double-click the InformaticaEndpoint parameter to open the Parameters dialog.
- Set the Default Value to the InformaticaEndpoint value for the environment.
- Click Save and Close on the Parameters dialog.
- Click Save and Close on the Execution Method dialog.
NOTE: The user running Informatica Cloud Jobs must have full access to the Informatica Cloud.
Creating an Informatica Cloud Job in JAMS
- On the Home screen, click Create a Job.
- Select JAMS Integration Jobs.
- Click Create an Informatica Cloud Task job.
- On the Add a New JAMS Job Definition screen, do the following:
- In the Folder field, select a folder where the Job will be saved.
- In the Name field, enter a name for the Job.
- Optional – In the Description field, select a date for the Job to start.
- In the Execution Method field, ensure InformaticaCloud is selected.
- In the Edit this job definition after adding field, ensure the checkbox is selected.
- Optional – In the Scheduled Date field, select a date for the Job to start.
- Optional – In the Calendar field, select the calendar to use.
- Optional – In the Scheduled Time field, select the time for the Job to start.
- Click Ok.
- Click the Source tab.
- Set the User and ensure it has access to the Informatica Cloud environment.
- Set the Task Type for the relevant Informatica Cloud Task. The Task list will automatically populate with all of the Tasks of the selected Type.
- Select the relevant Task using the drop-down list. The drop-down list is organized by folder and then by the tasks within that folder.
- Define the Schedule, Properties, Parameters, Documentation, and Security Items as needed.
- Click Save and Close.
Informatica Properties
| Property | Description |
|---|---|
| Informatica Credential | Set the Informatica Cloud user to run the Job. This is a Credential that is created within JAMS. |
| Informatica Retry Count | Set the maximum number of automatic retry attempts for Informatica Cloud REST calls. |
| Informatica Retry Interval | Set the interval between retry attempts when an Informatica Job fails. |
| Informatica Polling Interval | Set the interval between automatic retry attempts to get information and status about Jobs running in Informatica. You may need to adjust the polling interval if you are running many long Jobs. If you cancel a Job in JAMS while the Job is still running in Informatica, the Job will be canceled after the polling interval time. The default value is 3 seconds. |