Installing the JAMS Web Client/REST API (If Not Selected During Install)
If the JAMS Web Client was not installed during the initial installation of JAMS, you can install it by following the steps below. By default, it will be installed on the JAMS Server, but the JAMS Web Client can be installed on any Windows IIS Server.
Prerequisites
- JAMS V7.0 or higher
- Microsoft Windows Server 2022, 2019, or 2016
- .NET Framework 4.8
- IIS 8 or higher
- Edge, Chrome, or Firefox for the best experience
- If the REST API is installed on a separate server from the Scheduler, the following ports are required to be open on the Scheduler and Web Server:
- 4773 - Used to communicate from the Web Server to the Scheduler.
- 1801 - Used by the Web Server to communicate with the jamsrequests and jamsrequestssubmitcancel MSMQ queues on the Scheduler.
Installing IIS
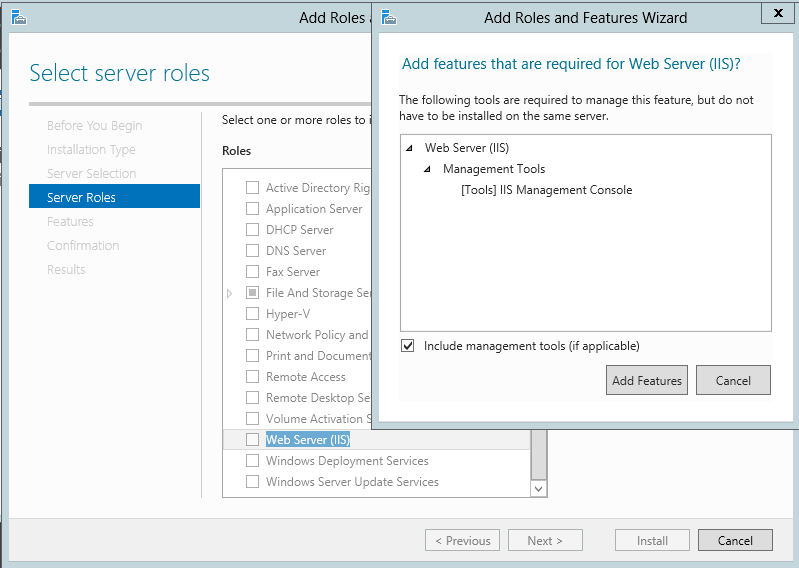
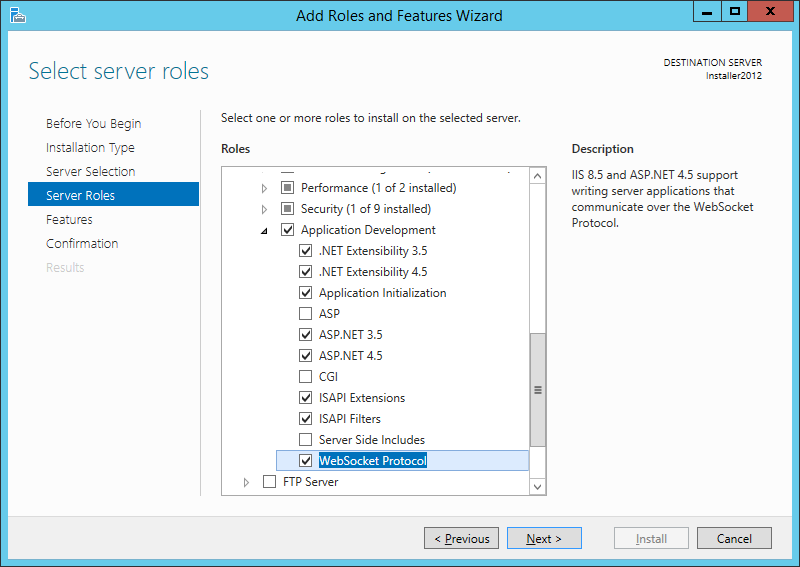
The installer attempt to enable the roles and features shown below within JAMS if the user performing the install has administrator rights. When installing roles and features, it may be necessary to supply a path to the Windows Source files (SxS). If this is true, manually install the roles and features shown below before installing the JAMS Web Client.
- Enable the Web Server IIS Role.
- Ensure the components listed below are enabled.
Installing the JAMS Web Client
- Run the JAMS installer.NOTE: You may see an error message on the Welcome screen that the certificate chain was issued by an authority that is not trusted. If this message appears, see Managing the JAMS Database for more information before continuing with the installation.
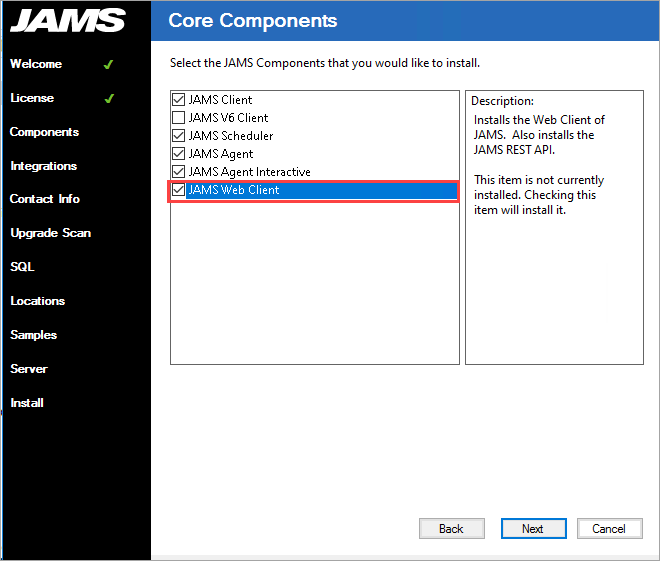
- Follow the prompts until you see the Core Components page.
- On the Core Components page, ensure the JAMS Web Client component is selected.
IMPORTANT: If you install the JAMS Web Client on a server where the JAMS Scheduler has already been installed, do not clear any Components that are already selected. This will uninstall those Components. If you install the JAMS Web Client on a server where the JAMS Scheduler is not installed, select only the JAMS Web Client Component.
- Click Next.
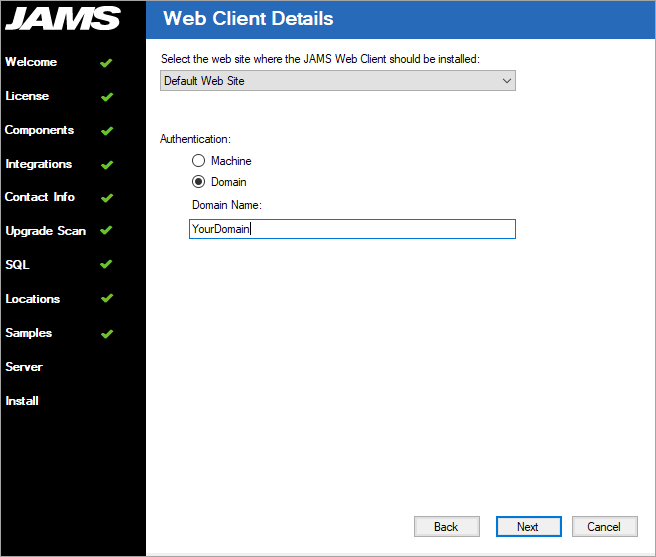
- Follow the prompts until you see the Web Client Details page.
- On the Web Client Details page, select the web site where the JAMS Web Client should be installed. Default Web Site is the default.
- Click Next.
- Follow the remaining prompts to complete the installation.
After JAMS is installed, open the Common.config file for the JAMS Web Client from C:\Program Files\MVPSI\JAMS\WebClient\.
Edit the Common.config file as necessary for the environment.
- Verify the connection string value matches the desired server.
- If the JAMS Site is installed within a domain, set the ContextType value to Domain and ContextName value to the domain itself. (In the image below, the domain is "JAMS".)
- If the JAMS Site is not installed within a domain, set the ContextType value to Machine and ContextName value to the name of the machine.
- If the JAMS REST API/Web Client is installed on a different server than the JAMS Scheduler Server, set the SchedulerName value and SchedulerPort value accordingly.
If the Scheduler is not on another server, setting values for SchedulerName and SchedulerPort will cause issues.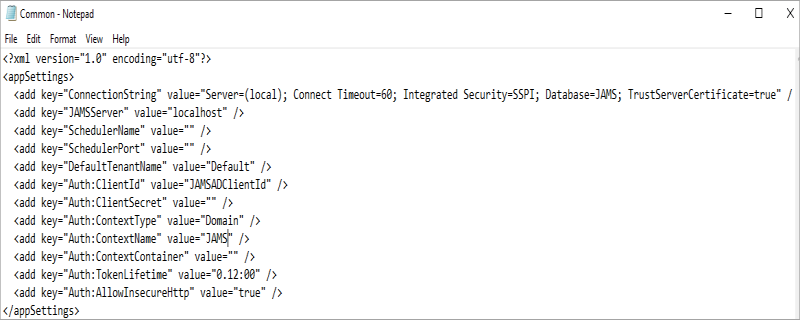
- If the JAMS REST API/Web Client is installed on a different server than the JAMS Scheduler Server AND a failover is not configured, add the key below to the Common.config file (C:\Program Files\MVPSI\JAMS\Scheduler\Common.config) on the JAMS Server. This opens port 4773, allowing the JAMS Web Client to communicate with the Scheduler. In an environment with a Failover configured, port 4773 will already be open. After configuring the JAMS Server Common.config file, restart the JAMS Server service.Copy
<add key="EnableRemoteAccess" value="true" /> - If the JAMS REST API/Web Client is installed on a different server than the JAMS Scheduler Server, the JAMS fat client must be installed on the web server. The client can be downloaded here. The Web Server and Scheduler Server must be running the same version of the fat client.
- If the JAMS REST API/Web Client is installed on a different server than the JAMS Scheduler Server, users must grant the Web Server full permissions to the jamsrequests and jamsrequestssubmitcancel queues on the Scheduler Server. For more information on granting access to the MSMQ using the naming format MyWebServer$, see Granting Permissions to the MSMQ Service from a Secondary JAMS Scheduler.
- If the JAMS Web Client is configured for HTTPS (the default is HTTP), the following additional key must be added to the Common.config file, where JAMSServerName is the actual name of the JAMS Scheduler.Copy
<add key="Auth:TokenUrl" value="https://JAMSServerName/JAMS" />
App Pool Settings
The user running the AppPool will be the user running the JAMS Services, which by default is LocalSystems.
If your JAMS Services are running as a domain account, it is also recommended to run the JAMSSiteAppPool as that same domain account.
Restart IIS services.
Documentation
The REST API includes built-in documentation displaying the endpoints and corresponding Headers that can be passed. There are two variants of Documentation that can be accessed based upon your preference: