Managing Dates
You can create individual dates on a Calendar that can be used for scheduling. Dates can be managed programmatically to allow you to automatically import third-party Calendar data. In the Definitions shortcut, there is an example Job named AddHolidays in the Samples folder.
Modifying a Date
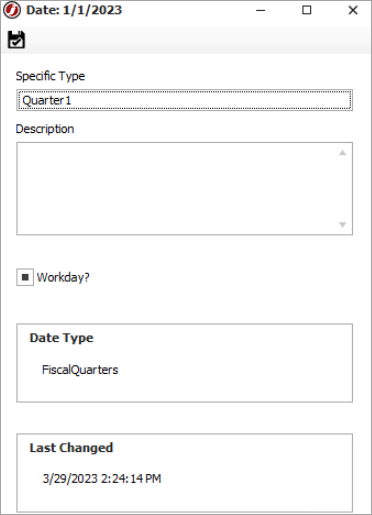
You can modify the description for the date as well as set it as a workday.
- Click Calendars from the Shortcuts menu.
- Under the Date List, right-click a Date, and select Edit.
- Edit the description as needed.
- Select or check the Workday checkbox.
- Click Save.
Deleting a Date
You can remove a Date if it is no longer being used.
- Click Calendars from the Shortcuts menu.
- Under the Date List, right-click a Date, and select Delete.
- When you are prompted to confirm the deletion, click Yes.
Copying a Date
You can copy a Date to another Date Type in the same or a different Calendar.
- Click Calendars from the Shortcuts menu.
- Under the Date List, right-click a Date, and select Copy To.
- In the Date Type field, click …
- Browse to the Date Type where you want to copy the Date.
- Click Ok.
Creating a Continuous Date
You can create a continuous date on a Calendar. A continuous date can be used to identify all dates in each fiscal quarter for a year. When you create a continuous date for each fiscal quarter, you need to specify only the first date of the quarter. The quarter ends the day before the next quarter begins.
You can use the ConvertTo-Date cmdlet to get the first day or last day of the quarter when you need these values for scripts.
- Click Calendars from the Shortcuts menu.
- Right-click Calendar and select Add Date Type.
- In the Date Type Name field, enter a name, such as Quarters.
- In the Continuous field, select the checkbox.
- Click Ok.
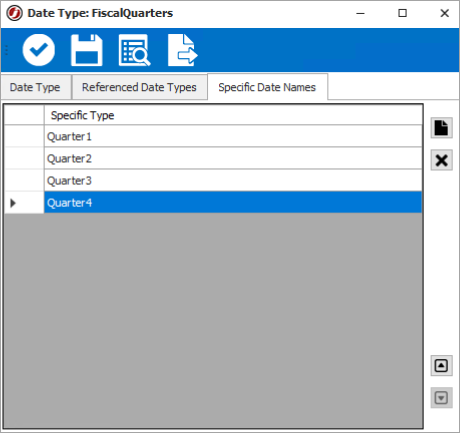
- Click the Specific Date Names tab.
- Click the New icon.
- Enter a name for the Specific Date Name in the row, and press Enter. For example, you can enter QuarterQ1. Repeat this step until all quarters have been added.

- Click Save and Close.
- On the Calendar Definitions screen, ensure the new date type is selected in the Calendar Navigator.
- Right-click the first day of the quarter 1 (January 1) on the Dates tab and select Add Date.
- On the Date List tab, double-click the date.
- In the Specific Type field, select the quarter 1 name “Quarter1”.

- Click Save and Close.
- Repeat steps 11-14 for each of the four quarters.
Date Tab
When you edit a Date, several options are available to view and modify the properties.
| Property | Description |
|---|---|
| Specific Type | The Specific Type property lets you select a Specific Named Type that was defined in a Date Type. |
| Description | The description is an optional summary of the date. |
| Workday? | Select the checkbox to make the date a workday for scheduling. Clear the checkbox to make the date a non-working day. |
| Date Type | The Date Type is a read-only field that displays the selected Date Type for the Date. |
| Last Changed | The Last Changed property displays the day and time the Date was last modified. |