Sequence Jobs
The Sequence Execution Method is available in all JAMS 7.X installations. Sequences are commonly used to schedule a stream of Jobs that automatically execute at regular intervals. JAMS V6.X users will recognize Sequences as the successor to and replacement for JAMS Setups.
Sequences consist of Logical Control Flows and Tasks. Tasks may include File Transfer actions, Failure actions, and Job Submissions. Tasks reside in and are directed by Control Flow containers. For instance, any Sequence Source with more than one Task will be wrapped in a master Sequence container.
Creating a Sequence Job
- Click Definitions from the Shortcut bar.
- Select the Job Definitions tab.
- Click the Add button in the Control Bar to open the Add a New JAMS Job Definition dialog.
(Alternatively, use the Add a New JAMS Job Definition button from the Welcome screen.) - In the dialog, select the Folder where the Job should be created.
- In the Name field, define a name for the new Job.
- In the Description field, enter a description for the Job, if necessary.
- In the Execution Method field, select Sequence Execution Method.
- Click OK. By default, the full Job Definition dialog opens the Source tab when the Job is initially saved.
- Use the Sequence Designer, Task Toolbar, and Properties to define the Sequence. (Task Toolbar, Sequence Designer, and Properties sections are described below.)
- Define Elements and Properties on the Sequence Job as desired to control how the Sequence will run.
- Save and Close the Sequence.
Sequence Source Layout
The object-oriented Sequence Source is made up of three sections - the Task Toolbox, the Design Area, and the Properties Panel.
Task Toolbox
The Task Toolbox (pinned left by default) contains a list of Tasks and Flow Controls that act as the building blocks of a Sequence. These tasks are organized into groupings based on their type and purpose, such as JAMS, File Transfer, and Control Flow.
The List View is included as a tab at the bottom of the Task Toolbox. This view lets you see the display names and qualified names of all the Jobs that are defined in Submit Job Tasks within the Sequence Job. This can help you quickly find the Job to view and modify its properties. If the Submit Job Task is empty, Submit Job is displayed as the display name and the qualified name is empty.
The Jobs are listed in the order they appear in the Sequence Job. For Jobs in a Parallel Task, they are listed from left to right. Click a Job in the List View to see it selected in the Sequence Job in the Design Area. Only one Job can be selected at a time.
Design Area
The Design Area is where items from the Task Toolbox are assembled. Drag and drop tasks to the Design Area. Note that this Design Area will have a master Sequence container added automatically when multiple Tasks exist in the Design Area. All other tasks and conditional flows will be nested inside of this master Sequence container. The Tasks defined in the Sequence Source will run in sequential order from top to bottom by default. The Design Area has several options to let you modify the appearance of the Sequence Job.
| Option | Description |
|---|---|
| Overview | Click Overview to see the full Sequence Job in a smaller window. This smaller window updates as you move your cursor within the Sequence Job. A box within the window shows the selected section of the Sequence, but selected Tasks will not be highlighted in the Overview window. |
| Fit | Click Fit to get the optimal view of all the Tasks in the Sequence Job. If a Task is selected, the Fit button will adjust to display only the selected Task. |
| Fill | Click Fill to have the view adjusted to display all Tasks in the Sequence Job. |
| +- (Scaling) | Click the + or – buttons to increase or decrease the scaling of the Sequence Job. |
Properties Panel
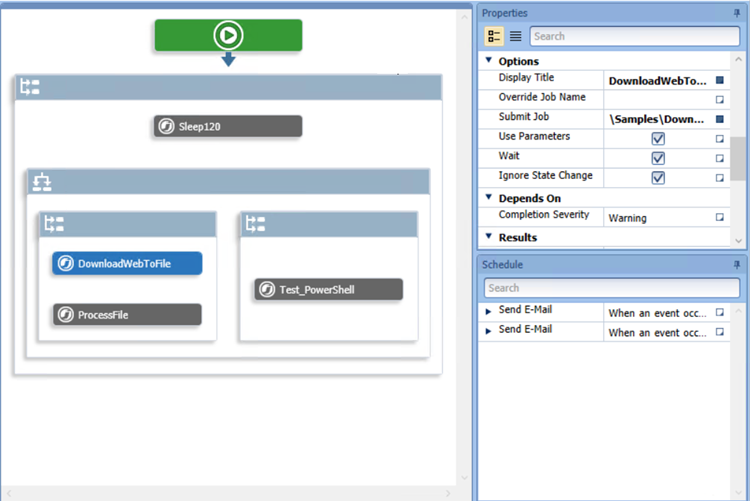
The Properties panel (pinned right by default) is used to populate or modify the tasks used in the Sequence. The Properties listed are responsive to the selected task or container inside of the Design Area.
For example, selecting a Submit Job task will display the information relevant only to that Submit Job task.
![]()
Adding Tasks and Containers to a Sequence
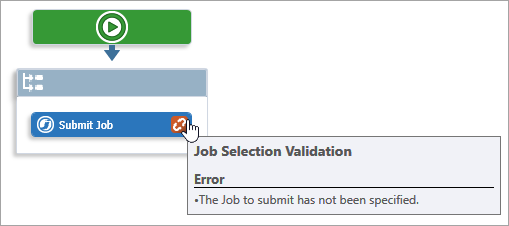
- Identify the Task or Container that should be added to the Sequence Source. Drag and drop the object into the Design area of the Sequence Source. A Sequence may be saved with a single Task in the Source.
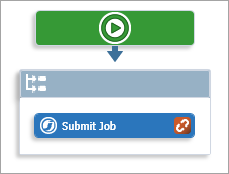
- Resolve any Validation Errors with the new Task or Container. Hovering over the Task will display the relevant issue.
- Add additional Tasks and Containers as desired, ensuring that no outstanding errors exist on any object.
NOTE: By default, JAMS Sequences execute Tasks in order from top to bottom. Ensure Tasks are arranged accordingly.
- If necessary, Tasks and Containers may be rearranged within the Design area using drag-and-drop functionality.
NOTE: Containers have a Parent-Child relationship. Removing or rearranging a container will remove or rearrange any child tasks or child containers.
- When the Sequence Source is configured as desired, Save the Job.
Using the Properties Panel
Select any Task or Control Flow from the Designer area to view its specific properties. Use the Properties panel to populate or modify individual property fields for that object.
Resetting Values
If you specified an override value at the Task level and you want to revert the value back to the default, you can reset the value. Click the square next to the right of the value and select Reset. This works the same as resetting the property on the Job Properties tab.
Inherited Values
If you have values that are set within a Job and then add an override value within the Submit Job task for the Job, the Reset option uses the original value at the Job level and not the override value. Properties and Elements are inherited from the selected Job and are displayed in the Properties and Schedule sections when you select a Submit Job Task.