How to Get There
On the Security Configuration Menu, enter option 7.
What it Does
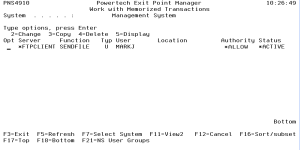
The Work with Memorized Transactions panel allows you to display, change, copy, and delete Memorized Transactions.
Options
2=Change
Enter option 2 next to a memorized transaction and press Enter to display the Change a Memorized Transaction panel. You can use the Change a Memorized Transaction panel to change the authority, auditing, message, and Switch profile properties of the transaction. You also can specify that you want Powertech Exit Point Manager for IBM i to capture the transaction when it occurs. This option updates any connected Location or User rule.
If needed, you can change the server/function or user of the memorized transaction, and the actual transaction that has been memorized.
3=Copy
Enter option 3 next to a memorized transaction and press Enter to display the Copy a Memorized Transaction panel. Use the panel to copy an existing transaction and edit it to filter on a different user or location than the original transaction, and change the authority, auditing, message, and Switch profile filter properties. You also can enter changes to the actual transaction string before saving it as a new transaction. If needed, you can change the server/function.
After you have edited the transactions, press Enter to save it. The Work with Memorized Transactions panel displays with the confirmation message Memorized Transactions(s) successfully copied.
4=Delete
To delete a memorized transaction, enter option 4 next to a transaction on the Work with Memorized Transactions panel. When you press Enter, the confirmation message Memorized Transaction(s) successfully deleted displays at the bottom of the panel. Note: Make sure you want to delete the transaction since it is deleted immediately.
5=Display
Enter option 5 next to a transaction to display the Display Memorized Transaction panel. The Display Memorized Transaction panel shows the filter properties of the memorized transaction.
Field Descriptions
System
System indicates the target of any operations you perform. When you add rules, for example, those rules will be sent to, and will affect processing on, the System named.
Opt
Enter a valid option from the list of options provided on the list panel.
Server
A Server in Powertech Exit Point Manager for IBM i is a controlled entry point into your system. These entry points are determined and defined by IBM. Powertech Exit Point Manager for IBM i has assigned easy-to-remember names to these controlled entry points.
Function
A Function, or Server Function, in Powertech Exit Point Manager for IBM i represents a class of operations that a given Server may perform. For example, the *SIGNON Server classifies its operations as those pertaining to changing passwords, generating authentication tokens, and retrieving sign-on information. Powertech Exit Point Manager for IBM i has assigned easy-to-remember names to these Functions, such as CHGPWD, GENAUTTKN and RETRIEVE.
Type
This field is used to indicate whether the associated User field refers to an O/S user profile or an Powertech Exit Point Manager for IBM i User Group.
The valid values are:
User
User represents the identity of the person initiating a transaction as a user profile. The special value *PUBLIC, when used on a rule, means that the rule applies to any User lacking a specific rule. when used as a subset or selection parameter, *PUBLIC means to select all such rules for display or printing. This displays the User to which this Memorized Transaction applies. If blank, then this is for a specific Location. If the value is *PUBLIC, the transaction applies to all users.
Location
Location represents the source of a transaction. Location can hold an IP Address, a Location Group, or the name of an SNA Communications Device. The special value *ALL, when used on a rule, means that the rule applies to any rule means that the rule applies to any Location lacking a specific rule. when used as a subset or selection parameter, *ALL generally means to select all such rules for display or printing. This displays the Location to which this Memorized Transaction applies. If blank, then this is for a specific User. If the value is *ALL, the transaction applies to all Users.
Authority
Authority represents the action to be taken when a rule is found that matches the data present on a transaction.
This field may hold one of these values:
Status
This is the status of the Memorized Transaction.
The possible values are:
Command Keys
F3 (Exit): Exit the panel without processing any pending changes.
F5 (Refresh): Refreshes the panel and resets all available text fields.
F7 (Select System): Use this command key to work with data from a different System.
F11 (View): Changes the data presented in the list.
F12 (Cancel): Exit the panel without processing any pending changes.
F16 (Sort/Subset): Allows you to sort and subset information by user, server, status, and/or transaction.
F17 (Top): Positions the list panel to the first record.
F18 (Bottom): Positions the list panel to the last record.
F19 (Left): Shifts the transaction data to the left.
F20 (Right): Shifts the transaction date to the right.
F21 (User Groups): Allows user to go to the Work with User Groups panel.
