Installing Powertech Antivirus
for IBM i
Use the following instructions to install Powertech Antivirus for IBM i.
Before You Begin
Read this section before you install Powertech Antivirus for IBM i.
You can manage Powertech Antivirus for IBM i through Powertech Antivirus for Fortra Application Hub, which is a browser-based management console, or directly on the endpoint. Systems on which Powertech Antivirus is installed are called "endpoints" in this guide.
Fortra Application Hub and Powertech Antivirus for Fortra Application Hub
Powertech Antivirus for Fortra Application Hub offers a centralized GUI for managing multiple instances of Powertech Antivirus on IBM i, Linux, and Unix endpoints. You can also update virus definitions and scan for viruses (on-demand) using Powertech Antivirus for Fortra Application Hub. Powertech Antivirus for Fortra Application Hub is optional to use and requires the installation of Fortra Application Hub on an additional system. If you do not intend to use Fortra Application Hub, only the endpoint installation is required, and you can skip the Fortra Application Hub-related sections in this document.
This installation guide, and the associated Powertech Antivirus for IBM i User Guide, includes information specific to the Powertech Antivirus for IBM i installation. To install Powertech Antivirus for Fortra Application Hub, see the Powertech Antivirus Installation Guide. To use Powertech Antivirus for Fortra Application Hub, see the Powertech Antivirus User Guide. Find the guides on the Fortra Community Portal.
IBM i Endpoint Considerations
Review the following before installing Powertech Antivirus for IBM i on an IBM i endpoint.
- Stop the replication of user profiles from production to HA system by either ending the replication software or ending the replication of the user profiles.
- Install Powertech Antivirus for IBM i on the HA and production systems.
- Setup Powertech Antivirus for IBM i replication per the HA Setup instructions (see Powertech Antivirus for IBM i High Availability Setup). If you are updating from release 8.08 or earlier to release 8.09 or later, please note that the HA Setup instructions have changed.
- Start replication (including the user profiles).
Ensure the following servers are available and running prior to installation:
- FTP Server
- Remote Command Server
System Requirements
The following are general system requirements and may vary depending on the nature of your environment.
Powertech Antivirus for IBM i version 8.09 requires the following:
- IBM i V7R3 or higher.
- IBM i option 30 Qshell. *
-
IBM i option 33 Portable App Solutions Environment (PASE). *
-
Only if you download virus definition updates from the Powertech Antivirus Server or get updates by using HTTPS instead of HTTP, and did not previously install the WGET utility:
-
IBM i option 34 Digital Certificate Manager (DCM) *,
-
Ensure that the *SYSTEM certificate store exists. For instructions on how to create the *SYSTEM certificate store if it does not exist already, see https://www.ibm.com/support/pages/how-create-system-store-heritage-digital-certificate-manager-dcm.
-
- If applications on your IBM i are blocked from connecting to external servers via HTTP, and it is not possible to change this, follow the instructions for Acquiring Virus Definitions Using a Local Repository.
- Must be current on the latest Cumulative PTF Package, HIPER Group PTF, and Database Group PTF for your operating system release.
* QSHELL, PASE, and Java are included with IBM i, but can be separately installed. You can determine if these options are installed by running command DSPSFWRSC (Display Software Resources). If a required option is not installed, you can install it using the GO LICPGM command and your IBM i installation media.
System Values
It is Fortra's goal to not change system values on customer systems because we recognize that security-conscious organizations have rigorous change control processes in place. Therefore, we ask you to make any system value changes that are needed. However, during this process, the following system values may be temporarily changed to the values shown below. After processing is complete, they are returned to current settings:
- QVFYOBJRST must equal 1, 2 or 3 or will be changed to 1.
- QFRCCVNRST will be changed to 0.
- QALWOBJRST must equal *ALL or *ALWPGMADP or will be changed to *ALL.
- QALWUSRDMN will be changed to *ALL.
Centralized Management Requirements
Find System Requirements for Powertech Antivirus for Fortra Application Hub in the Powertech Antivirus Installation Guide, Firewall Configuration section, on the Fortra Community Portal.
Installing Powertech Antivirus for IBM i
Follow these instructions to install Powertech Antivirus for IBM i:
- Download the Powertech Antivirus for IBM i installer (setupPTAV.exe) from the Fortra Downloads page. Double-click it to start it.
- Exit any Powertech Antivirus for IBM i menu currently displayed in a 5250 session on your PC.
- Use the WRKOBJLCK command to determine if any of the following objects are locked:
- STANDGUARD/AVLICENSE *MENU
- STANDGUARD/AVMENU *MENU
- STANDGUARD/AVSETUP *MENU
- STANDGUARD/AVSUPPORT *MENU
- Remove any locks on these objects before proceeding with the installation.
- Double-click the downloaded installer to start it.
- On the Choose Components panel, select which components you want to install. You can choose to install the Manuals and the Software for IBM i. Click Next.
- If you are only installing the Manuals, the process completes and the installer closes. The Manuals have been installed. You can skip the rest of these steps.
- On the IBM i Details panel:
- Select or enter the IBM i where you want to load Powertech Antivirus.
- Enter a user profile and password that's a member of the user class *SECOFR and has at least the following special authorities: *ALLOBJ, *SECADM, *JOBCTL, *IOSYSCFG, and *AUDIT. The user profile should have Limit capabilities set to *NO.
- (Optional) In the Advanced Settings section:
- Enter a port number or use the arrows if you want to change the FTP port number to something other than the default of 21.
- Select Secure File Transfer if you want to use FTPS (FTP over SSL) during the file transfer. The default FTPS secure port is 990, but it can be changed to the required secure port for your environment.
In the Timeout (seconds) field, enter the number of seconds the session should be kept active during an FTP transfer. You can choose anywhere between 25 and 1800 seconds (30 minutes).
NOTE: If the transfer takes longer than the amount of time specified, the session will expire.
- Click Next.
- You have two options on the Product Load Options panel:
Click Immediate Load if you would like to load the product on the IBM i now.
NOTE: If you are updating, this ends Powertech Antivirus until the product load completes. After you are done, Powertech Antivirus will be restarted.Click Staged Load if you would like to transfer the objects now and load them on the IBM i at a later time.
NOTE: See "Loading Staged Objects on the IBM i" (below) for instructions on how to load the staged objects on your selected IBM i system.
- The Product Load Progress panel for Powertech Antivirus installer launches.
If the Product Load Progress panel ends with an overall Failed message, the product upload could not complete properly. To find the reason the upload failed, click View Logs and review your logs. You can also use Download at the top of the logs to save the information for future review.
When the processing is complete, you have two choices:- If this is the only installation or update of Powertech Antivirus installer that you're doing, click Finish.
- If you have installs or updates to do on other IBM i systems, click Restart. Then, return to step 4.
Loading Staged Objects on the IBM i
If you chose to stage your objects during step 5b of the installation or update process, do the following to manually load them on the IBM i you identified above.
-
On the IBM i, execute the following command:
HSLOADMGR/HSWRKLOAD -
Enter option 1, Load, next to the Load Name for Powertech Antivirus and press Enter.
The installation program installs Powertech Antivirus, including the required user profiles and libraries (see the Installation Details section below). A prompt for the Powertech AV Installation (AVINSTALL) parameters opens.
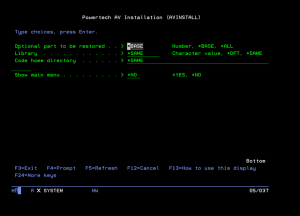
-
Press Enter to accept the suggested AVINSTALL parameters. The installation process displays the job log name, user, and job log number.
-
When the installation is complete, press F3 to exit the installation screen.

The installation process displays the job log name, user, and job log number. Use the WRKSPLF command to display the job log for complete information on the install.
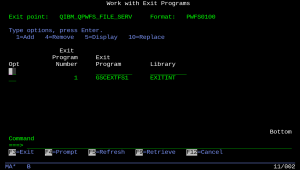
Activating Exit Program Integration After a Product Upgrade
If you already have Powertech Antivirus for IBM i installed and Anti-Ransomware protection enabled when you upgrade to version 8.09, the system does not replace the program on Exit Point QIBM_QPWFS_FILE_SERV for Format PWFS0100 with the new "integrated" program to be used. This ensures your Anti-Ransomware protection continues to work without needing to restart subsystem QSERVER, which would interrupt any NetServer (File Server) connections.
When convenient, you must remove the old program on the Exit Point (AVRWFSW in library STANDGUARD), and activate the new "integrated" program (GSCEXTFS1 in library EXITINT) by following these instructions:
-
Call command AVMENU.
-
Choose option 50, Setup Menu.
-
Choose option 10, Anti-Ransomware Menu.
-
Choose option 50, Activate/Deactivate Anti-Ransomware. The De/Activate Anti-Ransomware (AVACTAR) screen opens.
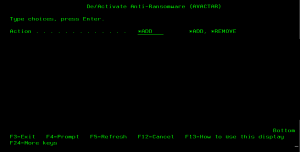
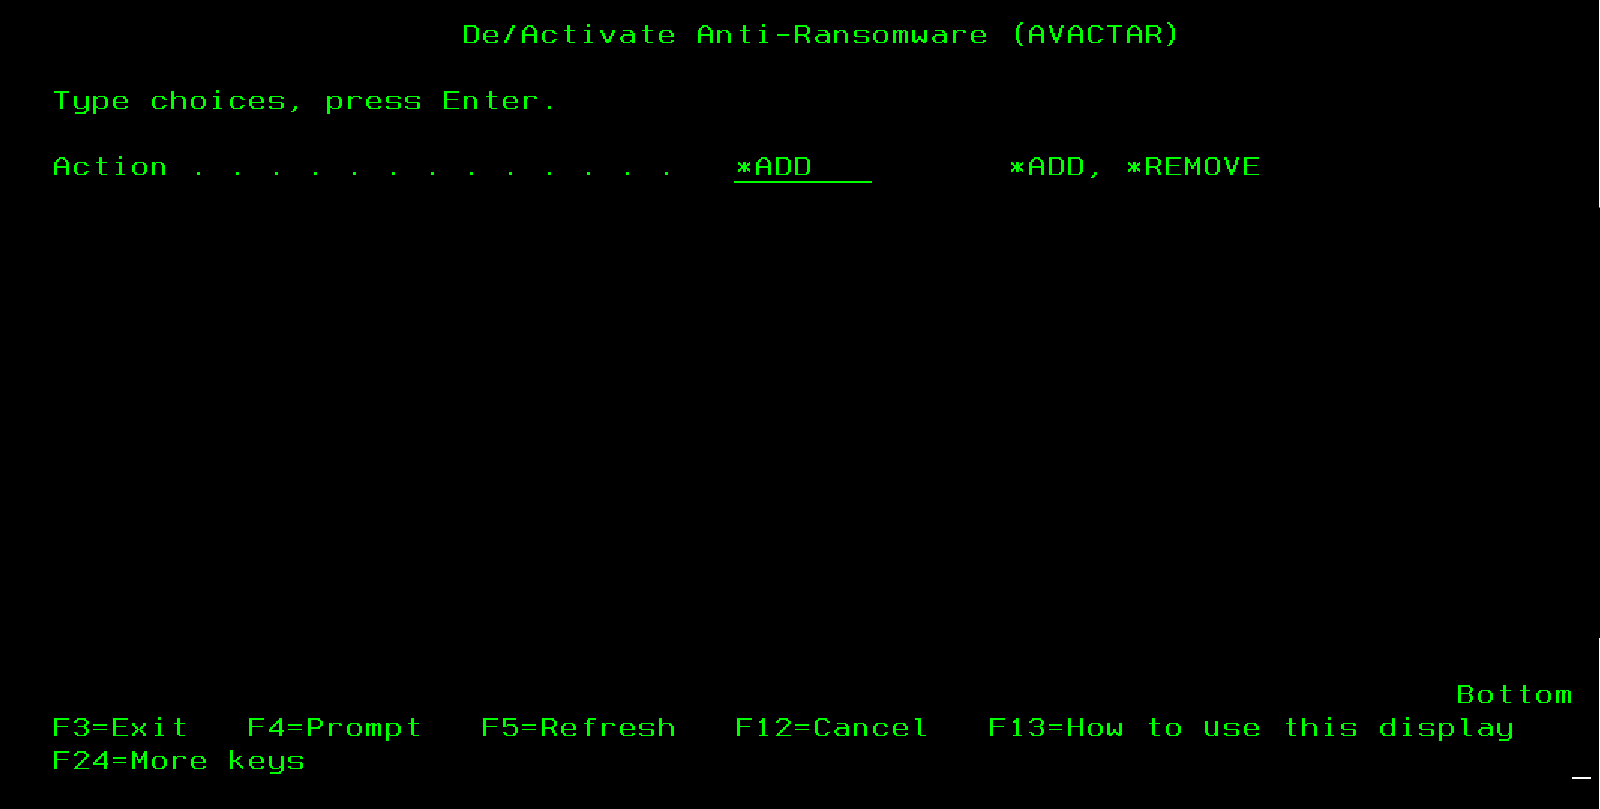
-
Ensure Action is set to *ADD.
-
Press Enter. You will be prompted to restart QSERVER.
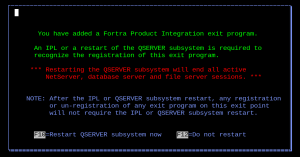 WARNING: Restarting QSERVER will interrupt any users connected to a NetServer File Share.
 -
Press F10 to restart QSERVER. The new "integrated" program will install.


Installation Details
The Fortra installation procedure creates libraries, profiles, authorization lists, commands, objects, and, in some cases, exit points on your system.
The following list explains the changes the installation program will make to your system:
- Creates the STANDGUARD library if it does not exist. The public authority on this library will be *USE, and should not be changed.
- Creates the STANDGUARD user profile for the purpose of owning objects in the STANDGUARD library. The user profile is created with no password and *JOBCTL authority (for the purposes of scheduling jobs).
- Grants the STANDGUARD user profile *USE authority to QSECOFR for the purposes of adopting *ALLOBJ authority as needed. There are a few times this level of authority is needed, such as updating virus definitions, quarantining files, and on-access scanning.
- Do not change the STANDGUARD profile to have *ALLOBJ authority.
- If the product is being installed for the first time (not an upgrade), the system value QSCANFSCTL is changed to *FSVRONLY (Scan file server access only). This turns off on-access virus scanning in a 5250 environment. Virus scanning will still occur for files opened through the network file servers (mapped drives). For more information about this setting, see On-Access Scanning. We recommend you start with *FSVRONLY until you are familiar with the product, then consider later setting this value back to *NONE, when you want to scan file accesses in a 5250 environment. Once you become familiar with the product, you can exclude directories before enabling scanning native file accesses.
- Creates the EXITINT library if it does not exist. The public authority on the EXITINT library is *CHANGE, and should not be changed.
- Creates the EXITINTNP user profile to own objects in the EXITINT library. The user profile is created with no password and no special authorities.
- Restores the licensed program 0AV2000.
- Adds an autostart job entry to the QSYSWRK subsystem to start the AVSVR job automatically at IPL. The AVSVR job must be active at all times for virus scanning features to function properly.
- Creates the /StandGuard directory tree in the integrated file system.
- Starts the AVINSITE job, which runs in subsystem QSYSWRK. The job user is STANDGUARD. The current user is QSECOFR. The AVINSITE job handles communication between this endpoint and Powertech Antivirus for Fortra Application Hub. If the IBM i system will not be managed using Powertech Antivirus for Fortra Application Hub, you can end the AVINSITE job.
Domino Installation Instructions
If you are licensed for Powertech Antivirus for Domino, you can install and use the optional Domino feature to scan Domino mail and databases. Do not scan Domino data directories using the AVSCAN or On-Access scanning features. See Recommendations in the On-Access Scanning and On-Demand Scanning sections of the Powertech Antivirus for IBM i User Guide for information on how to exclude Domino data directories from these processes.
Complete the installation instructions above and below to install the Domino module:
- Enter the following command:
RSTOBJ OBJ(*ALL) SAVLIB(QTEMP) DEV(*SAVF) SAVF(HSLOADMGR/SGAV730 PTAV850) - Enter this command:
RSTLICPGM LICPGM(0AV2000) DEV(*SAVF) OPTION(3) SAVF(QTEMP/AVSAVF3) - Enter AVMENU
- Choose option 52.
- Choose option 3.
- Enter the license key.
See the Powertech Antivirus for IBM i User Guide for additional information.
Starting and Updating Powertech Antivirus
- If applicable, enter the license keys according to the instructions in the email you received from keys@fortra.com.
- Type AVMENU on a command line and press Enter to start Powertech Antivirus.
- Configure Powertech Antivirus to use HTTP using the DAT setup options:
- On the Main Menu (AVMENU), choose option 50, then option 2.
- Change the Transfer Method to *WGET.
- Press Enter and then change the WGET string to *DFT and save.
- Verify Powertech Antivirus can now successfully retrieve the DAT updates from McAfee's HTTP site by running STANDGUARD/AVRUNUPD or monitoring your next scheduled DAT update job.
Running a Test Scan
Powertech Antivirus for IBM i can be tested using a test file called EICAR.com. This file does not contain a virus—it cannot spread or infect other files, or otherwise harm your system. The file is a legitimate DOS program and produces sensible results when run (it prints the message "EICAR-STANDARD-ANTIVIRUS-TEST-FILE").
The EICAR test file is maintained by the European Institute for Computer Anti-Virus Research (http://www.eicar.org) for the purposes of validating antivirus software. The following text is an excerpt from http://www.eicar.org/anti_virus_test_file.htm:
"You are encouraged to make use of the EICAR.COM test file. If you are aware of people who are looking for real viruses for test purposes, bring the test file to their attention. If you are aware of people who are discussing the possibility of an industry-standard test file, tell them about www.eicar.org and point them at this article."
To run a test scan
- Download the file from EICAR's Anti Malware Testfile page and save it to the /standguard/temp directory in the IFS.
-
At an IBM i command line, enter the following:
STANDGUARD/AVSCAN OBJ('/standguard/temp/eicar.com') CLEAN(*NO) CLEANFAIL(*NONE)A message appears similar to the following:
VIRUS ALERT: /standguard/temp/EICAR.COM is infected with 'EICAR test file'.
1 virus(es) found, 10 file(s) verified clean in 7 seconds. 0 file(s) not  scanned.
Examine the file's scan status using the command WRKLNK '/standguard/temp/eicar.com', then choose option 8. Page down to the last screen. Verify the 'Scan status' is *FAILURE.
Once the file is marked as having failed a scan, the file cannot be opened in any way.
After You Are Done
Congratulations! Powertech Antivirus for IBM i is now installed. Read the following for additional information and your next steps.
Obtaining Virus Definitions
Powertech Antivirus for IBM i requires up-to-date virus definitions.
Virus definitions are available as files that reside on an external server, update.nai.com. By default, Powertech Antivirus for IBM i attempts to download virus definition files by connecting directly to this server.
If, in your environment, connections from the IBM i to external servers are blocked, you must either configure the firewall to allow the connection, or use an intermediate server.
To allow the connection
If possible, first consider changing the firewall configuration (or other security solution) to allow connections with the following properties:
- Source: (IBM i system)
- Destination: update.nai.comNOTE: This host name has dynamically changing IP addresses.
- Protocol: HTTP
To use an intermediate server
If it is not possible to allow this connection, use an intermediate server to obtain virus definitions by configuring a local virus definition repository. See Acquiring Virus Definitions Using a Local Repository for a description of this configuration.
Update Virus Definitions
After installation, do the following to acquire the latest virus definitions from McAfee:
-
Enter the command AVMENU and choose option 20 to acquire the latest Virus Definitions.
- Continue with Updating Virus Definitions (in the Powertech Antivirus User Guide) to configure the product to schedule automatic downloading of virus definitions (DATs). New virus definitions are posted every day.
Next Steps
- Schedule a Full System Scan: Continue to On-Demand Scanning (in the Powertech Antivirus for IBM i User Guide) to schedule a full system scan. Be sure to schedule your first scan during off-peak hours. The first full system scan can run for a significant amount of time—up to several days—depending on how many files need to be scanned and the speed of the processor.
- Setup Monitoring: Continue with Monitoring (in the Powertech Antivirus for IBM i User Guide) for important information you need to know about monitoring Powertech Antivirus for IBM i events and activity.
- Setup Mail Scanning: If you are using the IBM i SMTP mail server, see Email Scanning (in the Powertech Antivirus for IBM i User Guide).