Configuring IBM QRadar to Recognize SIEM Agent Output from an IBM i
This article explains how to configure IBM QRadar to receive events from SIEM Agent and to correctly parse them.
The Universal LEEF Log Source Type controls the parsing of records into QRadar. This Source Type accepts the QRadar LEEF format and a certain number of pre-defined event attributes that form part of the LEEF format. The Event Name in the record is based on the QID—QRadar Identifier, which is a numeric representation of a specific type of event—that is selected for that event. QRadar also determines low-level and high-level categories based on that QID. Once an event type has been learned/mapped into QRadar under the Universal LEEF Log Source Type, the event type is interpreted correctly for any IBM i that sends events into QRadar. When you map that event type, it is saved into a log source extension for Universal LEEF format.
Use the following instructions to get started using QRadar with SIEM Agent, including configuration, mapping, and parsing, as well as setting up and automatically creating Log Sources.
The Event Name in QRadar is based on the QID associated with each event. The QID is included in events sent by SIEM Agent to QRadar. For instance, it can be a TCO0014 ‘Object Created’ event originating in the IBM i security audit journal, or a CPF1393 ‘User Profile Disabled’ event coming out of SYSMSG. For each of these event types, the following process can be used to get QRadar to further recognize them.
When you first enter into QRadar’s Event UI as a new IBM i is sending events, those events are likely categorized as ’Unknown’, as are the log source and low-level category. The event name, log source, and low-level category can be learned/discovered with some initial setup. From then on, when IBM i systems send those types of events to QRadar, these types of events and log source types will already be known to QRadar.
Recognizing initial IBM i events
Create a Log Source for your IBM i (by IP or Host Name) and point it to the Log Source Type ‘Universal LEEF’. To do so:
- In QRadar, go into Admin > Log Source > Log Sources > New Log Source (Upper Right).
-
Use the following settings as a guide:
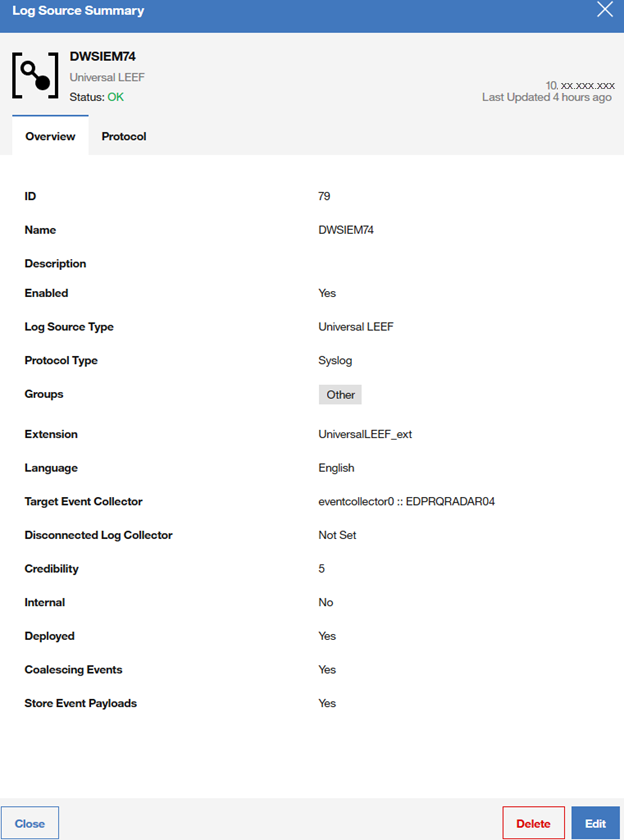
Note that in this example, a log source extension has been defined (“Extension: UniversalLEEF_ext”). A log source extension may not be available unless you have previously customized or mapped events in the DSM Editor and saved those changes. It is important to set the Log Source Type to Universal LEEF, as this will ensure that the received events are parsed (analyzed) in the intended manner by QRadar. Other settings can be adjusted as required.
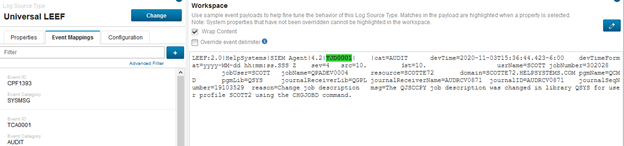
After this initial setup has been performed, log sources are recognized and created automatically, based on settings you can set within the DSM editor – Configuration tab. Use Log Source Auto-Detection settings and the Log Source Name Template to configure that automatic recognition process. This allows you to specify the location of log sources, that is, other IBM i systems that will send events to QRadar. An easy way to access the DSM Editor is to right-click an event and select the DSM Editor from there. At that point, you are editing that event type, and can further customize it.
You can map an event type (on the Event Mappings tab), further customize how it is parsed (on the Properties tab), or make other configuration changes related to auto-detection or auto discovery within the DSM Editor.
If you are, for example, looking at an event (type) like TCO0014 (Audit—Object Created) on the Event Mappings tab, you are able to see all of the events that have been mapped for this log source type. When you select an event (type) for mapping, your objective is to assign it a QID that identifies it.
Assigning a QID to an event
- While editing the event mapping (in the Event Mappings tab), choose the event name and select Edit.
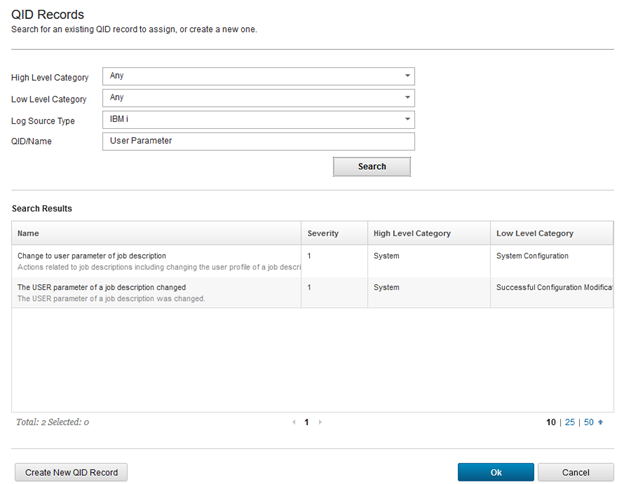
- In the QID window, choose an aappropriate high-level category for the event, a low-level category, and then the log source type (“IBM” works well for the log source type).
- Once you have picked those three values, enter some real text to search within the QID/Name value (like ‘object created’), and click the Search box.
- Now, you can scroll and find an appropriate mapped QID for that message.
Future Log Sources can "piggyback" on the event mapping set up for Universal LEEF, so you only need to do this one time for each event type. You can also create your own QID if you cannot find what you are looking for. The Event Name, Low Level, and High Level Category fields should all be populated when a QID entry has been defined for the event type.
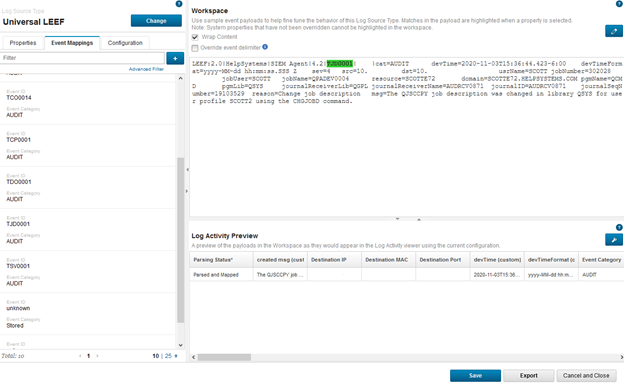
In the Properties tab of the DSM Editor, you can see which parts of an event’s payload have been recognized. You should see all the value pairs, and the label and value for each. LEEF should be the expression type for each of these. The payload should be fully parsed with minimal customization, if any, required. Selecting an event will cause the ‘value’ portion of a payload to be highlighted.
Assigning a QID to an Event that has not yet been mapped
Use the following instructions to configure QRadar so that it can easily classify events sent to it by SIEM Agent in LEEF format. The configuration maps event IDs to other QRadar attributes. Once configured, QRadar performs the mapping automatically. Doing this simplifies the process of integrating SIEM Agent with QRadar.
If QRadar has already received example instances of the event:
- Find an event within the Event Viewer (list of events coming in) that you would like to map.
- Right-click it and select View in DSM Editor.
-
Within the DSM Editor's Properties Tab, scroll down and click LEEF Event ID to select it. The associated LEEF Event ID value in the Workspace portion of the screen is now highlighted (in green).

-
Click the Event Mappings Tab.
-
Click + (plus) to the right of Filter to see the following:

-
Click Choose QID.
-
On the QID Records window, change the Log Source Type to IBM i , and put in some specific search text associated with the message you are attempting to find a QID for. Click the Search to see the results.
By changing to the Log Source Type to IBM i, you are going to be searching within IBM i specific messages. You may need to perform several searches with different text strings to find what you are looking for. In the example below, ‘User Parameter’ was used as search text because it was found directly in the body of the message.
-
Select the search result you want and click OK. If you cannot find a suitable QID in your search efforts, you can also click Create New QID Record, and create your own.
-
Click Create. You should see something like the following screen. Your Log Activity Preview at the bottom should show your event Parsed and Mapped. Your newly mapped event should now show up in the list of Mapped events in the left panel of the screen.
-
Click Save to accept your changes.
Now that you have successfully mapped the event, QRadar will automatically assign the Event Name, Low Level Category, and High Level Category to subsequently received events that have this Event ID.
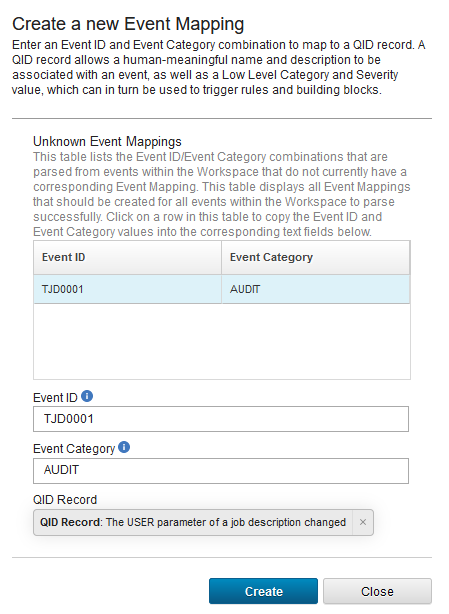
If QRadar has not received examples of the events, but you want to pre-configure the mapping:
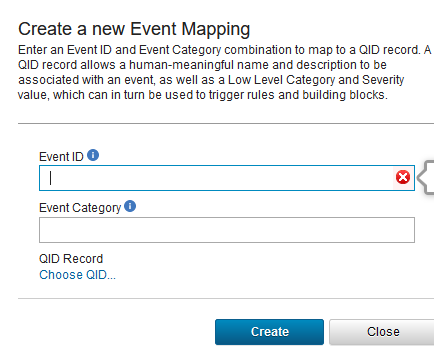
- Display the Event Mappings tab.
- Click + (plus) next to Create a new Event Mapping.
- Key in the Event ID you would like to map (i.e. "CPF1393" or "TCO0014"). Have an idea of what the event related message text will be to aid the search process, or have a separate screen up with SIEM Agent audit events and subtypes or SYSMSG events to refer to as you are performing searches.
- Key in the Event ID (case-sensitive).
- Click Choose QID, and follow the steps outlined above to create your preferred event mappings.
All of your Mapped Events will show up in the left margin (on the Mappings Tab), by Event ID.
Deploying your changes
After you have performed configuration, changes must be deployed to take effect. To do so:
- Select the Admin tab.
- Use the ‘Deploy Changes’ selection (top left).
After deployment, changes take effect on new event records coming in. Changes are not applied retroactively to older events. A good check to test your changes is to submit a “Last 5 Minutes” selection and observe the displayed values.