Automate Schedule Browser
Overview
The Automate Schedule browser is a convenient development tool that comes packaged with the Automate Schedule action. It enables connection to a Automate Schedule Server in order to browse and select items such as jobs, job suites, and variables during task construction. You can create and configure multiple connections which are automatically stored so you can conveniently reconnect to the host server of your choice by selecting from a list of preconfigured connections. The Automate Schedule browser uses its own session so that you can always browse the server even while Automate Schedule operations are being performed.
The Automate Schedule browser is accessible from the properties of any Automate Schedule activity that performs actions on the following elements:
- Jobs
- Job suites
- Automate Schedule variables
- Agent queues
- Notification list
These activities contain a folder icon found on the right side of any parameter that specifies selection of a Automate Schedule object.
Using the Automate Schedule Browser
The Automate Schedule Browser is a tool used during task development to provide a way for you to view items that reside in the server or select an item that a specific Automate Schedule activity should perform operations on during task execution. In order to view Automate Schedule items, you must first establish a connection to the server.
To create a new connection
- Click New.
- For the Server properties, enter or select the following:
- Name - A unique name for the connection.
- Notes - Enter any notes you wish to convey about the connection (optional).
- Server - The DNS name or IP address of the Automate Schedule Server of where to establish a connection.
- Port - The TCP/IP port assigned to enable communication with the Automate Schedule Server.
- User name - A valid username with access to the Automate Schedule Server.
- Password - The password to authenticate the username entered above.
- Use Https - If enabled, specifies that the server protocol type is HTTPS (secure HTTP). If disabled, the protocol type is HTTP. This parameter is disabled by default.
- Proxy type - The type of proxy required for Automate Schedule connections that pass through a proxy server. If you are unsure of the value to use in this parameter, contact your network administrator.
- Use authentication - If enabled, specifies the connection to the proxy server requires authentication (disabled by default).
- Proxy server - The hostname (server.domain.com) or IP address (xxx.xxx.xxx.xxx) of the proxy server.
- Proxy username - The proxy username to use to authenticate with proxy server. This parameter is available only if the Use authentication parameter is enabled.
- Proxy port - The port that should be used to connect to the proxy server. The default value is 808.
- Proxy password - The proxy password to authenticate with. This parameter is available only if the Use authentication parameter is enabled.
- Click Save to save the connection. The unique name you entered for this connection will appear in the Connect to drop-down combo box.
-
Repeat these steps for any additional connections.


To edit or delete an existing connection
- Click the Connect To drop-down combo box to display a list of existing connections.
- Select the connection you wish to edit or delete.
- Click Edit to edit the properties of the connection, or click Delete to permanently delete it.
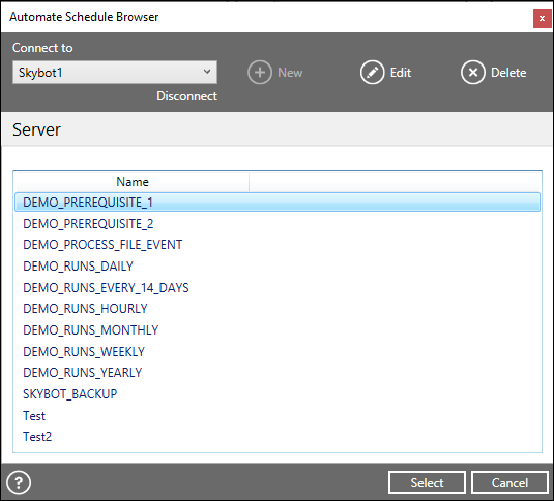
To connect and browse Automate Schedule items
- Select the desire connection from the Connect to drop-down combo box, and then click Connect.
- After establishing a connection, the browser searches for relevant items and populates the main window with a listing.
- To select an Automate Schedule item, do one of the following:
- Double-click on the file in the file list.
Single-click on the file in the file list, and then click Select.