CRM Browser
Overview
The CRM Browser is a convenient development tool that comes packaged with the Dynamics CRM action. It enables connection to the target Dynamics CRM server to provide the ability to browse and select entities during task construction. You can create and configure multiple connections (which are automatically stored) so that you can conveniently reconnect to the CRM server of your choice by picking from a list of preconfigured connections. The CRM Browser uses its own session so you can always browse the server even while CRM operations are being performed.
The CRM Browser is accessible from the properties of any Dynamics CRM activity that performs actions on entities. These activities contain a folder icon next to any parameter that specifies selection of entities.
Using the CRM Browser
The CRM Browser is a tool used during task development to provide a way to view items that reside in the CRM server, or select an item that a specific Dynamics CRM activity can perform operations on during task execution. In order to view CRM items, you must first establish a connection to the CRM server.
To create a new connection
-
Click the New button.
- For the Connection properties, configure the following parameters:
- Name - A unique name for the connection
- Notes - Any notes you wish to convey about the connection.
- Server - The URL of the Dynamics CRM server of where to establish a connection.
- Username or Windows Live ID - The username of the service account that is used to connect using AD, SPLA, or Passport authentication types. The format for this is specific to the authentication type: domain\username for AD and SPLA authentication types and a Windows Live ID for Passport authentication.
- Password - The password of the service account that is used to connect using AD, SPLA, or Passport authentication.
- Domain name (optional) - The name of the domain that verifies user credentials.
- Organization name - The name of the organization associated with the account. To query organization names and Dynamics CRM server URIs that exist on the system, click Discover.
-
For the Advanced properties, configure the following parameters:
- Microsoft Office 365 - If selected, the connection is established by way of an Microscoft Office 365 account. Select this parameter if you are using Microsoft Dynamics CRM Online through Microsoft Outlook. This parameter is disabled by default.
- Auto discover - Auto-discovery helps you detect where the Dynamics CRM components are installed, whether locally or remotely. If selected, Automate Desktop will use CrmDiscoveryService to obtain a name and URL endpoint for a target organization (disabled by default). The CrmDiscoveryService Web service is accessed through a global URL of an on-premise Microsoft Dynamics CRM server. Each Microsoft Dynamics CRM server hosts the CrmDiscoveryService Web service, which is located here: http://<server:port>/MSCRMServices/2007/AD/CrmDiscoveryService.asm.
- Discovery URL - The Discovery URL used by your site if you are connecting to a Microsoft Dynamics CRM Online organization. To connect to Microsoft Dynamics CRM Online, the discovery service is first pinged to retrieve a passport authentication ticket. This ticket indicates that a Live ID user is, authenticated to use the Microsoft Dynamics CRM Online instance.
- Organization URL - The URL of the organization service. If the Auto discover parameter is selected, this parameter is disabled.
- Home Realm URL - The URL of the home realm. This is the address of the identity provider. If the Auto discover parameter is selected, this parameter is disabled.
- Authentication type - The type of authentication used to connect to the Dynamics CRM server. If the Auto discover parameter is selected, this parameter is disabled.
- Timeout (seconds) - The total amount of time (in seconds) to allow for a synchronous connection request to the CRM server to complete. If this value is surpassed, a timeout error will occur. The default value is 120 seconds (3 minutes).
- Proxy type - The proxy protocol to use. If you are unsure of the value to use in this parameter, contact your network administrator.
- Use authentication - If enabled, specifies the connection to the proxy server requires authentication (disabled by default).
- Proxy server - The IP address or hostname (for example, server.domain.com) of the proxy server.
- Proxy username - The proxy username to use to authenticate with proxy server. This parameter is available only if the Use authentication parameter is enabled.
- Proxy port - The port number to use to connect to the proxy server (the default is 808).
- Proxy password - The proxy password to use that corresponds with the username entered in the Proxy username parameter.
-
Click Save to save the connection. The unique name you entered for this connection will appear in the Connect To drop-down combo box.
-
Repeat these steps for any additional connections.


To edit/remove an existing connection
- Click the Connect To drop-down combo box to display a list of existing connections.
- Select the connection you wish to edit or delete.
- Click Edit to edit the properties of the connection, or click Delete to permanently delete it.
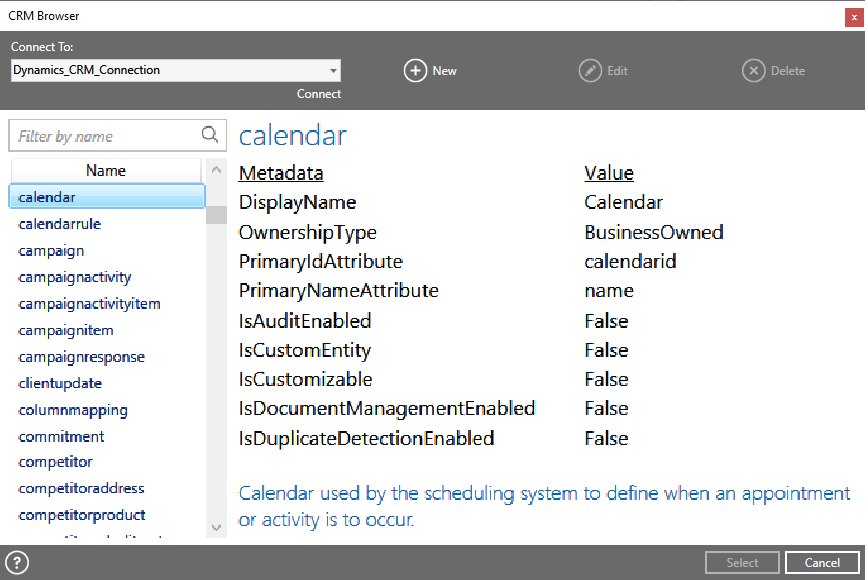
To browse/select entities
- Select the desired connection from the Connect To drop-down list, and then click Connect.
- Upon a successful connection, a list of entities appear on the left panel.
- Selecting an entity on the left panel populates the right panel the metadata, values, and a brief description of the entity.
- To
select an entity, do one of the following:
- Double-click on the file in the file list.
Single-click on the file in the file list, and then click Select.