FTP Browser
Overview
The FTP Browser is a convenient development tool that comes packaged with the FTP action. It is an easy to use graphical interface that enables connection to the target FTP server in order to browse remote directories and view or select remote files during task construction. The browser contains two views separated by tabs. The Server view lets you create and configure multiple connections which are automatically stored so you can quickly re-connect to the FTP site of your choice by simply selecting from a list of pre-configured connections. During connection, the Output view displays real-time data about the transaction between Automate Desktop and the FTP server, which can be useful in diagnosing obscure connection problems or identifying errors. In addition, the browser uses its own session, therefore, you can always browse the server even during FTP transfers.
The FTP browser can be accessed in the properties of any FTP activity that performs actions on remote folders and files (that is, FTP - Upload, FTP - Download and FTP - Rename). These activities contain a Remote Folder or Remote File property allowing specification of a remote folder/file in which to automate. A folder icon appears on the right-hand side of these properties, which, when clicked, opens the FTP Browser.
Using the FTP Browser
The FTP browser is a tool generally used during task development to provide a way for you to view folders and files that reside in the FTP server or select a file that a specific FTP activity should perform operations on during task execution. In order to view remote files, you must first establish a connection to the FTP server. Upon opening the FTP browser,
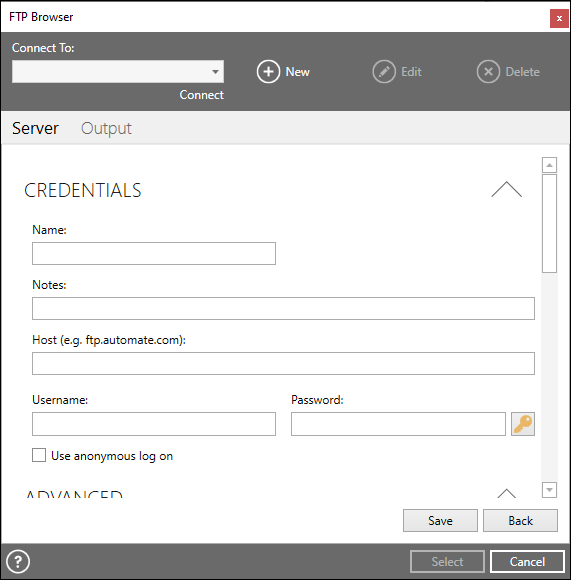
To create a new connection
- Click the New button.
- For
the Credentials properties, enter or select
the following:
- Name - A unique name for the connection.
- Notes - Any notes you wish to convey about the connection.
- Host - The IP address or a server and domain name (for example, server.domain.com) of the FTP server.
- Username - A username to use to log on to the FTP Server. The Username should be pre-configured at the server level.
- Password - The password that corresponds to the username entered in the Username parameter.
- Use anonymous log on - If selected, the FTP server is logged on as an "anonymous" user and the Username and Password parameters are disabled (disabled by default). The server must be configured to accept anonymous connections.
- For the Advanced properties, select the appropriate type of connect for the Connection Type parameter, and then enter or select any other advanced properties (if needed).
- For the Proxy properties, enter or select the following:
- Proxy type - The proxy protocol to use. If you are unsure of the value to use in this parameter, contact your network administrator.
- Use authentication - If enabled, specifies the connection to the proxy server requires authentication (disabled by default).
- Proxy server - The IP address or hostname (for example, server.domain.com) of the proxy server.
- Proxy username - The proxy username to use to authenticate with proxy server. This parameter is available only if the Use authentication parameter is enabled.
- Proxy port - The port number to use to connect to the proxy server (the default is 808).
- Proxy password - The proxy password to use that corresponds with the username entered in the Proxy username parameter.
- Click Save to save the connection. The unique name you entered for this connection will appear in the Connect To drop-down combo box.
-
Repeat these steps for any additional connections.

To edit/remove an existing connection
- Click the Connect To drop-down combo box to display a list of existing connections.
- Select the connection you wish to edit or delete.
- Click Edit to edit the properties of the connection, or click Delete to permanently delete it.
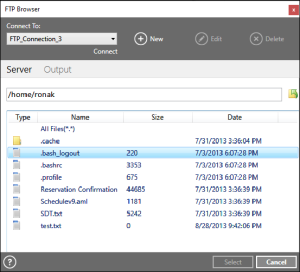
To browse remote folders or select remote files
- Select the desired connection from the Connect To drop-down combo box, and then click Connect.
- After establishing a successful connection, the FTP browser displays a list of files and folders on the main window and the current folder is listed in the edit field above the main window (as shown below).
- To
change folders, do one of the following:
- Double-click the desired folder in the file list.
- Enter the path and folder name into the edit field, and then press ENTER.
- To navigate up one directory, click the back icon to the right of the edit field.
- To select a file, navigate to the folder that contains the
file you wish to select (as per above instructions), and then do one of
the following:
- Double-click on the file in the file list.
Single-click on the file in the file list, and then click Select .
 NOTE: Selection of a file automatically closes the FTP browser window and ends the current connection.
