Fuzz Testing Wi-Fi Devices
Overview
To perform Wi-Fi fuzzing with beSTORM, you must install and configure a Kali Linux virtual machine on the computer running beSTORM and purchase and connect the ALFA AWUS036ACH USB Type-C dual-band AC1200 WiFi adapter.
How beSTORM fuzzes Wi-Fi devices
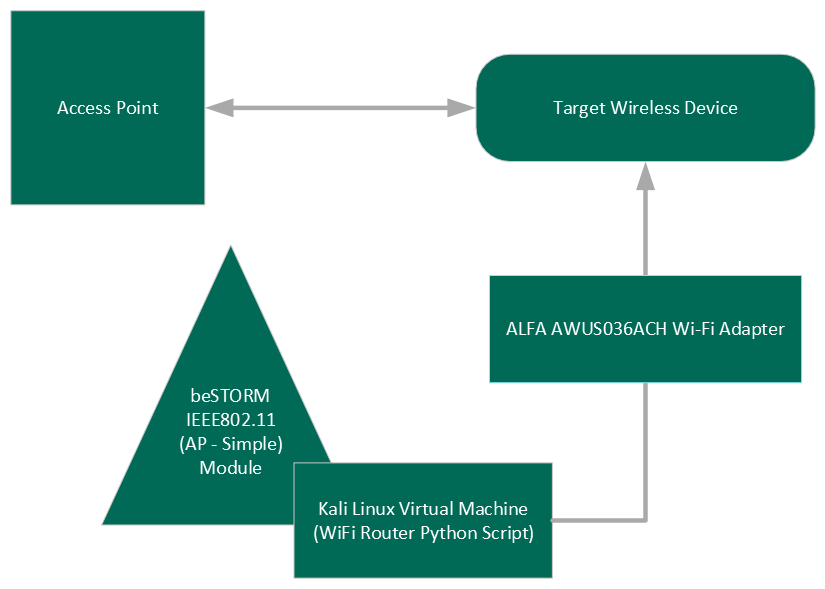
Fuzzing is performed by injecting malformed Wi-Fi packets into an existing communication between a live access point and the target wireless device you want to test. beSTORM uses the IEEE802.11 (AP) module to perform attacks on the target wireless device in a non-encrypted environment (WEP or WPA is not supported).
Hardware & software requirements
The following items are required to set up and perform Wi-Fi fuzzing with beSTORM:
- beSTORM 13.1.0 or later (licensed)
-
Windows 10 or later
-
VirtualBox 7.0 or later for Windows Hosts
-
Kali Linux 2023.2 or later for VirtualBox
-
7-Zip
Install and Configure the Kali Linux Virtual Machine
Follow these steps to install and configure a Kali Linux virtual machine on the computer running beSTORM:
Install Oracle VM VirtualBox
-
Download the Windows hosts version of VirtualBox.
-
Right-click the VirtualBox installer file, and then select Run as administrator. The VirtualBox setup wizard opens.
-
On the Welcome page, select Next.
-
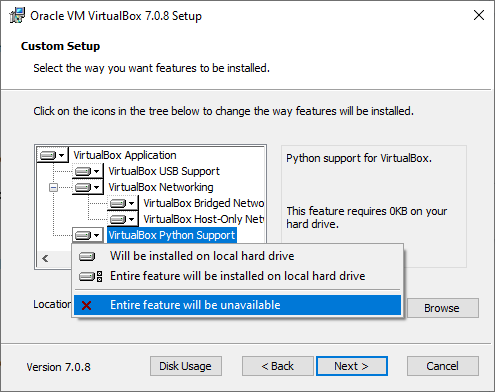
On the Custom Setup page, select VirtualBox Python Support, and then select Entire feature will be unavailable.
-
Select Next, and then continue through the rest of the setup wizard to finish the installation process.
Install 7-Zip
-
Go to 7-zip.org.
-
Download and install the latest version of 7-Zip.
Create and configure the Kali Linux virtual machine
-
Go to kali.org/get-kali.
-
Select Virtual Machines.
-
Download the version of VirtualBox that corresponds with your version of Windows (this example uses the 64-bit version).
-
Right-click the kali-linux virtualbox file, and then select 7-Zip > Extract files.
-
On the Extract dialog, enter the desired file path. Leave all other options to their default setting.
-
Select OK to extract the files. The extracted folder should contain the following files:

-
Open Oracle VMVirtualBox.
-
Select Machine > Add.
-
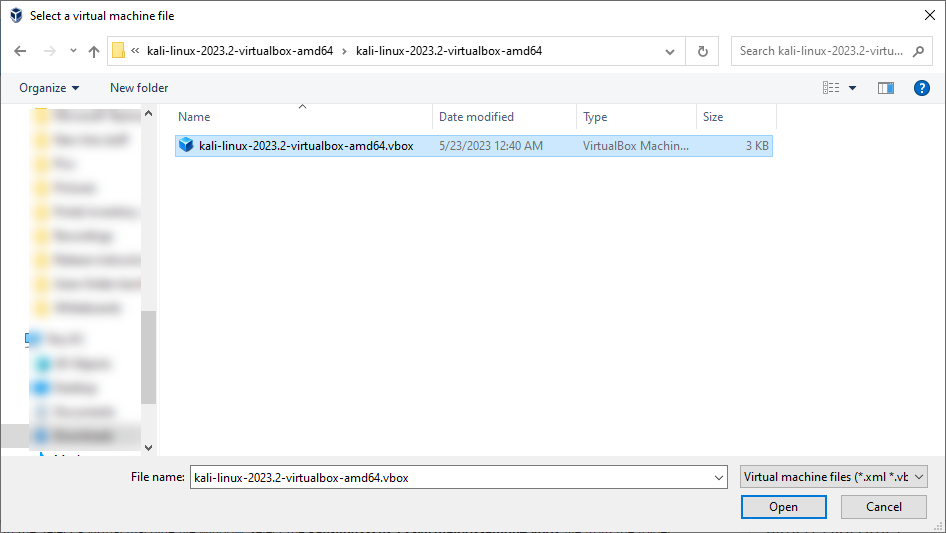
In the Select a virtual machine file window, select the kali-linux-2023.2-virtualbox-amd64.vbox file from the folder you extracted in step 6.
-
Select Open. The Kali Linux virtual machine is added to the Oracle VM VirtualBox Manager.
-
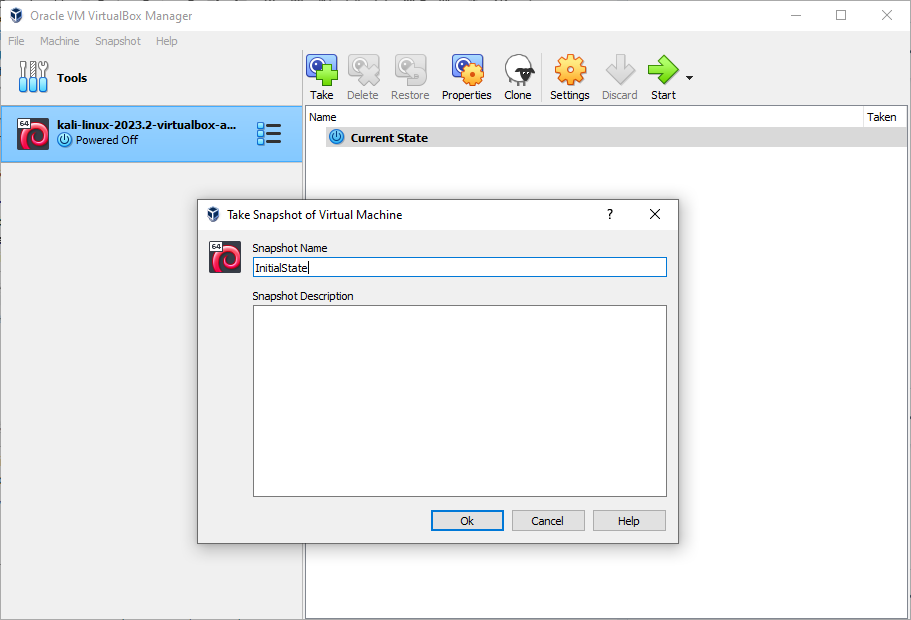
From the top of the Oracle VM VirtualBox Manager, select Machine > Tools > Snapshots.
-
Select Take, and then enter a name for the snapshot (for example, "InitialSetup"). This creates a snapshot of your Kali Linux virtual machine in the event you need to restore it to its initial state.
-
Select OK.
-
Connect the AWUS036ACH Wi-Fi adapter to the beSTORM computer using the provided USB cable.
-
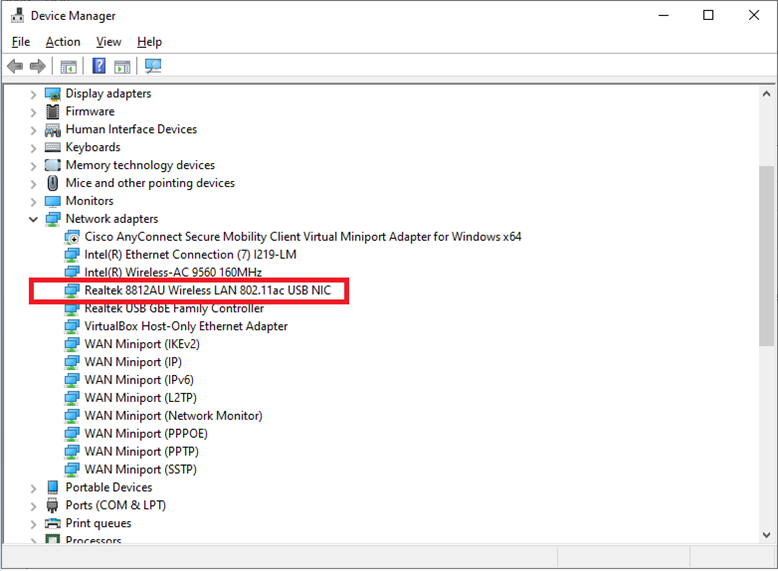
After Windows finishes installing the adapter, confirm Realtek 8812AU Wireless LAN 802.11ac USB NIC appears in the Device Manager.
-
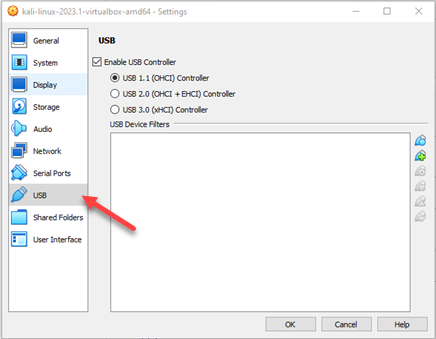
From the top of the Oracle VM VirtualBox Manager, select Machine > Settings.
-
From the left pane, select USB.
-
Select the Adds new USB filter with all fields set to the values of the selected USB device attached to the host PC
 button, and then select Realtek 802.11n NIC.
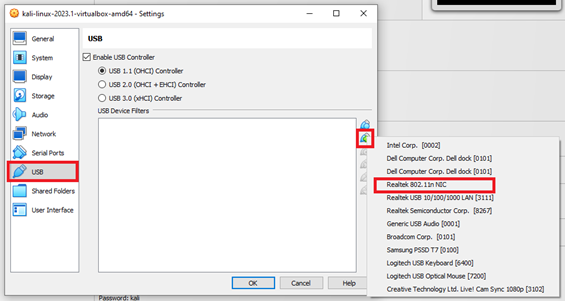
-
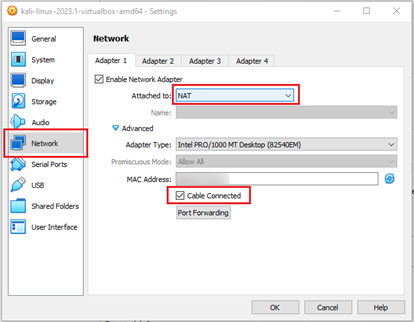
From the left pane, select Network.
-
On the Adapter 1 tab, select NAT from the Attached to box.
-
Expand the Advanced section, and then select the Cable Connected checkbox.
-
Select OK.
-
From the top of the Oracle VM VirtualBox Manager, select Start. The Kali Linux virtual machine will start booting up.
-
On the Kali log in screen, enter kali in both boxes (default username and password), and then select Log In.

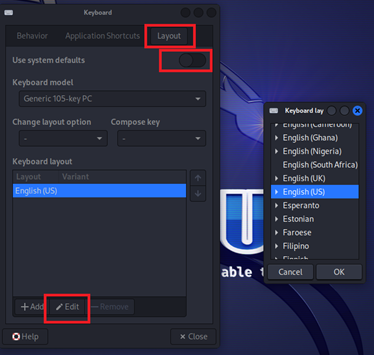
Change the keyboard layout in Kali Linux (optional)
If you need to change your keyboard layout after logging in to Kali Linux, do the following:
-
From the top of the Kali desktop, select the Applications
 icon.
icon. -
In the search bar, enter keyboard.

-
Select Layout.
-
Disable Use system defaults.
-
Select Edit, and then select the desired keyboard layout.
Install the AWUS036ACH Wi-Fi adapter drivers for Kali Linux
-
From the top of the Kali Linux desktop, select the Applications
icon > Terminal Emulator. -
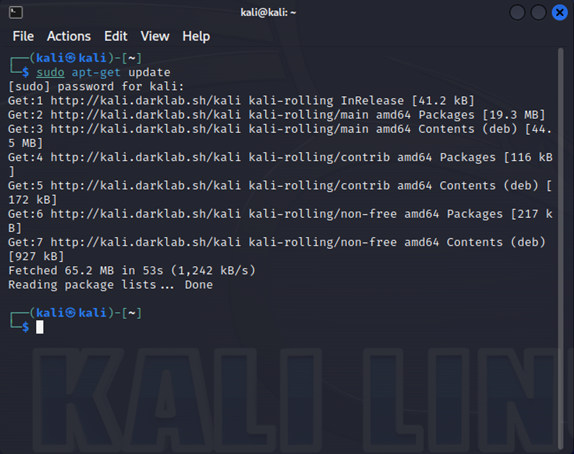
In the Terminal Emulator window, run the following command to update Kali Linux:
sudo apt-get update
-
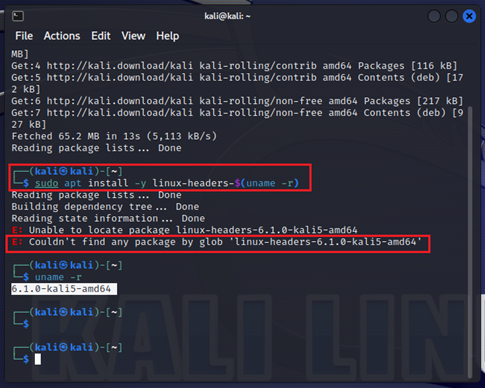
Run the following command to install the linux-headers package (prerequisite for the drivers):
sudo apt install -y linux-headers-$(uname -r)
NOTE: If the "Couldn't find any package by..." error appears while installing the linux-headers package, see Install any missing packages. -
Run the following command to install the Linux drivers:
sudo apt install realtek-rtl88xxau-dkms
-
When prompted, enter y to continue.
Install any missing packages
If the "Couldn't find any package by..." error appears while installing the linux-headers package, do the following:
-
Make note of the missing package's name.
-
From the top of the Kali Linux desktop, select the Applications
icon > Web Browser. -
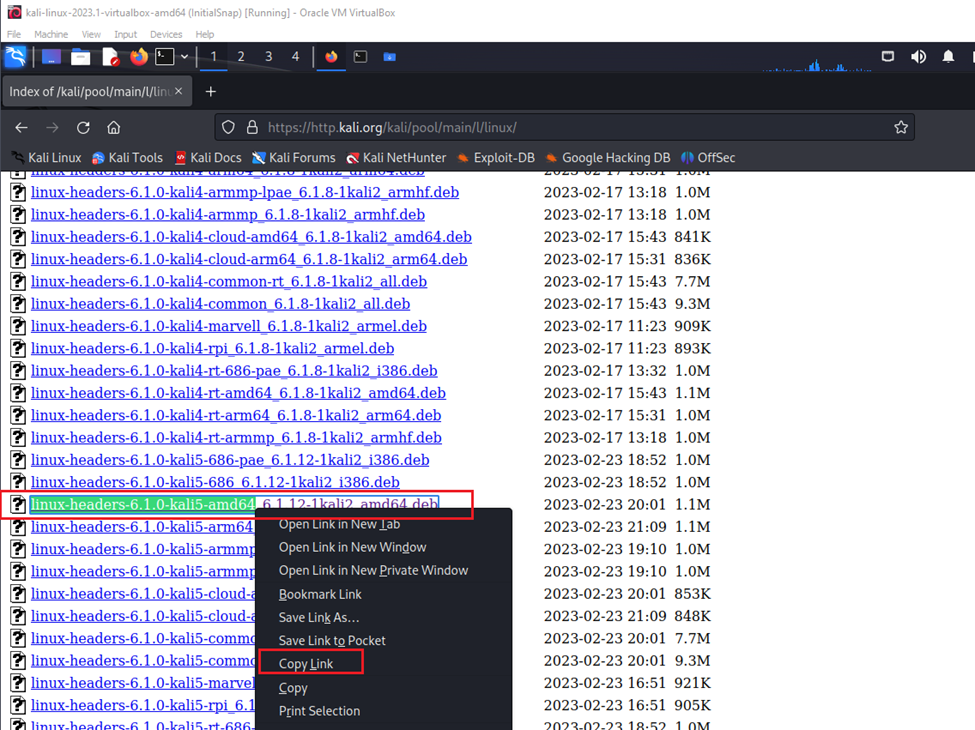
Go to https://http.kali.org/kali/pool/main/l/linux/, and then search for the package's name.
-
Right-click the package's link, and then select Copy Link.
- Open the Terminal Emulator.
-
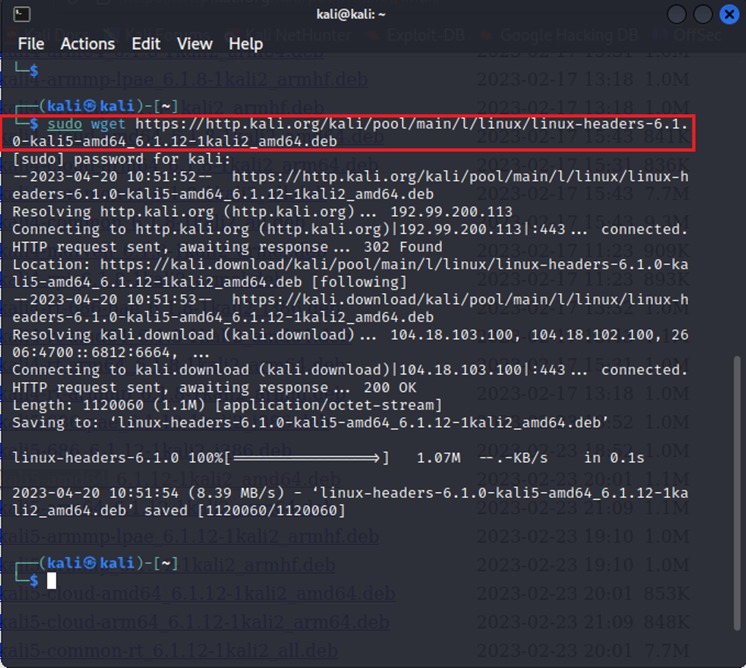
Enter sudo wget, and then after the command text, right-click and select Paste Link.
-
Run the command.
-
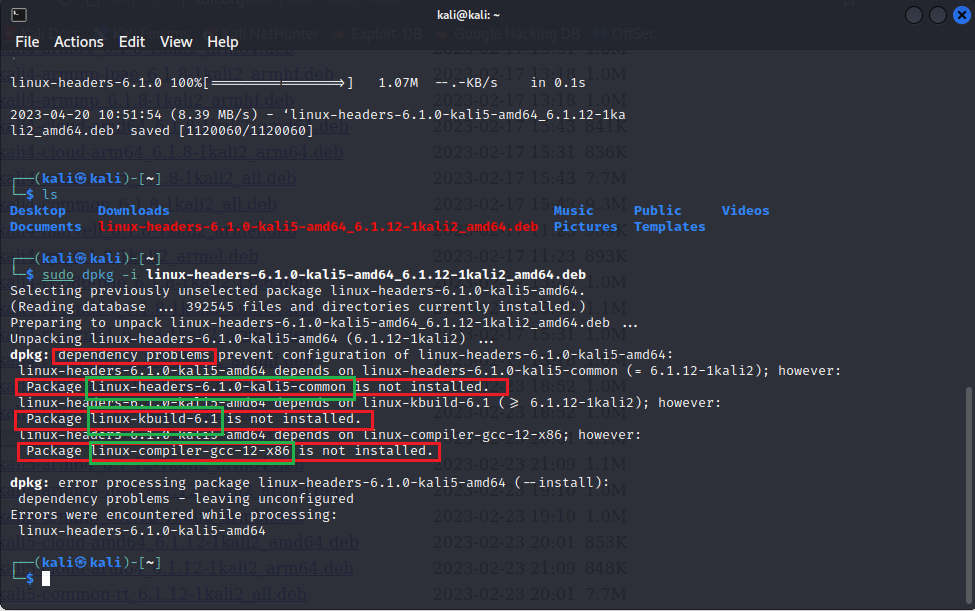
Enter sudo dpkg -i, and then after the command text, right-click and select Paste Link.
-
Run the command.
Install any missing dependencies
If you see the "dependency problems" error in the Terminal Emulator after running the sudo dpkg -i command, you must search for and install the missing dependencies before retrying the command. To install each missing dependency, repeat steps 3-9 from Install any missing packages.
In this example, there are three dependencies missing:
When copying dependencies, note the following:
-
If you are missing a linux-headers common dependency, copy the version without "-rt" in its name.

-
If you are missing a linux-kbuild dependency, copy the version that includes the same version number in the original missing package's file name. For example, in Install any missing packages, the missing package's file name is "linux-headers-6.1.0-kali5-amd64_6.1.12-1kali2_amd64.deb." The corresponding missing dependency is "linux-kbuild-6.1_6.1.12-1kali2_amd64.deb."

Once you have copied and installed the missing dependencies, execute the following command to install the Linux drivers for the AWUS036ACH Wi-Fi adapter:
sudo apt install realtek-rtl88xxau-dkms
When prompted, enter y to continue.
Install hexinject
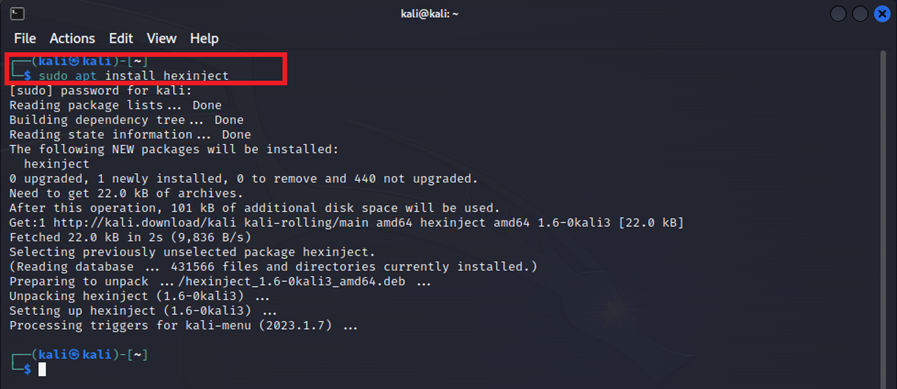
In the Terminal Emulator, run the following command to install hexinject:
sudo apt install hexinject
Create the Wi-Fi router Python script
-
From the top of the Kali Linux desktop, select the folder
 icon > Open Folder.
-
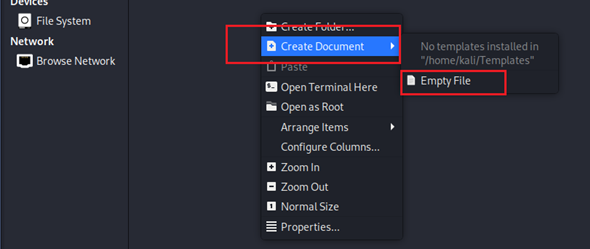
Right-click within the folder, and then select Create Document > Empty File.
-
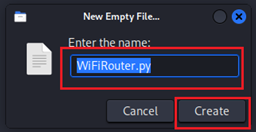
In the Enter the name box, enter WiFiRouter.py.
-
Select Create.
-
Double-click the WiFiRouter.pyfile.
NOTE: If you need to set a default application, select Mousepad, and then select Open.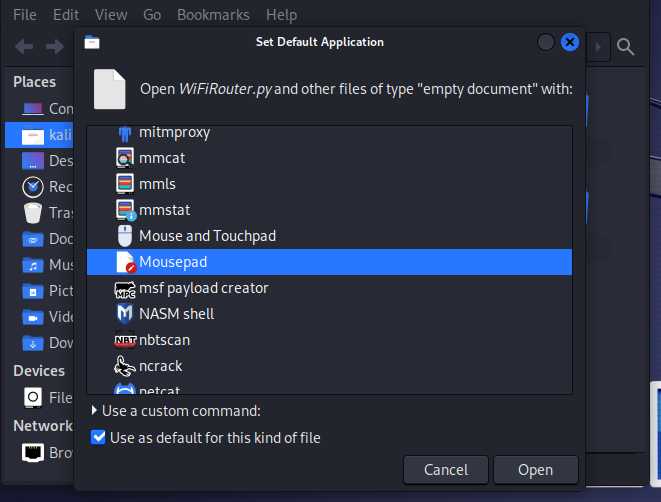
-
In Windows, open the beSTORM folder (C:\Program Files (x86)\beSTORM).
-
Using Notepad, open the WiFiRouter.py file.
-
Select Edit > Select All.
-
Select Edit > Copy.
-
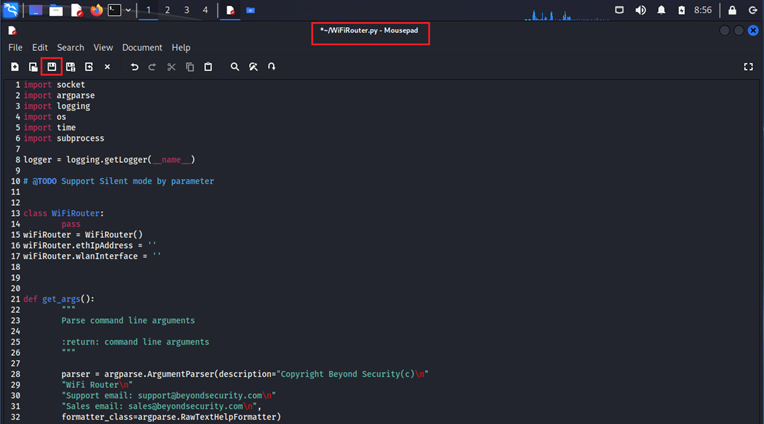
In Kali Linux, right-click in the open WiFiRouter.py file window, and then select Paste.
-
Select File > Save.
-
Close the Kali Linux WiFiRouter.py file.
-
In Windows, close the beSTORM WiFiRouter.py without saving (if prompted).
Update the network adapter settings
After installing the Linux drivers for the AWUS036ACH Wi-Fi adapter, do the following:
-
Close Kali Linux virtual machine window.
-
On the Close Virtual Machine dialog, select Save machine state.
-
From the top of the Oracle VM VirtualBox Manager, select Machine > Settings.
-
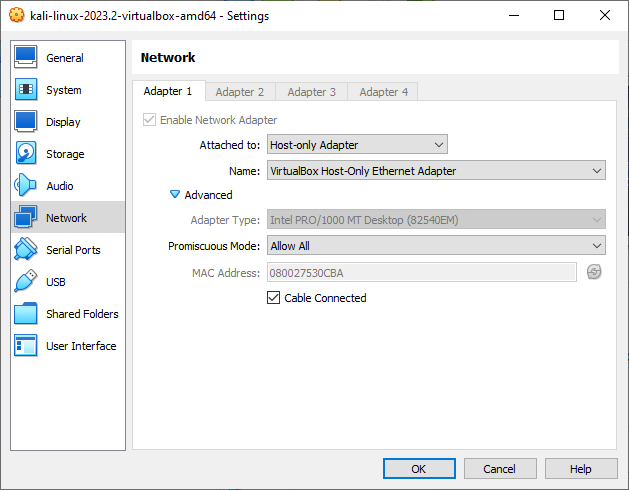
From the left pane, select Network.
-
On the Adapter 1 tab, update these settings to the following:
-
Attached to - Host-only Adapter
-
Name - VirtualBox Host-Only Ethernet Adapter
-
Advanced
-
Promiscuous Mode - Allow All
-
Cable Connected - Selected
-
-
-
Select OK.
-
From the top of the Oracle VM VirtualBox Manager, select Machine > Start > Normal Start.
-
Log in to Kali Linux.
-
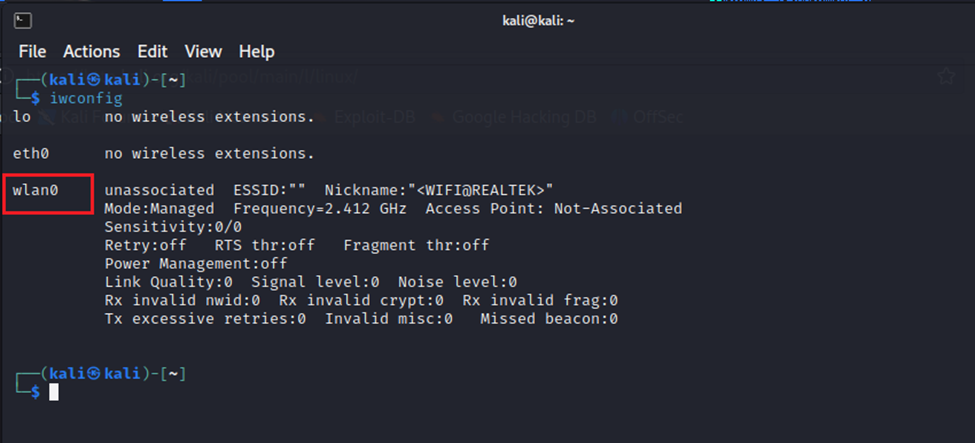
In the Terminal Emulator, enter and run the following command to verify the AWUS036ACH Wi-Fi adapter is recognized in Kali Linux:
iwconfig
-
Disconnect the AWUS036ACH Wi-Fi adapter from the beSTORM computer (you will reconnect the adapter in Start the Wi-Fi router Python script).
Fuzzing Your Target Wireless Device
Follow these steps to fuzz your target wireless device with beSTORM using the Kali Linux virtual machine and AWUS036ACH Wi-Fi adapter:
Set up an access point
Set up an access point on an open network (disable WEP or WPA encryption). Internet access is not required. Take note of the SSID (Name of the access point) and the channel in use by the access point.
To test the access point, connect to it from the computer running beSTORM, and then ping the IP address of the access point. To ping an IP address in Windows, do the following:
-
In the Windows search bar, enter cmd.
-
Select Command Prompt from the search results.
-
In the Command Prompt window, enter ping, followed by the IP address of the access point.
EXAMPLE: ping 192.168.0.0 -
Press Enter on your keyboard.
-
Once your ping is successful, connect the target wireless device you want to fuzz to the access point.
Disable sleep mode in Windows
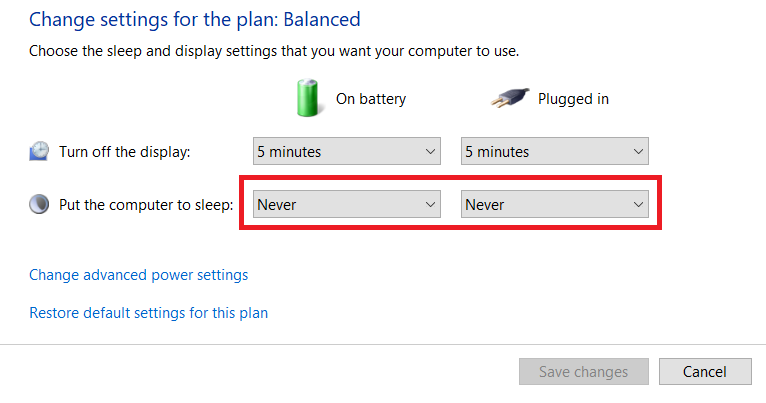
To prevent the computer from going to sleep during fuzzing, do the following:
-
In the Windows search bar, enter Power & sleep settings, and then select Power & sleep settings from the search results.
-
For the computer's sleep settings, set the battery power and plugged in options to Never.
Start the Wi-Fi router Python script
-
Log in to the Kali Linux virtual machine (enter kali for the username and password boxes).
-
Connect the AWUS036ACH Wi-Fi adapter to the beSTORM computer.
-
From the top of the Kali Linux desktop, select the Applications
icon > Terminal Emulator. -
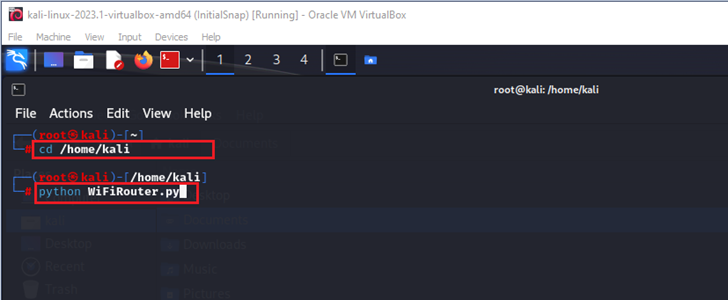
Using the folder and WiFiRouter.py file you created in steps 1-4 of Create the Wi-Fi router Python script, run the following commands in the Terminal Emulator:
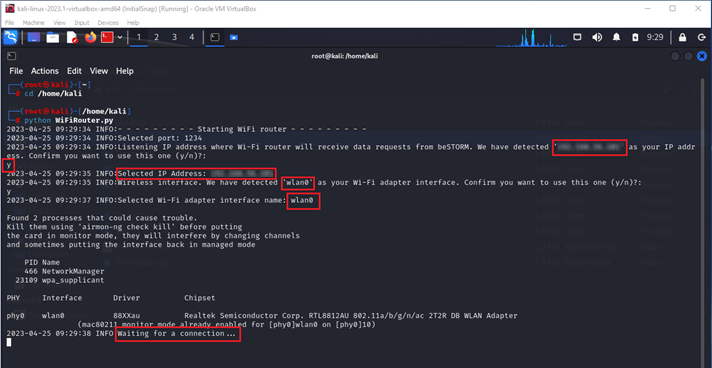
cd /home/kali
sudo python WiFiRouter.py
-
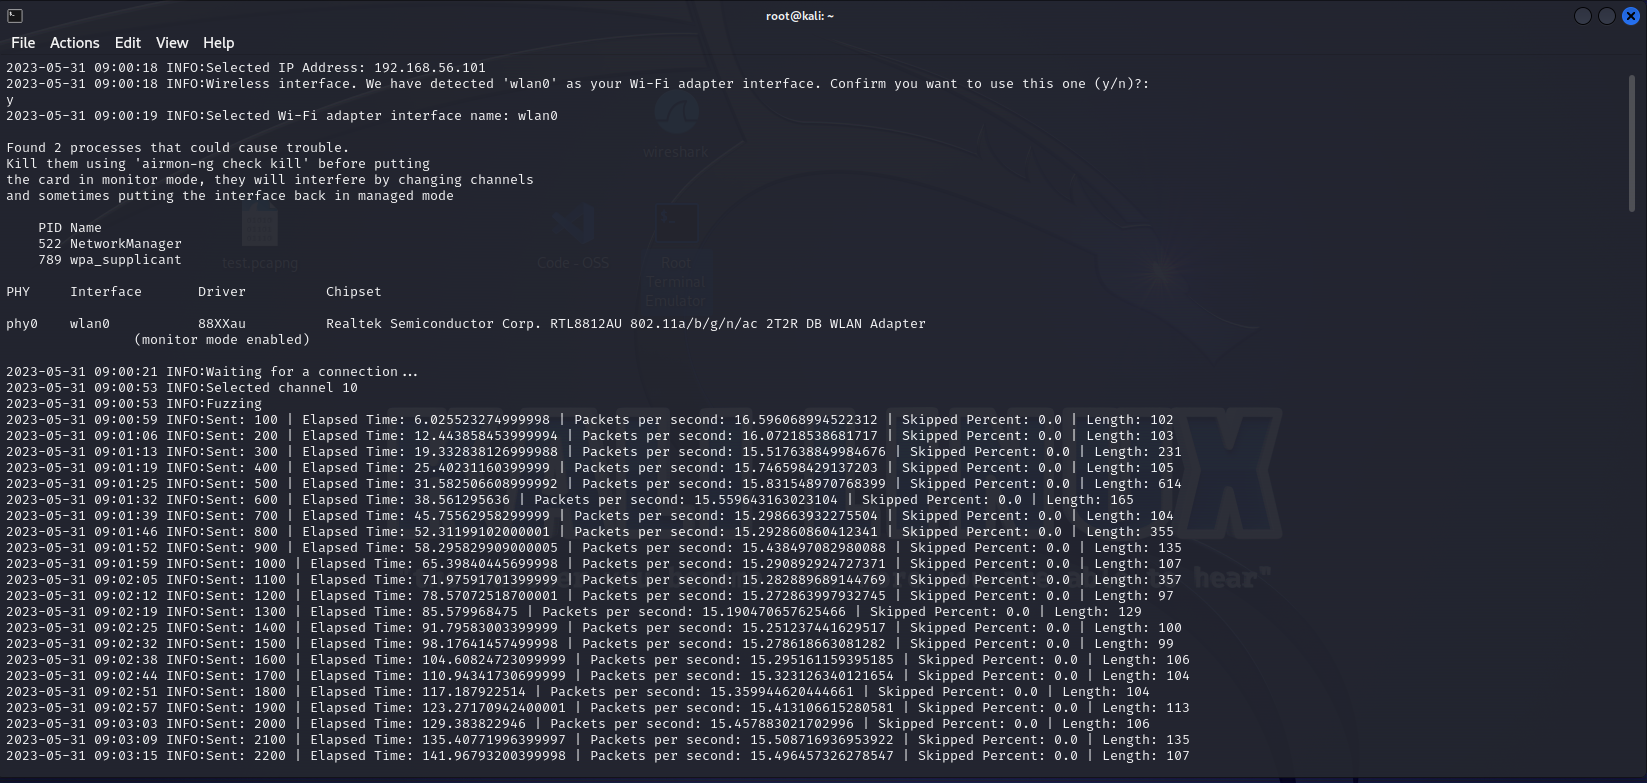
The Wi-Fi router Python script will start and detect the Selected IP Address of your Kali Linux virtual machine (you will need this IP address while configuring beSTORM), and the wireless adapter's interface name. Once "Waiting for connection" appears, the router is ready to use for fuzzing.
Create a Wi-Fi fuzzing project in beSTORM
-
Start beSTORM Client.
-
Select New Project. The beSTORM New Project Wizard opens.
-
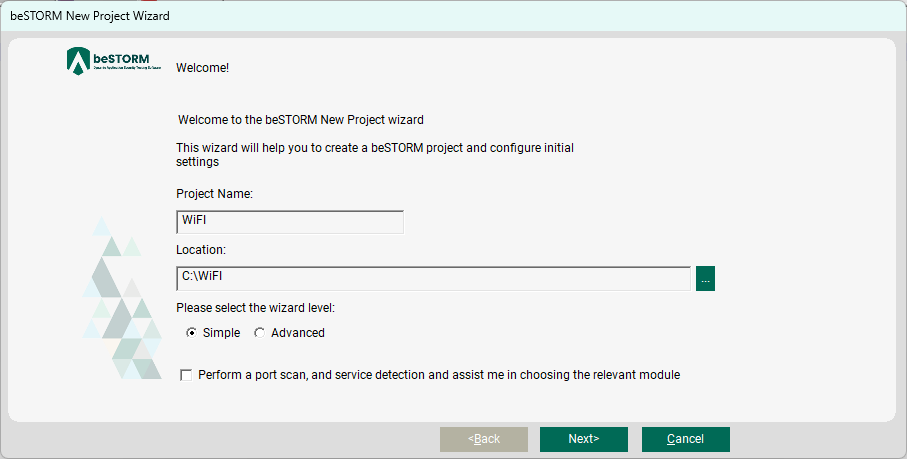
On the Welcome page, do the following:
-
In the Project Name box, enter a name.
-
Optionally, select a different file location for your project in the Location Name box.
-
Leave Please select the wizard set to Simple.
-
Leave Perform a port scan, and service detection and assist me in choosing the relevant module unchecked.
-
-
Select Next.
-
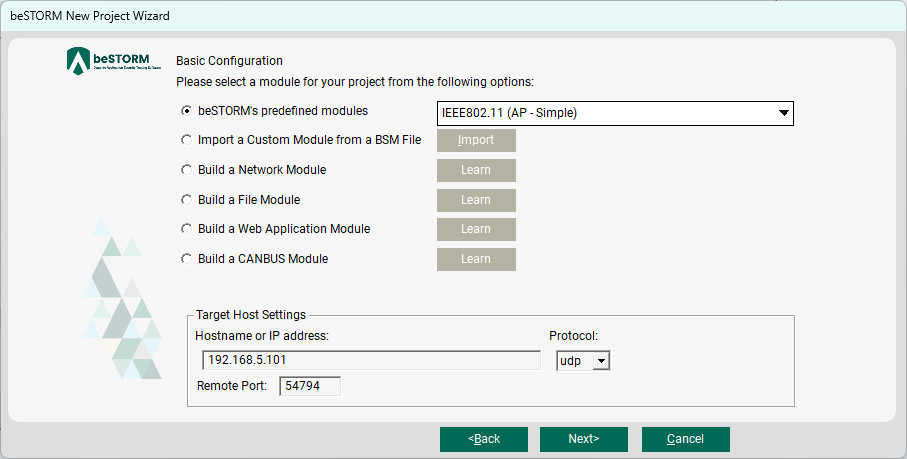
On the Basic Configuration page, do the following:
-
In the beSTORM's predefined modules box, select IEEE802.11 (AP Simple).
-
In the Hostname or IP address box, enter the Selected IP Address from step 5 of Start the Wi-Fi router Python script. Leave the Protocol and Remote Port options to their default settings.
-
-
Select Next.
-
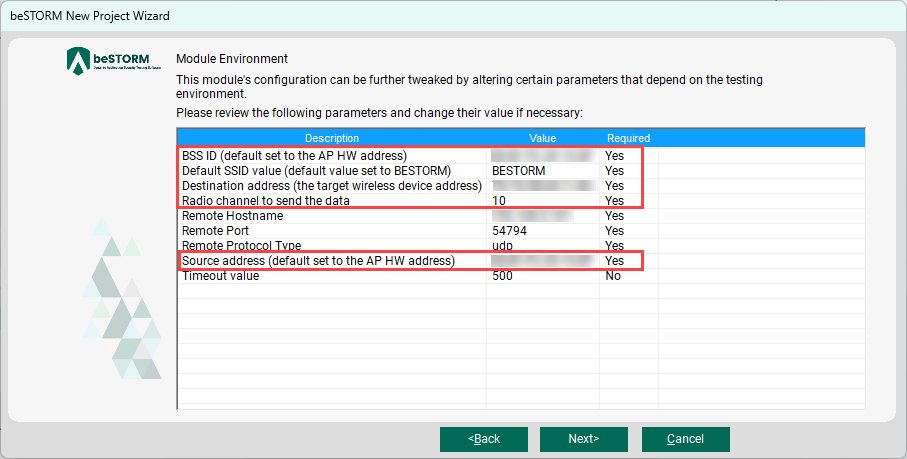
On the Module Environment page, confirm or set the following:
-
BSS ID - The MAC address of the Access Point.
-
Default SSID Value - The name of the access point you are replacing.
-
Destination Address - This is the MAC address of the target wireless device. You can double-click the Value box to open the MAC Address Finder dialog (a useful tool for locating a device's MAC address).
-
Radio channel to send the data - This is channel of the previous access point, and where the radio waves will be sent.
-
Remote Hostname - The IP address of the Kali Linux virtual machine.
-
Remote Port - The default port number selected on the Basic Configuration page.
-
Remote Protocol Type - The default protocol type selected on the Basic Configuration page.
-
Source Address - The MAC address of the access point. This test will spoof the access point's MAC address to inject packets into the communication between the access point and the target wireless device. You can double-click the Value box to open the MAC Address Finder dialog (a useful tool for locating a device's MAC address).
-
Timeout value - Leave to default value.
 NOTE: Use this example configuration to set up the IEEE802.11 (AP) or IEEE802.11 (AP - Simple) module. To create a project for the IEEE802.11 (Subscriber) or IEEE802.11 (Subscriber - Simple) module, switch the values for the Destination Address and Source Address (BSS ID remains the same).
-
-
Select Next.
-
On the Extra Configuration page, to monitor fuzzing, enter the IP address of the wireless target device in the Monitored IP address box.
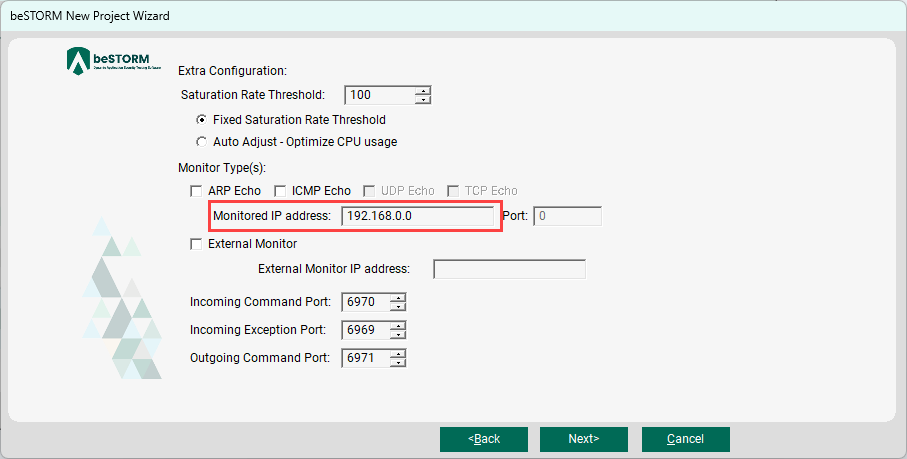 NOTE: If you can run software on the target wireless device, the Windows monitor or GDB monitor are ideal methods to monitor for failure. However, the most compatible method is to ping the target wireless device. If Internet Control Message Protocol (ICMP) pinging over Wi-Fi is unsuccessful, this indicates the client's Wi-Fi stack stopped working, which shows a potential weakness.
Verify monitoring works by pinging the target wireless device from the beSTORM computer using the ping command in the Windows Command Prompt. For example:
ping 192.168.0.0
If you receive a response, the monitoring will work with ICMP. -
Select Next.
-
On the Complete beSTORM wizard page, clear the Auto-start beSTORM scan now checkbox.
-
Select Finish.
-
Stop the access point that the target wireless device connects to.
NOTE: Skip this step if you are using the IEEE802.11 (Subscriber) or IEEE802.11 (Subscriber - Simple) module. -
On the beSTORM Monitor window, select Start to begin fuzzing. If there are no issues, fuzzing will begin immediately.
-
You can also view fuzzing results on your Kali Linux virtual machine.