Spear Phishing
Now that you have an understanding of client-side attacks, let’s talk about how to get the attack to the user. The most common way into an organization’s network is through spear phishing. Cobalt Strike's spear phishing tool allows you to send pixel perfect spear phishing messages using an arbitrary message as a template.
Targets
Before you send a phishing message, you should assemble a list of targets. Cobalt Strike expects targets in a text file. Each line of the file contains one target. The target may be an email address. You may also use an email address, a tab, and a name. If provided, a name helps Cobalt Strike customize each phish.
Templates
Next, you need a phishing template. The nice thing about templates is that you may reuse them between engagements. Cobalt Strike uses saved email messages as its templates. Cobalt Strike will strip attachments, deal with encoding issues, and rewrite each template for each phishing attack.
If you’d like to create a custom template, compose a message and send it to yourself. Most email clients have a way to get the original message source. In Gmail, click the down arrow next to Reply and select Show original. Save this message to a file and then congratulate yourself— you’ve made your first Cobalt Strike phishing template.
You may want to customize your template with Cobalt Strike’s tokens. Cobalt Strike replaces the following tokens in your templates:
| Token | Description |
|---|---|
| %To% | The email address of the person the message is sent to |
| %To_Name% | The name of the person the message is sent to. |
| %URL% | The contents of the Embed URL field in the spear phishing dialog. |
Sending Messages
Now that you have your targets and a template, you’re ready to go phishing. To start the spear phishing tool, go to Attacks -> Spear Phish.
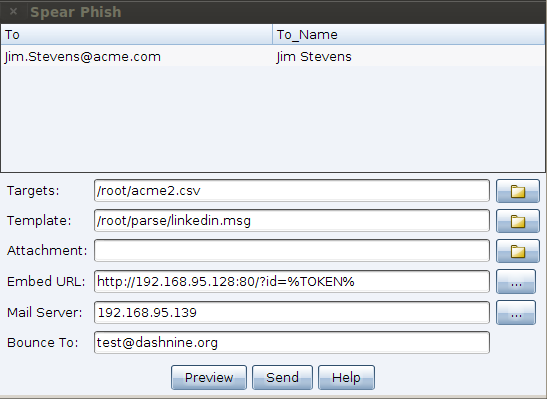
figure 53 - Spear Phishing Tool
To send a phishing message, you must first import your list of Targets. You may import a flat text-file containing one email address per line. Import a file containing one email address and name separated by a tab or comma for stronger message customization. Click the folder next to the Targets field to import your targets file.
Set Template to an email message template. A Cobalt Strike message template is simply a saved email message. Cobalt Strike will strip unnecessary headers, remove attachments, rewrite URLs, re-encode the message, and rewrite it for you. Click on the folder next to the Template field to choose one.
You have the option to add an Attachment. This is a great time to use one of the social engineering packages discussed earlier. Cobalt Strike will add your attachment to the outgoing phishing message.
Cobalt Strike does not give you a means to compose a message. Use an email client, write a message, and send it to yourself. Most webmail clients include a means to see the original message source. In GMail, click the down arrow next to Reply and select Show original.
You may also ask Cobalt Strike to rewrite all URLs in the template with a URL of your choosing. Set Embed URL to have Cobalt Strike rewrite each URL in the message template to point to the embedded URL. URLs added in this way will contain a token that allows Cobalt Strike to trace any visitor back to this particular spear phishing attack. Cobalt Strike's reporting and web log features take advantage of this token. Press ... to choose one of the Cobalt Strike hosted sites you've started.
When you embed a URL, Cobalt Strike will attach ?id=%TOKEN% to it. Each sent message will get its own token. Cobalt Strike uses this token to map website visitors to sent emails. If you care about reporting, be sure to keep this value in place.
Set Mail Server to an open relay or the mail exchange record for your target. If necessary, you may also authenticate to a mail server to send your phishing messages.
Press … next to the Mail Server field to configure additional server options. You may specify a username and password to authenticate with. The Random Delay option tells Cobalt Strike to randomly delay each message by a random time, up to the number of seconds you specify. If this option is not set, Cobalt Strike will not delay its messages.
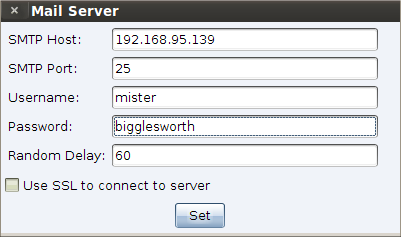
figure 54 - Configure Mail Server
Set Bounce To to an email address where bounced messages should go. This value will not affect the message your targets see. Press Preview to see an assembled message to one of your recipients. If the preview looks good, press Send to deliver your attack.
Cobalt Strike sends phishing messages through the Team Server.