User Variables Mapping
User Variables Mapping allows you to assign names to variable values that can then be displayed in a user-created view.
There are two Additional Information values and up to 99 variable values that can be defined for any given view. These custom variables are generated from individual information fields from within the Event Details.
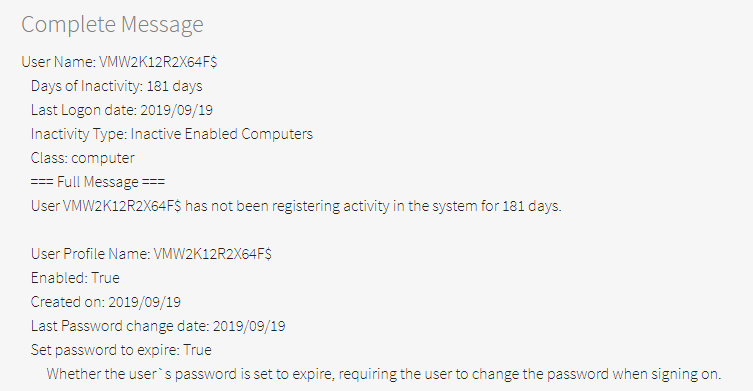
In the example below, it is possible to determine the Custom Variable fields from the Complete Message detail.
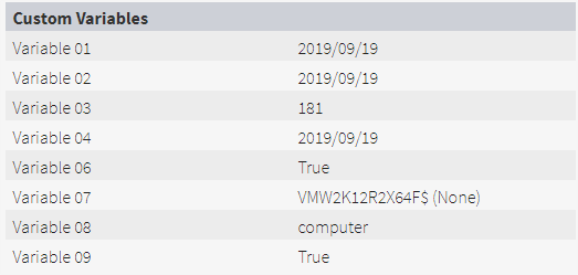
The Custom Variables can be found be scrolling down to the bottom of the Event Details panel on the right of the display.
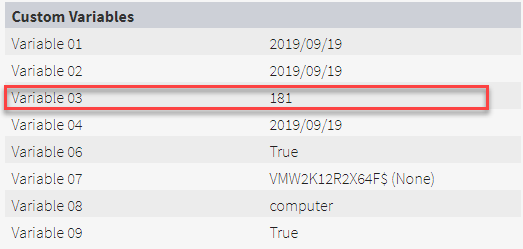
From this information, we can determine that Days of Inactivity in the Complete Message Detail for this event corresponds to Custom Variable 03. Therefore, by creating a user variable that maps Custom Variable 03 to Days Of Inactivity, it is possible to include that information on a user-defined view.
Creating User Variable mapping
User Variables mapping is available when creating, or editing, a user view and can be found by scrolling down to the bottom of the New View (if creating a new view) or Settings page of an existing view.

Assuming, we were creating a user view that was specific to user inactivity and having selected the appropriate filters on which to base the view, we could create a custom variable mapping that represented Days of Inactivity.
Using the previous example, we would select Variable 03 as this indicates the Days Of Inactivity period in the Complete Message detail.
In the User Column, use the drop-down choice menu to select the required variable, in this case Variable 03.
Assuming, we were creating a user view that was specific to user inactivity and having selected the appropriate filters on which to base the view, we could create a custom variable mapping that represented Days of Inactivity.
Using the previous example, we would select Variable 03 as this indicates the Days Of Inactivity period in the Complete Message detail.
In the Alias field, type Inactivity Days. You should now see something like this:

Click OK to save the User View.
Applying the User Variable Mapping to the main display
In order to be able to see the mapped variable in the main view of either the Event Manager or Forensic Analysis displays, the column needs to be selected.
Click Select Columns.

Scroll down to the bottom of the Select Columns display.
Click Inactivity Days to indicate that this variable is to be included in the Custom Columns of this view.
Click OK.
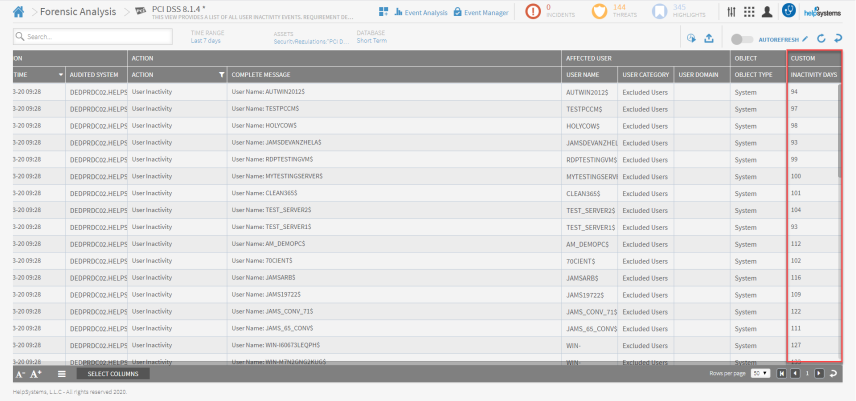
When the view is then accessed from within Event Manager or Forensic Analysis, the Inactivity Days column in shown in the Custom section of the main display.
User Variables Mapping and Reports
Any User Variable Mapping that has been configured for a user view is also reflected on any reports that use the variable and generated within Event Manager or Forensic Analysis. This applies whether the reports have been Scheduled ![]() or compiled instantaneously (Export)
or compiled instantaneously (Export) ![]() .
.
For example, the following 'User Modification' view showing the Custom column of Action...

Is included on the generated report as:
