Deploying Agents
Agents are typically deployed when you launch an attack module to exploit a vulnerability or to exploit end-users' lack of security awareness (client-side social engineering attacks). Successful exploits deploy a new agent after compromising the target system. When an attack module creates a new agent and commits it to the Entity Database, the agent automatically appears in the module's output panel and inside the compromised host in the Entity View Panel.
You can also manually deploy agents by using a generic file-transfer-and-execute module or from outside of Core Impact's Console. If you choose to manually deploy an agent, you must register the agent's existence in the Entity Database or the Console will not recognize it. To register the agent, go to the Modules Tab and use the Register modules located in the Agents category.
There is no limit on the number of agents you can install on a single host.
Deploying an Agent Using Valid User Credentials
Core Impact can use a valid username and password to deploy an agent on a remote host. In contrast to agents deployed using the exploitation process, these agents are deployed not by exploiting a vulnerability but by logging into the target hosts with the specified username and password. This is especially useful when valid credentials are obtained from cracking password hashes gathered from a compromised host.
Agents can be deployed in this manner through a variety of different protocols. Utility modules for doing this can be found in the Agents folder of the Modules panel. Some examples of these modules are:
- Install Agent using SMB: Installs an agent by connecting to a network share.
- Install Agent Using WMI: Installs an agent using Windows Management Instrumentation.
- Install an agent using ssh: Installs an agent by connecting through SSH.
- Install an agent using rlogin: Installs an agent by connecting through rlogin. This module can take advantage of trust relationships created by
.rhostsfiles. - Install an agent using telnet: Installs an agent using the telnet service.
- Install an agent using unix-portshell: Installs an agent on a Unix target using a shell bound to a port.
- Install an agent using VNC Protocol: Installs an agent using the VNC protocol.
- Install an agent using win-portshell: Installs an agent on a Windows target using a shell bound to a port.
To deploy agents using a valid username and password, follow this procedure:
- Select the desired target hosts for which you have a valid username and password.
- Select the install module from the Agents folder that corresponds with the install protocol you wish to use.
- Launch the module by dragging and dropping the module to the target host in the Entity View. This will evoke the Module Parameters .
- Change the USER and PASSWORD parameters to the username and password for the target host and click OK.
- A new agent with the privileges of the specified user will be installed on the target host. You can continue to work with this agent as usual.
Establishing Agent Communication Channels
Core Impact's Console must establish a communication channel with each agent in order to control it. Communication channels are established in a number of different ways depending on the agent deployment method and agent type.
When agents are deployed by an exploit module or a utility module, the exploit's Agent Connection/CONNECTION METHOD parameter will control the way the communication channel is established. Agents will use a TCP connection as a communication channel. The options available for the Agent Connection/CONNECTION METHOD parameter are:
- Connect to target. A new TCP connection will be created originating from the host where the current source agent is located, terminating at the remote agent on the target host. The Agent Connection/PORT parameter will control the specific TCP port where the remote agent will listen for incoming connections from the source agent.
If Core Impact is running on a computer behind a NAT device (such as a home DSL router), a connection method different than "Connect to" will not be effective right away. To support "Connect from", "Reuse connection" and "HTTP channel " in this scenario, activate the NAT support using the Network section of the Options Dialog Box. Open the Options Dialog Box by selecting > fromCore Impact's main menu. Refer to Network Options for a description of these settings. - Connect from target. A new TCP connection will be created originating from the remote agent on the target host back to the host where the current source agent is located. The Agent Connection/PORT parameter will control the specific TCP port to which the remote agent will attempt to connect to on the source agent host. If the specified port is already in use by another exploit, the agent connector has the ability to reuse that same port. Some client-side exploits will attempt to use the HTTP Connect feature first when "Connect from" is selected. See HTTP Connect Channel for more information on HTTP Connect.
- Reuse connection. The agent will reuse the same TCP connection that was used to deliver the attack. For instance, if the agent is deployed using an attack against a web server listening on TCP port 80, the agent will use that initial connection to communicate back to the Console.
- HTTP channel. A new HTTP connection will be created from the remote agent on the target host to the host on which the HTTP Tunnel resides. In the cases where the remote host has a HTTP proxy defined, the remote agent will connect to the HTTP Tunnel end point through the configured proxy. Additional settings related to this connection method can be configured within the "HTTP Tunnel" section in the module's parameters. See HTTP Tunnel Channel for more information.
- HTTPS channel. A new HTTPS connection will be created from the remote agent on the target host to the source agent. Additional settings related to the HTTPS Channel can be configured in Agents Options.
The HTTPS connection method will work on Windows target hosts if one of the following conditions is met:- The OS version is older than Windows Vista
- If Windows Vista or newer, the Check for server certificate revocation is unchecked in the Security section of the Advanced tab of the Internet Control Panel. This setting is enabled by default.
- If Windows Vista or newer with the Check for server certificate revocation enabled, the target host has Internet access directly or through a proxy server.
Agent Expiration Date
Several modules that deploy agents will offer a Agent Expiration and Agent Expiration Date configurations so that, at the defined date and time, the agent will automatically uninstall from its host. Setting the Agent Expiration to Use global settings will inherit the global Agent Expiration settings in Options - Agents. You can see this option in the below example module Install Agent using unix-portshell:
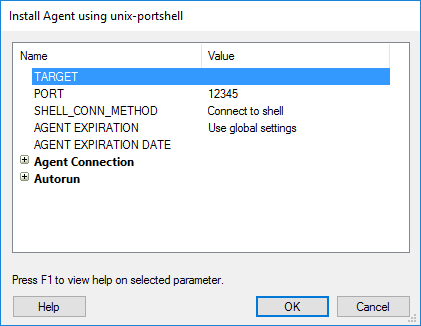
figure 60 - Agent Expiration Date
Agent Chaining
Agent chaining allows you to connect to a newly-installed agent behind a firewall using an existing, connected agent's communication channel. As you deploy successive agents, chaining allows the Console to maintain a single connection versus many.
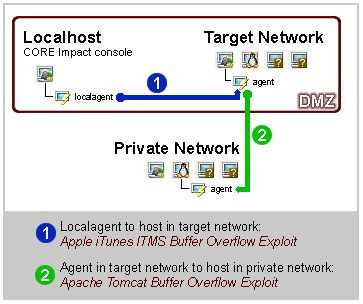
figure 61 - Agent Chaining Example
The diagram above demonstrates the necessity of agent chaining. Chaining becomes even more critical if your network employs packet filtering. For example, the scenario illustrated above might include a packet filter in the DMZ network that filters connections from the Internet to the internal private network. In this case, once a host in the DMZ was compromised, the only way in which you could connect to agents inside the internal network would be to re-use the original agent's channel.
Agents are "chained" to the agent that was set as source when they were connected. Typically this means that agents are chained directly to the localagent (the Console), but the chaining relationship automatically changes as you change source agents. This behavior is referred to as implicit chaining.
Remember, if you want to simply run a module using a remote agent, click on that agent (focus on it) and then run the desired module. The module will automatically attempt to run using the focused agent.
Viewing Agent Chains
If you switch source agents often, it is easy to lose mental track of current agent chains. To view agent chains, use the Show agent chaining route module located in the Agents category on the Modules Tab of the Console to obtain agent chaining information. This module receives an agent as its target and displays the current route used to reach it. The following example includes typical information displayed on the Module Log Panel after running this module.
   Module "Show agent chaining route" started execution on Wed Mar 20 20:37:18 2002
   Chaining route for agent: agent(5)
   /localagent -> agent(1) -> agent(2) -> agent(5).
   --
   Module finished execution after 1 secs.
Re-routing Agent Chains
Once you establish a chaining route to an agent, Core Impact will attempt to reconstruct that route each time the agent is reconnected. To reset the chaining route for an agent, follow this procedure.
- Run the Delete agent chaining route module against the agent (Modules Tab/ Agents category).
- Enter the new agent's name in the Value column, or use the ellipsis button to the right of the field to select it and click OK. If you leave the proxy agent value for the new agent blank, the next time that the agent is connected a new route will be set with the current source agent.
- Click OK. The module will execute and information about the agent route is displayed in the Executed Module Info Panel of the Console.
Using Agent Plug-ins
Agents can use plug-ins to add functionality to a deployed agent. The following plug-ins are available and, once installed on an agent, extend that agents capabilities for as long as it exists. Plug-ins are automatically removed when the agent is uninstalled:
- PCAP. Provides packet-capture capabilities for the agent. An agent with the PCAP plug-in can execute modules that require packet capture (for example, Port Scanner - Fast SYN, Password Sniffer or Network Discovery - Passive). Only the localagent and agents with this plug-in installed can execute modules that require packet capture. For convenience, this plug-in can be installed by right-clicking on an agent and selecting Install Pcap Plugin.
The PCAP plug-in requires the presence of a packet-capture driver (WinPcap) in Windows hosts. If there is no version of WinPcap installed on the machine, the driver is installed and removed when the PCAP plug-in is installed/uninstalled. - TCP Proxy. Allows you to create TCP tunnels from Core Impact's Console to the agent. By taking advantage of this plug-in, you can redirect a local TCP port in the computer running Core Impact to a remote TCP port on the other side of the agent. Use the TCP Proxy Plugin module in the Agents/Plugins module folder to open new TCP tunnels. You will then be able to tunnel SSH traffic through that machine and pass it along to an SSH server.
- HTTP Proxy over TCP Proxy. If the TCP Proxy plugin is already installed on the agent, you can use the HTTP Proxy over TCP Proxy plugin to browse a web server that is visible from the agent's host machine.
You can install or remove plug-ins using the modules in the Agents/Plugins/Install module folder.
Recovering Agents
If you have a Reconnection Policy established for an agent (see Set Reconnection Policy or Agents Options), then you can use the Recover option to attempt to reconnect to an agent that has unexpectedly lost its connection to the Core Impact console.
Set Reconnection Policy
By default, if an agent is not set to be persistent, and there is no reconnection policy, then the agent automatically self-destructs when it loses connectivity to Core Impact's source agent, even if the connection is disrupted for only an instant. To prevent this, you can set a Reconnection Policy for the agent and then determine how that agent attempts to reconnect to the Core Impact console following an unexpected disconnection. Using the Set Reconnection Policy option overrides any global reconnection settings in Agents Options.
To update an agent's reconnection policy:
- Right-click on the agent.
- Select Set Reconnection Policy. The module's parameters will appear.
- Set the parameters of the policy and click the OK button.
- ENABLE POLICY: This should be set to true if you want the agent to be able to reconnect to its source agent following an unexpected disconnection.
- CONNECTION TYPE: This should be set to Connect From if the Connection Policy is enabled. This means that the agent will try to initiate a connection back to the source agent.
- RETRY INTERVAL: This value determines how often an agent should attempt to connect back to the Core Impact console.
- RETRY TIMEOUT: This value determines how long the agent should attempt to connect back to the Core Impact console.
- AGENT PORT: The port on which you would like the reconnection to occur. Enter 0 to reuse the agent's original connection port.
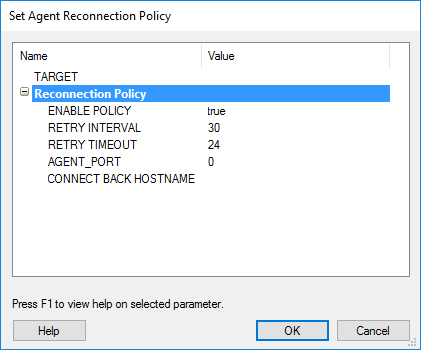
figure 62 - Set Agent Reconnection Policy
The agent's Reconnection Policy has now been modified.
Update Connection Status
When you run the Update Connection Status command on a connected agent, Core Impact will test the agent for 2 types of performance:
- Connection (upload and download) speed between the Core Impact console and agent
- Performance of the agent on its host machine (measured in system calls per second)
The resulting performance data will appear in the Module Log pane and also stored in the agent's Quick Information.
Common Agent Error Messages
This section describes error messages you may encounter when working with Core Impact's agents.
syscall not supported by target-
The module was not meant to run on the platform on which the source agent was deployed. For example, the
signalsyscall is not part of the Windows Operating System. If a module uses it, it will run on every agent except agents deployed on the Windows platform, where it will abort and generate the syscall not supported by target message.The module's description will include information about the supported platforms. Additionally, module highlighting will not highlight a module which requires a syscall not supported by the source agent.
the server is unreachable-
The remote agent is down. Communication has been disrupted due to a networking problem or a loss of control by the agent.
pcap_plugin is not installed-
The PCAP plug-in (see Using Agent Plug-ins) is not installed in the agent. Right click the agent and select Install Pcap Plugin to install it.