Macro Modules
Macro Modules allow you to combine multiple Core Impact modules into a single module package and then to execute it on your target systems or use it as an auto-runnable post-exploitation step. With Macro Modules, you can automate common tasks that are usually run in sequence with some preset parameters. For instance, the Information Gathering Example Macro in the My Macros module folder will do the following:
- Run the Network Discovery - ICMP module against a specified netblock.
- Run the Network Discovery - TCP Connect module against a specified netblock.
- Run the OS Detection module against each of the scanned hosts.
Macro Modules are no different from other Core Impact modules except for the fact that they take advantage of automation features built into Core Impact's API.
Creating Macro Modules
You can create powerful macros graphically using Core Impact's Macro Creation Wizard.
You must be in an opened Workspace to create a Macro Module but, after the Macro is created, it will be available across all Workspaces in your Core Impact instance.
To create a Macro Module:
- In an opened Workspace, navigate in Core Impact's menu bar to Modules -> Create Macro...
- The Macro Wizard will open. Click the Next button to proceed.
-
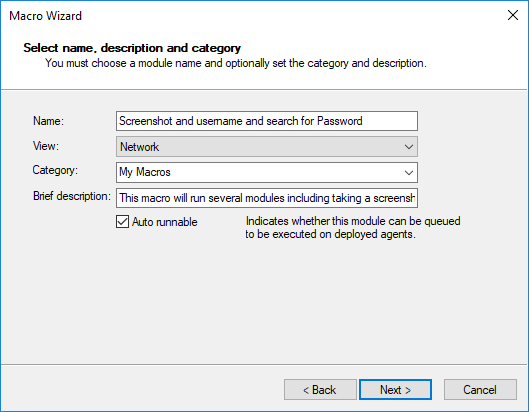
Complete the first form with the following details:
Name: The name of the macro as it will appear in the modules list.
View: The entity view for which the module will be visible. For example, if you select Network, then the Network entity tab must be active in order for the new module to appear in the Modules View.
Category: The folder in the Modules list where the new macro will reside. By default, new Macros are saved in the My Macros folder, but you can change this by clicking on the drop-down menu and selecting a new location.
Brief description: Optional description of the Macro.
Auto Runnable: If this option is checked, you can configure an exploit to automatically run this Macro Module if the exploit successfully launches an agent.

Click the Next button after the form is complete.
-
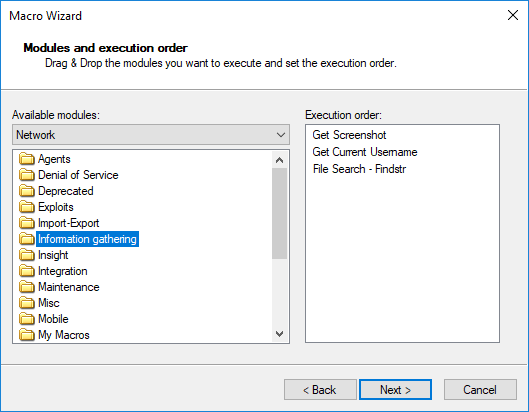
Drag and drop each module that you want to include in the macro from the Available modules pane (left) to the Execution order pane (right).

You can change the execution order of the modules in the Execution order pane by dragging a module to a different position in the sequence. A dotted line is displayed to help you see where the module will be dropped.
To remove a module from the sequence, select it and press the Delete key.
Click the Next button to proceed with the wizard.
-
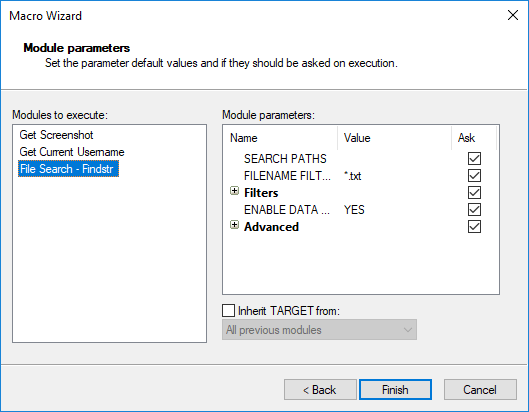
For each module in the sequence, you can select which parameters will be manually set by the user when the macro is run and which will be set by default. To configure this:
- Select the module in the Modules to execute pane.
- In the Module parameters pane, for each parameter, place a check in the Ask column if you want the user to input the parameter value when the macro is executed. If the Ask box is not checked, the data in the Value column will be used when the macro is executed.
- Change any data in the Value column by clicking on the value. Some parameters will offer a simple text field or a drop-down menu, and others will show an ellipsis (
 ) button that, when clicked, will provide more options for setting the value.
 - Some parameters can be inherited from the results of a module higher in the sequence by checking the Inherit TARGET from checkbox. After checking this box, select the module from which the current module should obtain its TARGET value(s). If the module selected in the drop down box outputs more than one value, the module will be run on each one.

- Click the Finish button and the Macro Module will be created.
You can view the progress of the generation process by selecting the Meta Module Generator module in the Executed Modules panel, then clicking on the Module Log tab.
Using Macro Modules
Macro Modules are used just as other modules in Core Impact. If you configured your macro to be auto runnable, you can use this macro as a post-exploitation step with several of the RPTs. To execute a macro module manually, follow these steps:
- Locate the macro in the Modules Panel. When the macro was created, you specified a location for it.
- Launch the macro by either double-clicking it or dragging and dropping it onto an item in the Entity Database.
- The macro module's parameter dialog box will open.
If you wish, set the parameters and then click OK to execute the macro module.
See Running Modules for more details.