Working with Modules
Core Impact modules are the mechanisms that underlie the RPTs - they are your individual tools for penetration testing. Modules help you complete simple tasks such as resolving hostnames or very complex ones such as exploiting a buffer overflow vulnerability on a remote host. When you perform a Rapid Penetration Test (RPT), the system executes individual modules behind the scenes for you. Modules can be executed individually, or you can use modules to execute other modules. These macro modules execute other modules in the manner and order you desire.
Individual modules can be accessed from the Modules View of the Console, shown below.
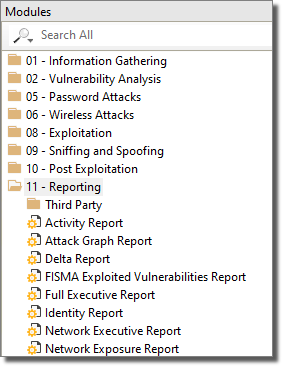
On the Modules View, modules are organized into folders (also known as 'categories') that refer to the module's general purpose or use. When you select a module, information such as version and a description of what the module does is displayed in the Quick Information Panel at the bottom of the Console.
The list of available modules is automatically created from Core Impact's module directory when you open the first workspace. This list can be recreated at any time by selecting -> from Core Impact's drop-down menu.
The Modules view will only show modules that are applicable for the currently-select entity view. For example, if the Client Side entity view is active, only modules that apply to client-side testing will be visible in the Modules View.
Additionally, the Modules view automatically highlights modules that are applicable to the object type that is selected (if any) in the entity view. For example, if a host with a known operating system is currently-selected in the Network entity view,Core Impact will highlight only those modules in the Modules view that work on or against that specific host's operating system. Note that you can run a non-highlighted module to try to validate an assumption on the target's operating system. The colors used for highlighting can be changed in the Modules category of the Options Dialog Box ( -> ) - see Modules Options.
Running Modules
To run a module, you can either double-click on it or drag and drop it onto a target. Some modules will require additional parameters be set prior to execution. When you run a module, the Module Parameters Dialog Box appears. Each module specifies the parameters it needs. The first time a module is executed, default values are used for all parameters.
For information about a specific parameter and its possible values, select the parameter in the Module Parameters Dialog Box and press F1 to display contextual help describing the selected parameter.
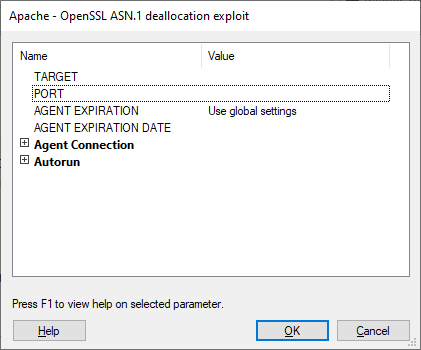
figure 40 - Module Parameters Dialog Box
When you launch a module, the TARGET value in the Module Parameters Dialog Box is automatically set to the currently-selected object in the Entity View Panel. All the remaining parameters are set to their default values. You can change these values before clicking OK, which will execute the module. Some modules, such as modules in the Shells category, do not need any parameters.
Core Impact's Remote desktop access module - when run - will use a connected agent to try to leverage a remote desktop tool (e.g. VNC) on the host and open a remote desktop session. To run this module:
- Navigate to the Modules view and make sure that the Network entity tab is active.
- Type the string "remote desktop" into the module search field. This should reveal the Remote desktop access module.
- Double-click the Remote desktop access module. The module's parameters will appear.
- Set the module's parameters to reflect your preferences and environment:
- Port: Set to port number to connect to.
- Use a tunnel: Set to YES if the connection will use a tunnel.
- View only: Set to YES to establish a view-only remote desktop session. You will have no user input.
- 8 bits: Set to YES to create a low resolution remote desktop session. Set to NO to create a high resolution session.
- Scale: Set the scale of the screen to be displayed as a percentage.
- Inject into another process: Set to YES in order to inject the remote desktop process into another process that is already running on the target that has access to the desktop.
- Password: Enter the password to be used in the server on the target host. Password should be 8 bytes - if it is more, only the first 8 bytes are used.
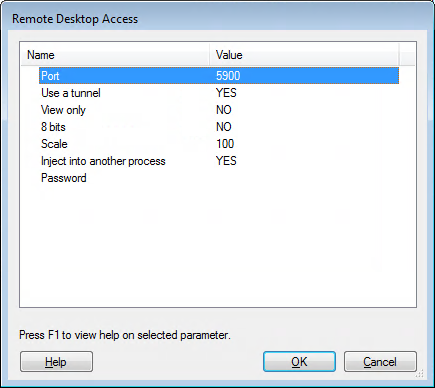
figure 41 - Remote Desktop Access Module Parameters
- Click the OK button.
The Module will run - check the Module Log pane for output and/or error details.
Dragging and Dropping Modules
The most common way of executing a module is to drag and drop it onto a valid target in the Entity View Panel. This method is particularly convenient when the module needs a target with which to interact. Whenever a module is dropped onto an entity, the TARGET parameter in the Module Parameters Dialog Box is automatically set to the name of that entity (modules can also be dropped over a group of entities, see the section called “Multiple Targets” for more information). If the module does not require a TARGET parameter, dragging and dropping has the same effect as double-clicking it.
Some modules that typically require a target for execution are the different port scanners, RPC endpoint mapper, and OS identification and attack modules, including client-side exploits.
Some modules specify the class of TARGET they work with (agents, hosts, emails, etc.). When dragging and dropping these modules, the Console will only allow you to drop them onto targets of a valid class.
Specifying Host Ranges
Modules that work with IP addresses accept address ranges instead of a host. These modules use the TARGETRANGE parameter instead of TARGET in the Module Parameters Dialog Box. These ranges follow the syntax specified in the table below.
Host Range Syntax
| Specific ranges |
|
|||
| Multiple ranges |
|
You can also specify these ranges by clicking on the ellipsis button ( ) next to the TARGETRANGE parameter's Value column.
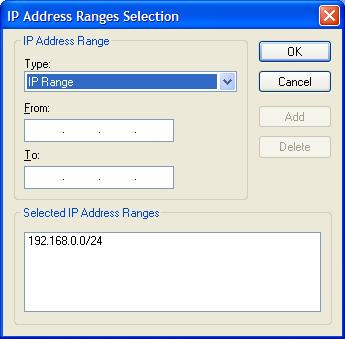
figure 42 - Select Ranges Dialog Box
The Select Ranges Dialog Box lets you add ranges in four different ways:
- Single IP. A single IP address.
- IP Range. A continuous range of IP address starting on the From address to the To address.
- CIDR Notation. A network in the CIDR format, where the first four numbers specify the network name and the number on the right side of the slash represents the number of "1"s in the binary representation of the network's netmask.
- Import From File. A text file with a list of IP addresses and/or ranges. Click on the ellipsis button to browse for the file.
Click on the Add button as many times as necessary to build the desired target range. Click OK when you are done. The TARGETRANGE parameter will reflect your changes.
Multiple Targets
You can execute any module against a network folder using any of the methods described above. Core Impact's Console will behave differently during this operation according to whether the module accepts host ranges or not.
If the module accepts host ranges (receives a TARGETRANGE parameter), the Console will not update the TARGETRANGE parameter since it denotes an IP list and might not make sense when dropping over a folder. Typically, modules that need TARGETRANGE create new objects rather than work with existing ones.
If the module does not accept host ranges (receives a TARGET parameter), a ";" -separated list of hosts with the selected folder contents will be automatically created and set as the TARGET parameter for the module. Upon execution, the module will iterate over each one and process them.
You can also specify multiple target hosts for a given module by clicking on the ellipsis button next to the TARGET parameter's Value column.
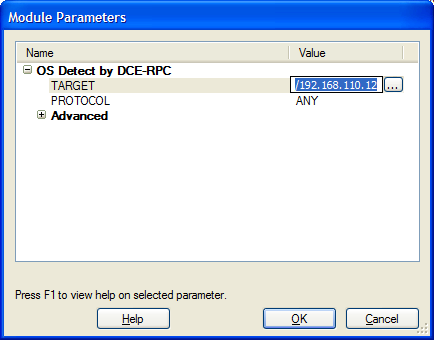
figure 43 - Multiple TARGET selection
Using the TARGET selection dialog, you can select the specific hosts you wish to target by checking/unchecking the checkbox to the left of each host's name. When you are finished, click OK and you will be returned to the Module Parameters dialog. The TARGET parameter will be set to the selected hosts.

figure 44 - Entities Selection
Specifying Port Ranges
Modules that require a set of port numbers to do their work will ask you to provide a value for the PORT RANGE parameter. This parameter can be a list of comma-separated port numbers and ranges (as in "22,23,80,100-200"), a list of predefined port ranges, or a combination of both. Core Impact includes several predefined port ranges:
- DYNAMIC. Includes all the default TCP ports relevant to the currently-installed remote exploits. For instance, if Core Impact only had two exploits, one for SSH and the other for SMTP, then the DYNAMIC port range would be equivalent to "22,25".
- NMap Top 12. Includes the top 12 ports likely to be opened (as identified by NMap - see http://nmap.org/book/nmap-services.html)
- NMap Top 50. Includes the top 50 ports likely to be opened (as identified by NMap - see http://nmap.org/book/nmap-services.html)
- NMap Top 100. Includes the top 100 ports likely to be opened (as identified by NMap - see http://nmap.org/book/nmap-services.html)
- NMap Top 500. Includes the top 500 ports likely to be opened (as identified by NMap - see http://nmap.org/book/nmap-services.html)
- NMap Top 1000 (NMap default). Includes the top 1000 ports likely to be opened (as identified by NMap - see http://nmap.org/book/nmap-services.html)
- tcp-all. Includes all default TCP ports for known TCP services.
Selecting tcp-all will cause the module to check all 65,535 ports, which will add a considerable amount of time to the module's runtime.
You can select any combination of these predefined port ranges by using the Port Range Selection Dialog box. To open this dialog box click on the Value column for the PORT RANGE parameter and click on the ellipsis () button.
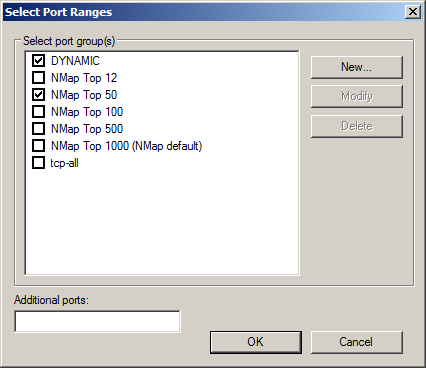
figure 45 - Port Range Selection Dialog Box
To select/unselect a given port range check/uncheck the checkbox to the left of the range's name. You can add an additional range by typing it in the Additional ports field at the bottom of the dialog box.
You can also define additional port ranges and give them a name for future reference. To add a new range, click on the New button. The Port Range Groups dialog appears.
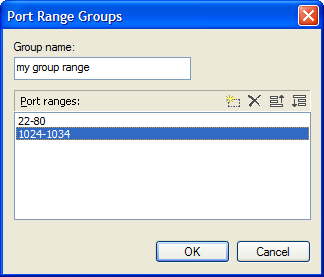
figure 46 - Port Range Groups Dialog Box
To add a new range, click on the  button. When finished click OK. Your new port range will be listed along with the predefined ranges, and you can now use it either by itself or in combination with other port ranges.
Launching Recently-executed Modules
The Console tracks modules you have recently executed and allows you to launch these modules from the Entity View Panel by right clicking on the desired target and selecting a module from the Recent Modules list.
You can also relaunch modules directly from the Executed Modules pane - see Resuming Modules.

figure 47 - Recent Modules Command