A2:2021 Cryptographic Failures
Below we document the steps to test the OWASP A2:2021 Cryptographic Failures security risk only. Use this test to:
- Identify unencrypted data upon successfully accessing a SQL database
- Identify exposed credit card numbers, social security numbers and email addresses
- Define custom searches for other types of sensitive data
- Flag weak encryption in HTTPS-secured sites
Please note that you can combine tests and run more than one on a specific target or set of targets.
-
On the Risk Types dialogs of the Wizard, select A2 - Cryptographic Failures.
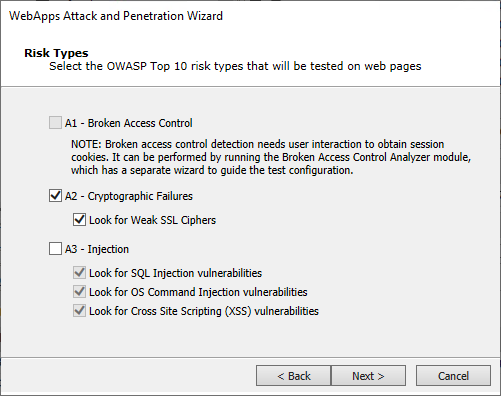
Look for Weak SSL Ciphers: Check this option if you want Core Impact to look also for weak SSL ciphers in the target web pages.
-
Click Next until you are past the Risk Types selection. For the following steps ONLY A2 - Cryptographic Failures and its related options are selected.
If you selected Look for Sensitive Information in documents, this dialog displays to configure.
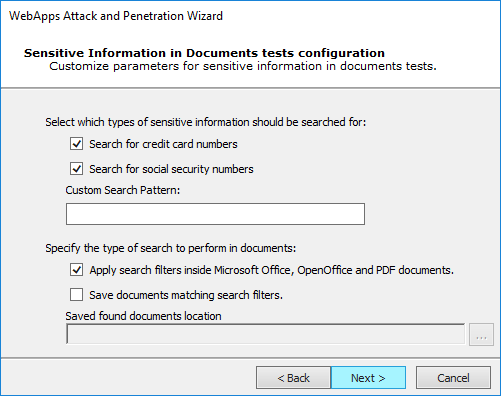
You can instruct Core Impact to Search for credit card numbers or Search for social security numbers in any documents it finds.
Additionally, add a Custom Search Pattern to help Core Impact find specific data - enter an extended regular expression and that would be run across all the HTML pages that the wizard is targeting.
Check the Apply search filters inside Microsoft Office, OpenOffice and PDF Documents option if you want the test to search inside of documents that are linked from the HTML pages.
Check the Save documents matching search filters option if you want Core Impact to save any documents where it locates sensitive data. Then provide a path where the documents should be saved.
Press Next to continue.
-
The final dialog—Session Management—displays.
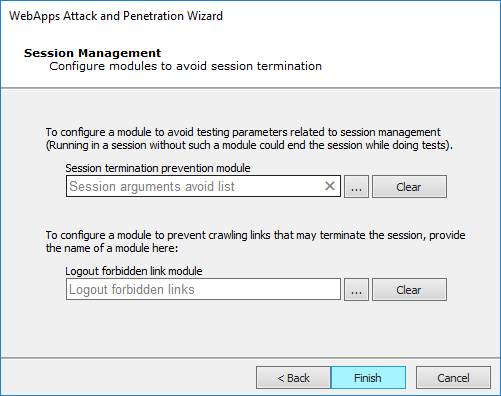
To configure a module to avoid testing pages that could terminate the session, use the ellipsis (
 ) button. By default, the Session arguments avoid list module will be enabled for this purpose. Click the Clear button if you do not want any module to perform this function.
 -
Click the Finish button to begin the test. If you had selected other Risk Types, click Next to make additional configurations.
If the WebApps Attack and Penetration is successful, then WebApps Agents will appear under vulnerable pages in the Entity View. See Interacting with WebApps Agents for information about how to leverage the WebApps Agents. Additionally, if a vulnerability is found, it is assigned a Vulnerability ID which will allow Core Impact users to track reported vulnerabilities after testing. The Vulnerability ID will appear in the ''Information'' pane when the vulnerable web page is selected and also in the name of the agent that is deployed for the page.
You can extend Core Impact's functionality by writing your own custom modules. For more information about writing custom modules, please contact Customer Support (see Contact Support).
Return to WebApps Attack and Penetration.