This procedure provides instructions for creating a user account. For the procedure for creating an EFT Server administrator account, refer to Configuring Server Administrators.
To create a user account
After you have completed the Site Setup wizard, you can continue directly to the User Creation wizard. Otherwise, in the Administrator, connect to EFT Server and click the Server tab.
Do one of the following:
On the main menu, click Configuration, then click New User.
Right-click the Server node or any node within it, then click New User.
On the toolbar, click the New
user icon ![]() .
.
(On Active Directory Sites, if an invalid domain was created, the New User option is disabled.)
The Create New User wizard appears.
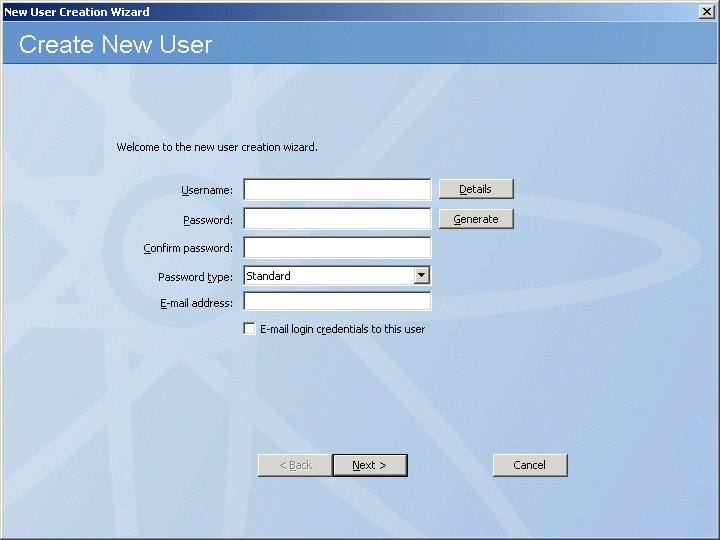
In the Username box, provide the logon name. All characters are supported except the asterisk (*) and the plus sign (+).
(Optional) Click Details. The New User Account Details dialog box appears.
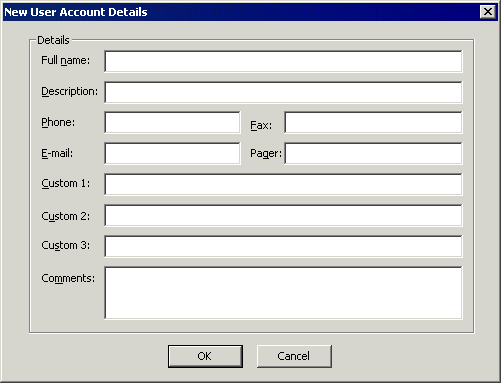
Provide the user account details (name, e-mail, phone, etc.), then click OK to return to the wizard.
The e-mail address is validated when you click OK. If the e-mail address contains invalid characters or does not contain the @ symbol, an error message appears. Click OK to dismiss the error message, then correct the address.
In the Password and Confirm password boxes, provide the account password or click Generate to generate a complex password. If you click Generate, the password appears in the box so that you can provide it to the user.
In the Password Type drop-down list, click one of the following:
Standard - A plain text password is required.
Anonymous - Any password, including nothing, allows an anonymous connection.
Anonymous (Force e-mail) - Any well formed e-mail address is the password.
OTP S/KEY MD4 - Used for logging in to an OTP- One-Time Password. Intended to make it more difficult to gain unauthorized access. By constantly altering the password, as is done with a one-time password, this risk can be greatly reduced.enabled server.
OTP S/KEY MD5 - Used for logging in to an OTP-enabled server.
|
|
PCI DSS (multifaceted security standard that includes requirements for security management, policies, procedures, network architecture, software design, and other critical protective measures) requirement 8.5.8 states that you should not use group, shared, or generic accounts and passwords. To address this requirement, EFT Server hides the Anonymous password types for HS-enabled Sites anywhere that the password type is selectable. |
(Optional) In the E-mail address box, provide the user's e-mail address. If you provided an e-mail address in the New User Account Details dialog box, this E-mail address box is completed automatically.
(Optional) Select the E-mail login credentials to this user check box. Refer to E-mailing User Passwords for details, if necessary.
|
|
PCI DSS requirement 8.5.7 states that you should communicate password procedures and policies to all users who have access. You can edit the default text of the e-mail that is sent when you create a new user (CredentialsTemplate.txt) to include your organization's password policies and procedures. This file is stored in EFT Server's Application Data folder (by default, C:\Documents and Settings\All Users\Application Data\GlobalSCAPE\EFT Server Enterprise.) |
Click Next. The memberships page appears.
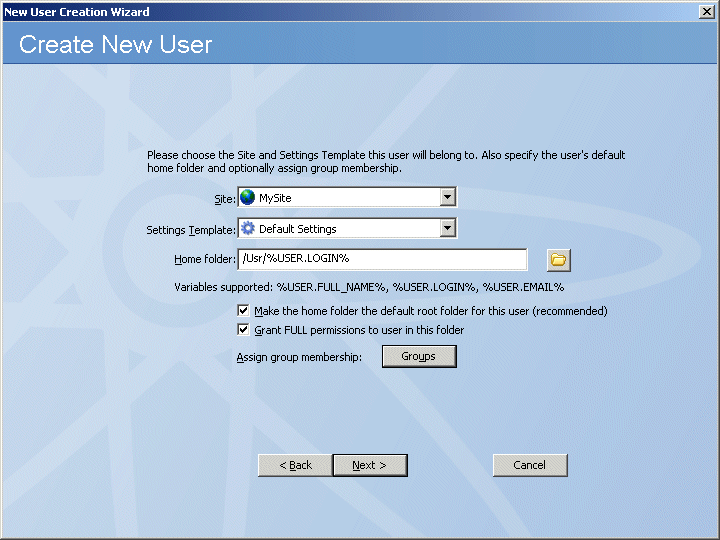
In the Site drop-down list, click the list to select the Site to which you want to add the user. If only one Site is defined, or if you clicked in a Site tree before clicking New User, the Site's name is displayed in the list box.
Click the Settings Template list and click the Settings Template to apply to the new user. All new users are automatically members of the Default Settings Template. You can move the user to a different template later if you have not yet defined a custom Settings Template.
In the Home
folder box, type or click the folder icon ![]() to browse for and select a path (from the
relative Site root) to the user's home folder. The default path is in
the Site root /Usr/%USER.LOGIN%.
You can also add the variables %USER.FULL_NAME%
and %USER.EMAIL%
to the path. You cannot
navigate up past the Site root and no verification is performed
to determine whether the path is valid.
to browse for and select a path (from the
relative Site root) to the user's home folder. The default path is in
the Site root /Usr/%USER.LOGIN%.
You can also add the variables %USER.FULL_NAME%
and %USER.EMAIL%
to the path. You cannot
navigate up past the Site root and no verification is performed
to determine whether the path is valid.
|
|
If you use /Usr/ as the account's home folder (and remove the default %USER.LOGIN%) and clear the Grant FULL permissions to user in this folder check box, the account will inherit the permissions of the /Usr/ folder, which are Show this folder in parent list and Show files and folder in list. The account will not have permission to upload, download, and so on. Refer to Setting VFS Permissions for details of setting permissions on individual accounts. |
The Make the home folder the default root folder for this user check box setting is inherited from the User Settings Template/Site, but you can override the setting. If you do not want the user to have a home folder, clear this check box. Select the check box to make the home folder the user's default root folder.
Select the Grant the user full permissions in their home folder check box if you want the user to have full permissions to their home folder.
|
|
If you do not grant users full permissions to their home folders, they will inherit their Group's permissions. |
Next to Assign group membership, click Groups. The Group Membership dialog box appears.
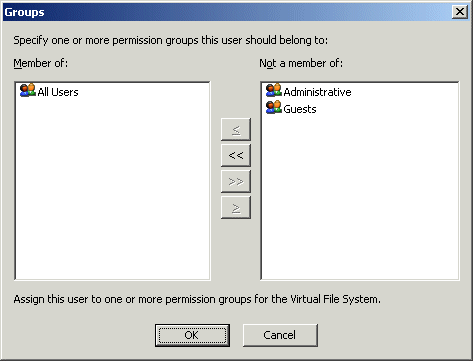
Permission Groups are used in the Virtual Folder system to assign permissions to users. Each user is assigned to the All Users group. To assign the user to one or more other Groups, double-click the Group or click the Group and use the arrows to move the Group between the Member of and Not a member of boxes, then click OK.
Click Next. The protocols page appears.
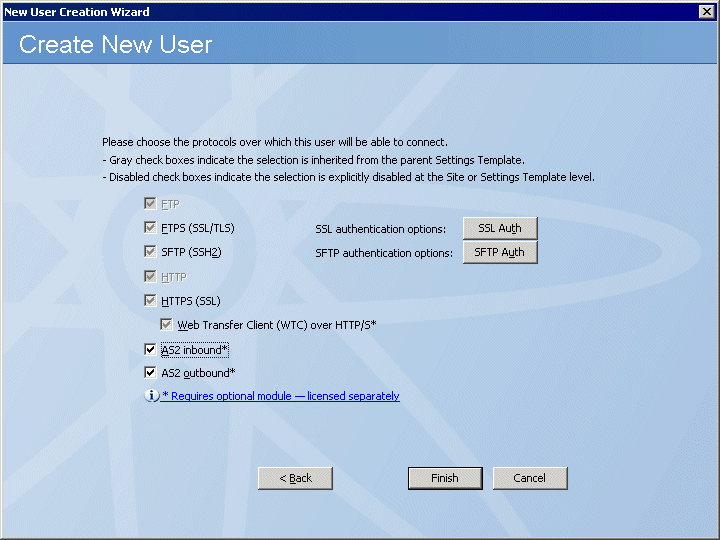
Select one or more check boxes next to the protocols on which the user is allowed to connect to EFT Server. (At least one check box must be selected.) The grayed-out check boxes indicate inherited settings from the Settings Template and Site. Clear the check boxes next to the protocols on which the user is not allowed to connect to EFT Server. If the text next to the protocol is also grayed out, the protocol has not been enabled for the Site and is not available.
If you selected any SSL protocol check boxes, click SSL Auth to configure SSL authentication options for this user, if different from the Site/Settings Template.
If you selected the SFTP check box, click SFTP Auth to configure SFTP authentication options for this user, if different from the Site/Settings Template.
Click Finished. The user account appears in the tree and is selected.
To create more users, repeat the procedure above starting with step 2.
Adding or Removing Users to or from a Group