![]()
In version 6.2 and later, IP address policy changes are propagated to the DMZ Gateway whenever the policy is modified in the administration interface or by the auto-ban logic.
|
This online help file is for EFT Server version 6.2.x. For other versions of EFT Server, please refer to http://help.globalscape.com/help/index.html. (If the Index and Contents are hidden, click Show Contents pane in the top left corner of this topic.) |
By default, all IP addresses are granted access to EFT Server. EFT Server allows you to grant access to only one specific IP address or a range of IP addresses, or deny access to one specific address or a range of addresses. EFT Server can control TCP/IP access at EFT Server, Site, or Settings Template, or per user.
|
In version 6.2 and later, IP address policy changes are propagated to the DMZ Gateway whenever the policy is modified in the administration interface or by the auto-ban logic. |
To grant/deny access by IP Address on a Site
In EFT Administrator, connect to EFT Server and click the Server tab.
In the left pane, click the Site, then click the Connections tab.
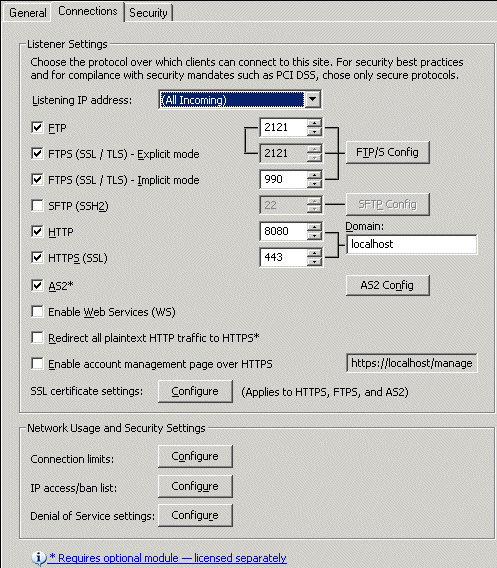
In the Network Usage and Security Settings area, next to IP access/ban list, click Configure. The IP Access/Ban List dialog box appears.

The table under Except those listed below displays IP addresses that are granted or denied access.
|
If an IP address appears in this list that should not have been banned, you can delete it from the list by clicking it, then clicking Remove. For more information about how IP addresses are banned, refer to Disconnecting Users after a Defined Number of Invalid Commands, Banning an IP Address that Uses an Invalid Account, and Flooding and Denial of Service Prevention. |
Select the Restrict IP Access check box. (You can unrestrict IP access by clearing the check box without clearing the exceptions list.)
Click granted access or denied access, then click Add. The IP Mask dialog box appears.
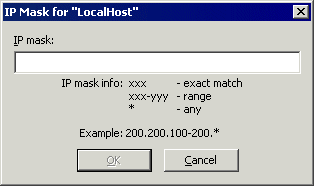
In the IP mask box, specify the IP address or range of IP addresses to deny or grant access to the Site. You can use wildcards to select ranges of IP addresses.
Click OK to close the IP Mask dialog box. The IP address/mask appears in the exceptions list.
Click Apply to save the changes on EFT Server.
Controlling IP Access for Remote Administration
Controlling User Access by IP Address