![]()
The Migration wizard is not available in EFT Server "SMB" edition. Refer to Copying Server Configuration to Several Computers to backup EFT Server configuration manually.
When migrating from a development, staging, or test computer to another computer, you cannot simply copy over EFT Server's configuration files to the new host. In EFT Server Enterprise edition, you can use the Migration wizard to gather each of the necessary files, then package them into one easy-to-transport file. The Migration wizard can recreate the entire folder structure and settings automatically or you can run it in manual mode and verify every setting as you step through the wizard. (Physical folders under the VFS are not recreated when the configuration is restored; however, IF those physical folders are present at the time of restoration, then any VFS permissions assigned to the folders are retained.)
|
|
The Migration wizard is not available in EFT Server "SMB" edition. Refer to Copying Server Configuration to Several Computers to backup EFT Server configuration manually. |
The Migration wizard is an interactive tool designed to assist you in the following situations:
Performing Disaster Recovery. If the production Site is corrupted and configuration is lost, damaged, or destroyed, the wizard can assist you with restoring EFT Server to a prior working state.
Migrating from staging to production or to new hardware. If you want to move EFT Server from a staging or development box to a production server or have set up a Server with one or more Sites on one computer and want to move it to another computer or a different network location, the wizard can assist you with gathering all the necessary files for a successful move.
|
|
If you are migrating from a test environment to a production environment and do not need to keep the test environment's Server, Site, and user configuration settings, you do not need to use the Migration wizard. You can just start from scratch, and run the Server, Site, and New User wizards on the new system. |
Backing up for disaster mitigation (routine backups, or backup prior to major changes). The wizard can backup all necessary configuration if the administrator needs a backup to be readily available and requires automatic backup at least once a day. The Migration wizard can also help if a major change is about to be made, such as a new version installation or new hardware changes to EFT Server computer, and you need a mechanism to manually backup the current configuration. The Migration wizard can take a snapshot immediately before the major change takes place, in addition to the automatic daily backups.
The migration fails if there is a mismatch/discrepancy in listening IP addresses, VFS root or structure, Authentication Manager settings, DMZ Gateway settings, or database connectivity.
The Migration wizard backs up the entire EFT Server configuration in an archive file at a path that is accessible to the EFT Server service.

The following items are backed up:
The configuration files
All certificates and keys that are pointed to from configuration file
Any custom reports
All registry overrides (for special settings)
The \web folder (to capture any customizations)
Entire VFS structure (physical folders recreated only under the Site root, not those pointed to by virtual folders)
Any Advanced Workflows created
The wizard can be initiated manually in the EFT Server administration interface from the File menu or automatically in Event Rules. In EFT Server Enterprise, when you create your first Site, a Timer Rule is created that runs the Backup Server Configuration Action once a day at midnight, using all defaults for naming and backup location (\backup\Server Configuration Backup [Month] [Day] [Year].bak). The Rule includes a Cleanup Action to delete backup files (*.bak) older than 30 days in that same folder. This Backup and Cleanup Rule is enabled by default, but you can disable it and edit it as necessary.
|
|
It is a good idea to save the backup on a drive other than on the one on which the EFT Server is installed. If EFT Server's hard drive fails, you will want to use the backup to restore configuration. Refer to Backup Server Configuration Action for details of editing the Backup and Cleanup Rule. |
To manually back up Server configuration
On the main menu, click File > Backup Server Configuration. The standard Save As dialog box for your operating system appears.
Specify the location in which to save the backup, then click Open. Save the backup on a drive other than on the one on which the EFT Server is installed. The configuration is saved and is named Server Configuration Backup [Month] [Day] [Year] with a .bak extension.
One of the following occurs:
A "backup successful" message appears. Click OK to dismiss the message.
A failure message appears. Restart the EFT Server service, then run the backup again.
To restore Server configuration
You can specify either Automatic Restore to prompt only when the wizard encounters discrepancies or problems with restoring, or Manual Restore, which allows you to verify and make changes to settings, as needed. Automatic Restore is the default setting. In automatic mode, you are not prompted to verify settings or allowed to change them. Review the Manual Restore procedure below for details of the settings that are verified during restore.
|
|
Any configuration changes made since the backup are, obviously, not included in the restore. For example, if you have deleted or added users since the last backup, those users will have to be deleted or added again after you restore. |
Install and activate the product on the target system, if restoring to a different computer.
After installation is complete, the New Administrator Connection wizard appears. You must configure the local connection (create the LocalHost Server object in the tree) before you can restore from backup.
In the Connection wizard, leave This computer selected, and specify the Label for the local connection. By default, the label is LocalHost. Because LocalHost is a very common label, it is a good idea to change the label to something that is easily identifiable in error logs, reports, and remote connections. For example, GS_EFTS. You can label EFT Server anything you want; the EFT Server name is not dependent upon the computer name.
After you are logged in to EFT Server, do one of the following:
In the Server Setup wizard, click Restore from Backup.
On the main menu, click File > Restore Server Configuration.
The Migration Wizard appears.
Click the folder icon ![]() to specify the .bak file to use for restoring Server configuration.
to specify the .bak file to use for restoring Server configuration.
Provide the administrator login credentials for the configuration being restored, then click OK. (You can use the EFT Server administrator credentials, Windows Authentication, or the currently logged on user's credentials.) The path to the backup file appears in the Backup file location box. The Selected Archive Details area displays the date the backup was made and the username that created the backup, if it was a manual backup, or "Automatic Recurring Backup" if it was an Event Rule-created backup.
Click Next. The Restore Options page appears.
Automatic Restore
Click Automatic Restore. The Recreate the entire folder structure check box is selected by default. Clear this check box if you do not want to recreate the VFS folder structure.
|
|
If your EFT Server folder structure includes user folders (e.g., C:\Inetpub\EFTRoot\MySite\Usr\<username>), if you clear the Recreate the entire folder structure check box and do not recreate these folders manually, the users will not be able to access their folders. |
Click Next. The Ready to Restore page appears. Read the information on the page, then click Restore.
After the Server is restored, restart EFT Server and log in to the administration interface. A log appears describing the restore process, including file names and paths, and contains any errors encountered during restore.
Manual Restore
Click Manual Restore, then click Next. The Sites to Restore page appears.
Select the check boxes of the Site(s) whose settings you want to import and clear the check boxes of the Site(s) whose settings you do not want to import, then click Next. The Site Listening IP Address Assignment page appears.
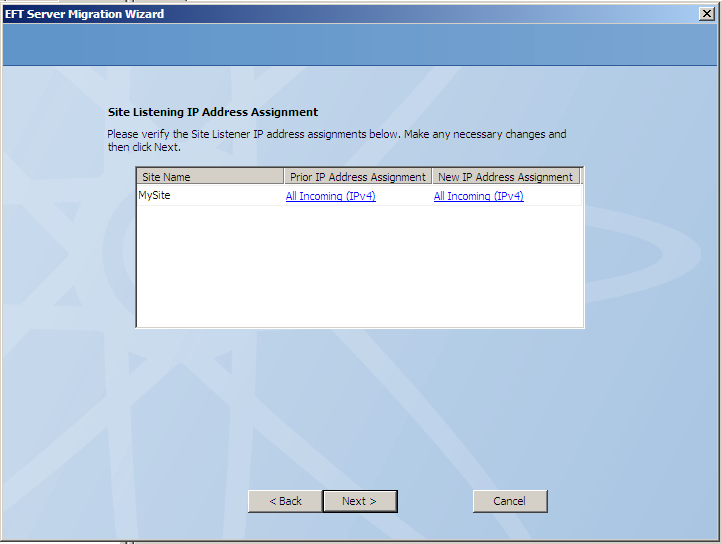
Review the IP address for each Site. If you are restoring a Site to a different IP address, click to edit the IP address in the New IP Address Assignment list. The Listening IP Address Assignment dialog box appears.
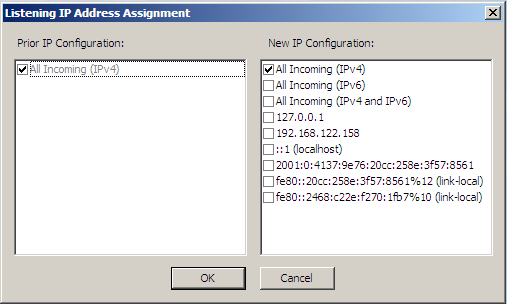
In the New IP Configuration box (right pane), select the check box of one or more the IP addresses to use, then click OK.
Click Next. The Site Authentication Manager Settings page appears.
The authentication database for each Site to be restored appears in the list. In the Settings column, click View/Modify if you want to view or change the path where EFT Server will store the user database. (You cannot change the type of authentication.)
If EFT Server cannot connect to the Site's authentication provider, an error message appears.
Click OK to continue as is or click Cancel to modify the authentication provider settings.
Click Next. The Site Root Folder page appears.
Review the root folder location for each Site that you are restoring. If necessary, click the folder icon to specify a different location, then click Next.
If the DMZ Gateway is defined and configured in EFT Server that you are restoring, the DMZ Gateway page appears. Otherwise, you will skip this step.
Review the IP address(es) and port(s) for the DMZ Gateway. Click to edit the IP address or port, if different.
Click Next. EFT Server will test the DMZ Gateway connection and, if successful, the wizard proceeds to the next page.
If a failure occurs, the wizard displays a warning prompt indicating failure to connect to the DMZ Gateway and allowing you to either fix the problem (go back to the previous page to verify the IP address and port) or proceed anyway (if the IP address and port are correct, but the DMZ is not communicating).
If the Auditing and Reporting module is defined and configured in EFT Server that you are restoring, the Auditing Database Connectivity page appears. Otherwise, you will skip this step.
Click Test to verify connectivity to Auditing and Reporting Module queue and, if successful, send an asynchronous test message to the database. If a connection to the database cannot be made within 5 seconds, a warning prompt appears. (Verify that the database is available.)
Click Next. Database connectivity is again verified and the Ready to Restore page appears.
Read the information on the page, then click Restore.
After the restore is complete, restart the EFT Server service. After you restart the Server service and log back in via the administration interface, the restore log appears in the default text editor.
Review the log in case errors were encountered during restore.