Before you make any changes to the Web Transfer Client (WTC) files, make a backup copy of any files and images that you plan to edit. Deleting or incorrectly editing the WTC files can render the client unusable. When you upgrade to a new version of EFT Server, copy the *changes* to the new files; do not overwrite the new files with your custom files as numerous updates will have been made.
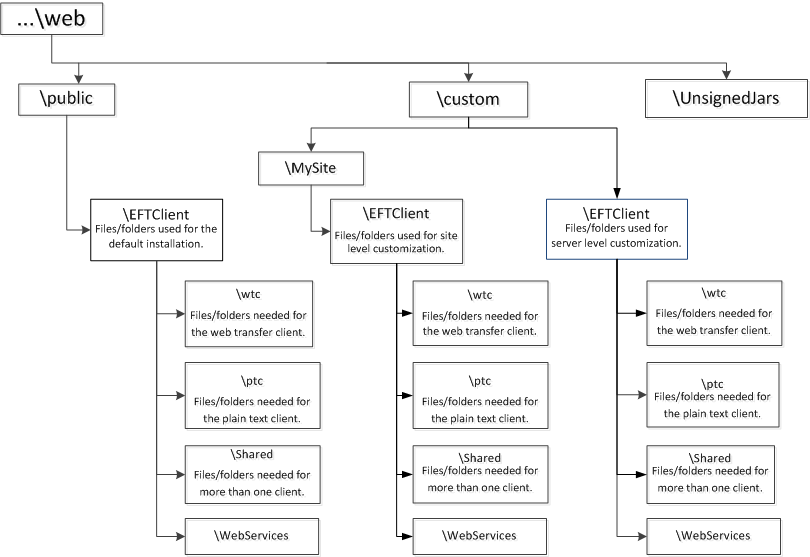
EFT Server provides for custom branding of the per-Site and per-Server login page, WTC interface, Plain-Text Client (PTC), Account Management interface, and AS2 Management interface. Once the appropriate files are edited, you can save them in the \custom\ directory for the Site and\or Server. Each file is searched for independently, so you could have some files branded on the Server (under \custom\EFTClient\), others branded on the Site (under \custom\MySite\EFTClient\), and the balance left as they were originally installed (under \public\EFTClient\).
EFT Server first looks in the Site's custom (branded) directory \web\custom\MySite\EFTClient and loads any branded files. For files that are not present in the Site's \custom\ directory, EFT Server checks the Server's \custom\ directory, \web\custom\EFTClient\, and loads the files that it finds there. Finally, for any other files, it will load the default files from \web\public\EFTClient\. Branded files that are Site specific override any Server-wide branded and default files, while branded files that are Server-wide override the default (GlobalSCAPE-branded) files provided by the installer.
Upon initial installation, this \custom\ directory is empty. You must create the directory structure for any Server (\custom\EFTClient\) or Site (\custom\MySite\EFTClient\) branded files. If you have multiple Sites, each Site can have different branding (e.g, one can be in English and one in French).
The best practice is to have only customized files in the \custom\ folder and to leave the default files unmodified in the \web\public\EFTClient folder.
The Site folder \web\custom\[SiteName]\EFTClient\ should hold just those files that contain customizations for that Site.
The Server folder \web\custom\EFTClient\ should hold just those files that contain customizations for the Server.
The Server-branded files will apply to all Sites defined on the Server, but any Site-branded files will override the Server-branded files.
It is not necessary to restart the Site or Server to see your changes, but you will have to refresh your browser.
Below is an illustration of the folder hierarchy:
To customize files on the Server
Create an \EFTClient\ folder in the \custom\ folder.
Copy only the default files that you want to edit (rebrand) for the Server into the \custom\EFTClient\ folder that you created. (It is not necessary to copy all of the default files.)
Edit the copy of the file and save it in the \custom\EFTClient\ folder.
The WTC and PTC files can be modified independently.
For example, suppose you wanted to rebrand the PTC from English to French:
Copy the EFTWebClientPlainText.htm file from \web\public\EFTClient\ptc to \web\custom\EFTClient\ptc.
Edit the copy of the file to rename the buttons from English to French. For example, change the word "Upload" in:
<button class="fg-button ui-state-default fg-button-icon-left ui-corner-left fg-button-toggleable" type="button" id="uploadButton" title="Upload" ><span class="ui-icon ui-icon-circle-arrow-n"></span>Upload</button>
to "Envoyer":
<button class="fg-button ui-state-default fg-button-icon-left ui-corner-left fg-button-toggleable" type="button" id="uploadButton" title="Upload" ><span class="ui-icon ui-icon-circle-arrow-n"></span>Envoyer</button>
Save the file, then reload the PTC browser page. Your buttons are now in French!
(If you wanted to make only one of your Sites French, you would copy the file to \web\custom\SiteName\EFTClient\ptc INSTEAD of \web\custom\EFTClient\ptc.)
To customize files on the Site
Create a directory structure in the form [SiteName]\EFTClient\ in the \custom\ folder.
Copy only the default files that you want to edit (rebrand) into the \custom\SiteName\EFTClient folder that you created. (It is not necessary to copy all of the default files.)
Edit the copy of the file and save it in the \custom\SiteName\EFTClient\ folder.
When upgrading, the \custom\ and \public\ folders are backed up and renamed with the date and time (e.g., \customBackup_9-28-2010_16-18\ and \publicBackup_9-28-2010_16-18\).
If you lack the resources to edit CSS and HTML pages yourself, GlobalSCAPE's Professional Services group can create custom web pages for you.
For information about HTML and CSS files, refer to the MSDN reference at http://msdn.microsoft.com/en-us/library/aa155133.aspx.
Enabling User Access to the Web Transfer Client
Enabling the (EFT Server) Account-Management Page
AS2 Account Information Web Page
File Location Changes (changes from previous versions)