![]()
![]()
EFT Server comes with a built-in upload form that uses the POST method. When HTTP or HTTPS transfers are enabled in the Administrator interface and your users have permission to upload to EFT Server using HTTP or HTTPS, they can upload files to their home directory via a Web browser using the HTML Listing and Upload form. The form automatically appears when you connect to EFT Server via a Web browser, with your home folder as the root.
|
|
If you are sending files with the Secure Ad Hoc Transfer (SAT) module and using Single-Click Authentication,, SAT creates the Single-Click link and sends it to the user. When the user follows the link, the HTML Listing and Upload form appears. |
Limitations of the upload form include:
Inability to mass transfer files
Inability to rename or delete files
Inability to create folders
Follows Windows file-naming conventions; does not allow Unicode characters
The size of file uploads is limited by the setting in the Settings Template or user account and the fact that you are using HTTP to upload files. Browser-based uploads are limited to a 2GB or less file size.
EFT Server checks the size of the uploaded file and will close the connection if it exceeds the 2GB limit. The browser stops the transfer process upon the connection closing, and informs the user of the broken connection. (The over-size-limit error message sent by EFT Server will not be received by the browser, just the information regarding the broken connection.)
If the Web Transfer Client (WTC) is installed, enabled, and has licenses available, the WTC appears instead of the HTML listing and upload form. The WTC benefits include resume support, a transfer queue, sending multiple files concurrently (as opposed to sequentially), no file-size limit, drag-and-drop support, and integrity validation.
|
|
Ensure the Windows Firewall on the EFT Server computer is not blocking Web access. In most Windows operating systems, the Windows Firewall is turned on by default. |
To access the HTML listing and upload form
In a Web browser, type or paste the URL for EFT Server. If you are using an HTTP or HTTPS port other than the default, you also have to provide the port number in the URL. (For example, type:
http://10.0.0.124:8080/
The HTML listing and upload form appears.
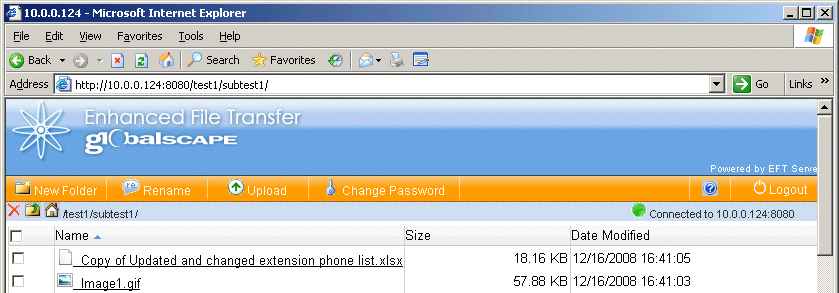
The orange toolbar provides options to create a New Folder, Rename a file, Upload a file, Change Password, Logout, or access the help file.
The blue toolbar provides options to delete a file
![]() ,
go up a folder
,
go up a folder ![]() , and go to your home folder
, and go to your home folder ![]() . Next to the home folder icon, your location
is listed. If only a forward slash appears, /,
you are in the home folder.
. Next to the home folder icon, your location
is listed. If only a forward slash appears, /,
you are in the home folder.
To upload a file
Click Upload. The Upload bar appears. (To close the Upload bar, click Upload again.)
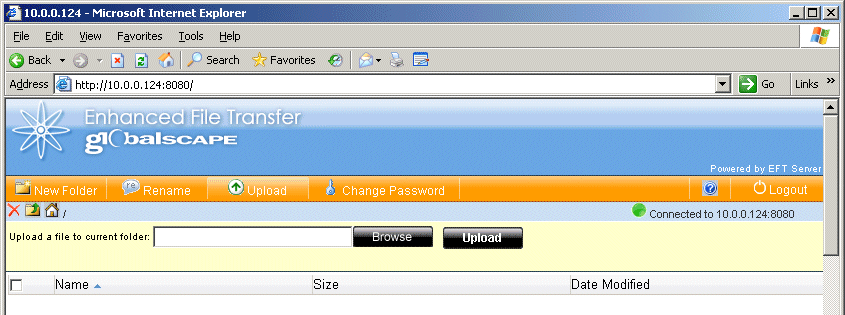
Click Browse. A standard Open dialog box (depending on your operating system) opens to your My Documents folder.
Click a file to upload to EFT Server, then click Upload. The file is uploaded to EFT Server and appears in the file listing.
To download a file
Click a file name/link. A standard File Download dialog box appears (depending on your operating system).

Click Open to open the file (if you have the program necessary to view it), click Save to save the file to your hard drive or a network location, or click Cancel to cancel the download.
To rename a file or folder
Select the check box next to the folder or filename, then click Rename. The Rename dialog box appears.
Click in the New Name box, type a new name for the folder or file, then click OK. The folder or file is renamed.
To delete a file
Select the check box next to the filename, then click
the delete icon ![]() . A confirmation message appears.
. A confirmation message appears.
Click OK to delete the file or Cancel to keep the file.
To create a new folder
Click New Folder. A dialog box appears in which you can type a name for the folder.
Click OK. The folder appears in the tree.
To change your password
Click Change Password. The Change Password dialog box appears.
In the Old Password box, type the password that you used to log in to the Web Transfer Client.
In the New Password box, type a new password.
In the Confirm Password box, type the new password again.
Click Change Password to verify the new password or Cancel to keep your current password.
If the new and confirm passwords do not match, an error message appears. Click OK to try again.
If the new password is the same as any of your previous passwords (depending on password history settings), a message appears and the password is not changed. Click OK to try again.
If the new password is accepted, the Password Accepted message appears and you are logged out of EFT Server. Click OK to continue.
The login dialog box appears. Type your new password, then click OK to log back in to EFT Server.
To logout
Click Logout. A message box appears explaining that you have been logged out of EFT Server, and reminds you that for extra security, you should close the browser.
Click Exit. If a confirmation message appears, click OK. The browser closes.
You can customize the HTML Listing and Upload form to suit your needs. For example, you can change the GlobalSCAPE logo to your logo. Be sure to change only the HTML between the <body> tags. Changing content within the <head> tags could make the HTML Listing and Upload form unusable.
The safest way to edit the form is to make a backup copy first, then make one change at a time so that you can more easily back out the changes you make, if necessary.
The files that make up the HTML Upload and Listing page are stored on the EFT Server computer:
C:\Program Files\GlobalSCAPE\EFT Server Enterprise\Client\EFTWebClientPlainText.htm is the HTML page that defines the HTML Upload and Listing page.
C:\Program Files\GlobalSCAPE\EFT Server Enterprise\Client\EFTPlainTextClientRes\ contains the resources (images, JavaScript, etc.) for the HTML page.
banner.png is
the EFT Server/GlobalSCAPE logo in the upper left corner

You can replace that with your own logo if you make your logo the same dimensions (320 x 63 pixels).
The text "Powered by EFT Server" can be replaced in EFTWebClientPlainText.htm.
The text "Connected to <%host_ip%>:<%host_port%>" can be edited in EFTWebClientPlainText.htm. If you want to display the IP address of EFT Server, do not edit the variables "<%host_ip%>:<%host_port%>". If you want to hide the IP address of EFT Server, delete or comment out "to <%host_ip%>:<%host_port%>".
To replace the GlobalSCAPE logo with your logo
Edit your company logo so that it is 320 x 63 pixels and save it in C:\Program Files\GlobalSCAPE\EFT Server Enterprise\Client\EFTPlainTextClientRes\.
In C:\Program Files\GlobalSCAPE\EFT Server Enterprise\Client\EFTWebClientPlainText.htm, find the following text:
<img alt="GlobalSCAPE Enhanced File Transfer" src="/EFTClient/EFTPlainTextClientRes/banner.png" style="width: 320px; height: 63px" />
Replace banner.png with the filename of your logo.
(Alternately, just name your logo banner.png and replace the GlobalSCAPE banner.png. Be sure to save a backup copy of the logos in another location.)
|
|
You will not be able to see your changes in a WYSIWYG editor. You will have to copy the changes to the EFT Server installation folder, then refresh the browser to see the changes. (It is a good idea to save a copy of all original files so you can revert to it them if necessary.) |