![]()
![]()
You can create an e-mail notification action for Event Rule and AS2 Transaction success/failure notifications. The default text is shown in the dialog box below. To save time, you can create an e-mail notification template.
|
|
On Sites using AD Authentication, the EFT Server must have "Log On as a domain user" permission in order for e-mail notifications to work. |
To customize an Event Rule e-mail message
Follow the procedure in Creating Event Rules to create a new Rule or select an existing Rule to which you want to add the Action.
|
|
If you want to copy the involved user when the event is triggered, the Rule must be based on a User Event. |
In the Actions list,
double-click Send notification email or
click it, then click Add Action.
The Action is added to the rule as  .
.
Click the [select] link. The E-Mail Notification Message dialog box appears. The To box displays the first e-mail address defined in EFT Server's address book on the SMTP tab.

The Select Names dialog box is populated with names and e-mail addresses defined on EFT Server in user account details and the SMTP tab. Do the following to specify recipients:
In the TO, CC, and BCC boxes, type the e-mail address of the intended recipients.
Click TO, CC, or BCC. The Select Names dialog box appears.
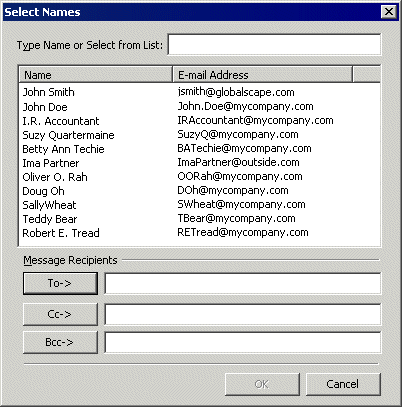
In the Type Name or Select from List box, type a name to search for.
Select one or more recipients, then click CC, or BCC. For multiple selections, press SHIFT (contiguous) or CTRL (non-contiguous).
Click OK to save the changes.
In the Subject box, type a descriptive "title" for the e-mail to indicate to the recipient the purpose of the e-mail. You can also add variables. For example, if you want to see the reason an Event was triggered without opening the e-mail, add the variable %EVENT.REASON% to the Subject line.
For example, if you add the following text and variables to the Subject Line:
EFT Server Notification: %EVENT.NAME%: %USER.LOGIN%, %EVENT.REASON%
when username jbug uses the wrong password, an e-mail is sent with the following Subject line:
GlobalSCAPE EFT Server Notification: User Login Failed: jbug, Invalid password
|
|
%EVENT.NAME% is the Server-defined name for the Event (e.g., File Renamed); %EVENT.EVENTNAME% is the user-defined name for the Event (e.g., My File Renamed Event Rule). Also, be aware that your recipient might get hundreds of e-mails every day; therefore, "Here's the info you wanted" might not be descriptive enough. |
In the Message box, type the text of the e-mail. You can use HTML tags within the body of the e-mail. (Be sure to include the opening and closing <html> and <body> tags.) You can also define an e-mail template for common e-mails and provide a link to the template in the Message area. If the account to which the e-mail is sent accepts HTML-formatted e-mail, you can format the e-mail to suit your needs; you are only limited by your knowledge of HTML.
Refer to Creating an E-mail Notification Template for details of creating an e-mail template. (If the recipient's e-mail server does not accept HTML e-mail, the recipient will see the e-mail in plain text.)
In the Variables box, click a property that you want to insert in the e-mail message. The text surrounded by percent signs, the context variable, is inserted into the body of the e-mail, and will be replaced by EFT Server with specific information about the Event when the e-mail is sent. Review the available Variables when deciding which variables to add, because some variables cannot be used in e-mail notifications.
If you just want the information contained to the variable in your e-mail message, click the context variable in the right column of the Variables box. (For example, if you select %EVENT.TIME% in the right column, the time will be displayed without a text label.)
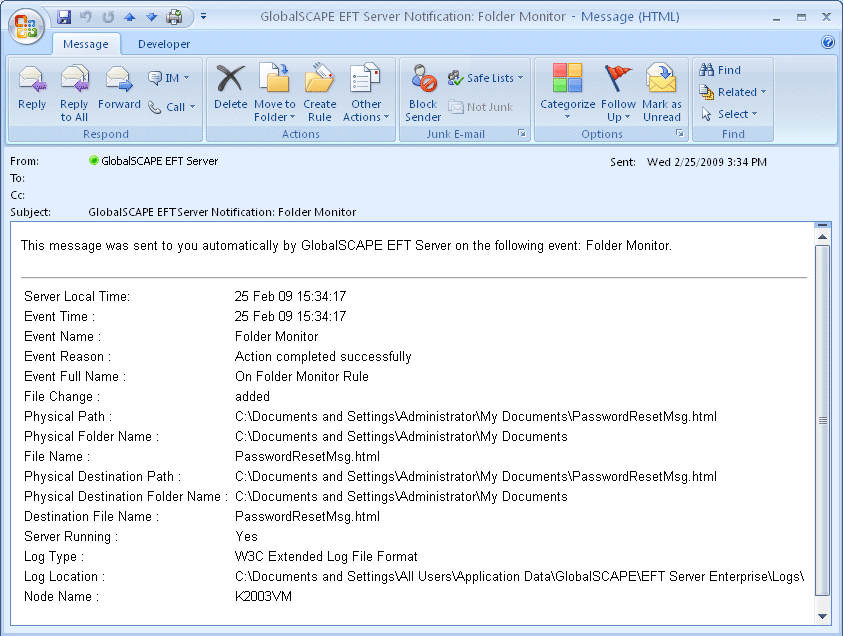
If you want the information and a label, click the text in the left column of the Variables box. (For example, if you click Event Time, the label and the time appear in the e-mail, as shown in the illustration below).
If this is a User event and you want to send a copy of the message to the involved user, select the CC Mail Notification to user check box.
If you want to specify a different address than the prepopulated one from the SMTP tab, select the Over From Field check box, then specify the address.
Click OK.
Click Apply. When the event occurs, the e-mail notification is sent and may look similar to the one below, depending on how you configure the e-mail.
Creating an E-mail Notification Template