
Variables can be used to represent data in a Workflow that might be different from computer to computer. Variables can be modified during a Workflow's execution and can be used to represent and store data that might be different each time the Workflow is run. Once you have created a variable, it becomes available for use in other steps of the Workflow. It also appears in drop-down lists in places where a variable can be entered, and it can be used in expressions by placing the variable name between percent signs (%).
To use create a variable
In EFT Administrator, connect to EFT Server and click the Server tab.
In the left pane, expand the Site node for the Site that you want to configure, then click the Advanced Workflow node.
Edit a Workflow or create a new Workflow to open the Workflow Designer.
Do one of the following:
On the main menu, click Insert > Create Variable.
Click the Variables tab, right-click, then click Add Variable.
Press CTRL+ALT+V.
The Create Variable dialog box appears.
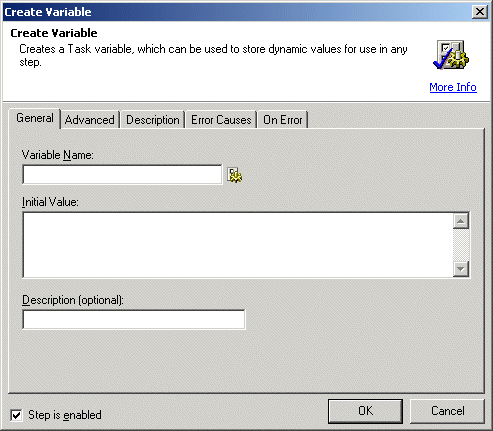
In the Variable Name box, type the name of
the variable or click the Expression
Builder icon ![]() to define an expression. Names must begin with a letter,
can contain only alphanumeric characters, and cannot contain spaces. Place
a percentage sign (%) at the beginning and end of the variable name. Be
careful that variable names used do not conflict with a BASIC keyword,
function, or instruction. A way to avoid this is to insert unique text
to the beginning of all variables names. For example, type My
in front of all variables so that %DATE%
(which is a BASIC keyword) would become %MyDATE%
thus avoiding any name conflict.
to define an expression. Names must begin with a letter,
can contain only alphanumeric characters, and cannot contain spaces. Place
a percentage sign (%) at the beginning and end of the variable name. Be
careful that variable names used do not conflict with a BASIC keyword,
function, or instruction. A way to avoid this is to insert unique text
to the beginning of all variables names. For example, type My
in front of all variables so that %DATE%
(which is a BASIC keyword) would become %MyDATE%
thus avoiding any name conflict.
In the Initial Value box, type the initial value of the variable or leave it blank for null. The value can be literal or an expression, if surrounded by percent % signs. For example, %Date%.
In the Description box, type a description of the variable to remind yourself and others what the variable is used for.
Click the Advanced tab
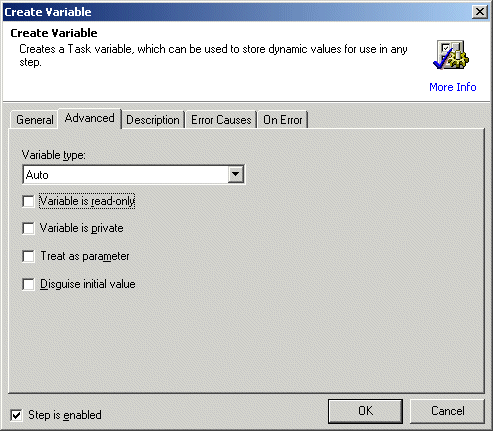
In the Variable type area, specify whether the variable is Text or a Number, or leave the default of Auto.
Select or clear the check boxes as needed:
Variable is read only (Optional): Specifies that the variable is not able to be set to a value other than that specified in the Initial Value parameter. Selecting this option is equivalent to creating a Workflow specific constant.
Variable is private (Optional): Specifies that the variable is only available to the current Workflow and not to sub Workflows started with the Start Workflow action. If this value is left unselected (default) the specified variable will be available to sub Workflows.
Treat as parameter (Required): Specifies that the variable will only be created if it does not already exist. This is particularly useful when a Workflow may have parameters passed to it at runtime (that is, variables of the same name will be created automatically) but a default value should be assumed when debugging and parameters are not present.
Disguise initial value (Optional): Specifies the value that the variable should be set to initially. As with all parameters, this value may be literal or an expression (if surrounded by percent % signs).
Click the Error Causes tab.
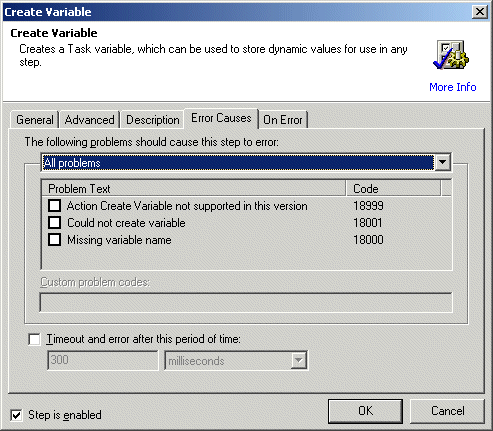
Specify what to do in case of certain errors. In the following problems should cause this step to error box, click the down arrow and click All problems, Selected problems, or All except selected.
If you chose Selected problems, or All except selected, in the Problem Text area, select the check box(es) for the situation(s) that could cause an error, such as Could not create variable or Missing variable name.
Select the If step takes more than this many milliseconds to complete check box if you want to trigger an error when the step takes longer to process than the number of milliseconds that you specify. 300 milliseconds is the default.
Click the On Error tab.
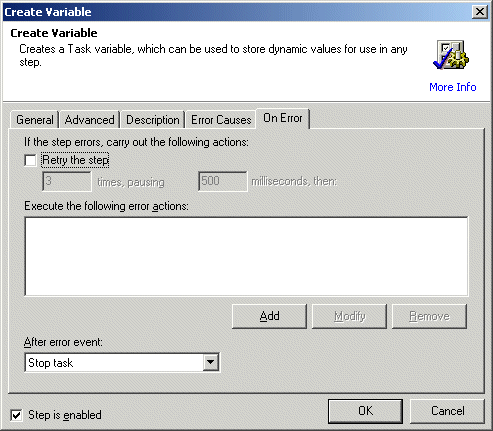
If you want to try the step again on errors, select the Retry the step check box, then specify the number of times to retry the step, the error actions:
Beneath the Execute the following error actions box, click Add. The Error Action dialog box appears.
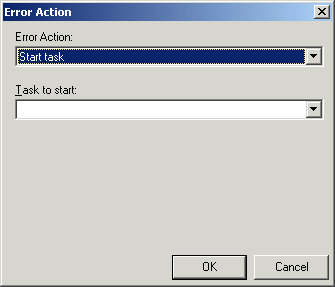
In the Error Action box, click an action to perform. The Task to start box changes depending on your selection in the Error Action box. For example, if you specify Write to Windows Event Log, Task to start changes to Text, and you can specify the text that is to appear in the Windows Event Log when this Workflow errors.
In the After error event box, specify the action to carry out if the step errors: Stop task, continue to next step, Break loop, goto label, or goto step.
Click OK to create the variable.