In the Administrator, connect to the server, then click the Server tab.
In the left pane, click the Site, then click the IP
Access tab.
The TCP/IP Access Restrictions
area displays the IP addresses that are granted or denied access. By default,
all IP addresses are granted access.
|
|
If the Ban IP address after excessive invalid commands check box is selected on the Site's Advanced tab, and a user triggers this action, their IP address will appear in this list. If the invalid commands were not malicious and you do not want to ban the IP address, you can remove it from the list by clicking it, then clicking Remove. |
Click
Granted access
or Denied access, then
click Add. The IP Mask dialog box appears.
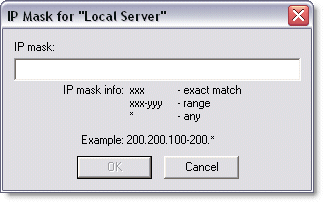
Specify the IP address or range of IP addresses to deny or grant access to the Site. The Server allows wildcards to select ranges of IP addresses.
If most IP addresses are allowed access, click Granted access, then list the exceptions to the rule.
If most IP addresses are denied access, click Denied access, then list the exceptions to the rule.
Click OK to close the IP Mask dialog box. The IP address/mask appears in the exceptions list.
Click Apply to save the changes on the Server.