On the active node, run the WAFS installer, following the procedure in Installing WAFS or Upgrading the Software to install the Vault.
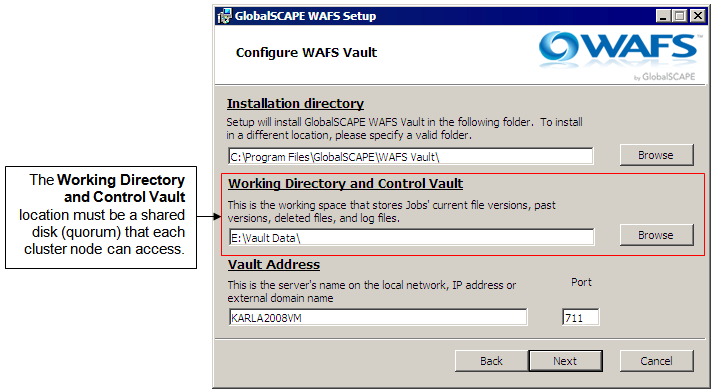
Be sure to specify the shared storage location that you set up for the cluster nodes on the Configure WAFS Vault page, in the Working Directory and Control Vault area. You must point each clustered Vault to the same shared storage location.
The illustration below is an example of setting up the shared storage (disk) location.
Once installation is complete, prior to a system reboot, configure the WAFS Vault services to start Manually, as this will ensure proper WAFS behavior in a clustered environment. (Your cluster software might set this up for you, but verify in the Services snap-in that the service is set to start Manually, not Automatically, before you reboot.)
Stop the cluster service on this node, then make the second node active.
Run the WAFS installer on the second (now active) node, using the same shared storage location, and setting the services to start Manually. The nodes must be identical for smooth failover.
Set up a "Generic Service" in the cluster for the Vault service (you can do this on either node):
In the configured clustered environment, click Manage a Cluster.
Select the cluster that will be used for WAFS.
Under Services and applications, click Configure a Service or Application.
Click Generic Service, then click Next.
In the list of available services, click WAFS Vault, then click Next.
Provide a descriptive name for the service such as WAFSVaultServ. (The length of the name is limited; you will receive an error if the name is too long.)
Specify the IP address that will be shared between cluster nodes, then click Next.
On the Select Storage page, assign the shared disk, then click Next.
On the Replicate Registry Settings page, click Add, then specify one of the following registry locations, depending on whether the system has a 32-bit or 64-bit OS. (The dialog box provides the first part of the key.) IMPORTANT: This registry location must be specified correctly. You can avoid errors by copying and pasting the key from the Registry Editor or from the text below.
32-bit: SOFTWARE\Availl
64-bit: SOFTWARE\Wow6432node\Availl
Complete the wizard.
Verify the same service appears in both nodes of the cluster.
Verify the active node automatically started the WAFS Vault service.