Enable and Configure the Send and Reply Portals
(Requires HTTPS, Workspaces) Workspaces is an enterprise ad hoc file transfer solution that allows employees to quickly and securely send large files from within the Web Transfer client or in Microsoft Outlook. Workspaces for Outlook allows organizations to address broad scale, risky file sharing practices while providing an easy-to-use interface for end users that requires little to no training from IT staff. Users benefit from an enhanced email experience with advance sending features, such as the ability to receive file pick up receipts. Recipients pickup their files in their web browser via a secure link. Administrators have the ability to manage user transactions behind the scenes, including the ability to set secure link expiration overrides and set policies for the automatic handling of exceedingly large file attachments.
-
MFA in the WTC is disabled by default. Refer to Enable Multifactor Authentication for the WTC for instructions for enabling it.
-
MFA in Workspaces is enabled by default. Refer to the procedure below for instructions for configuring it.
-
To use Workspaces for Outlook, the EFT administrator must enable Workspaces and install and enable the EFT Outlook Add-In on end-users' computers, as described below.
-
On the user account, the Allow secure file sending check box must be selected.
-
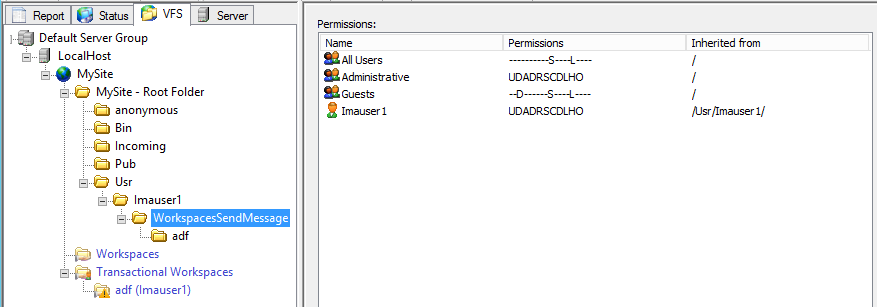
When you send a file in the Web Transfer Client, a WorkspacesSendMessage folder is created under the sending user's home folder in the Virtual File System (VFS). Subfolders in the WorkspacesSendMessage folder are named for the Subject line of the message.
To enable Workspaces for sending files
-
In the administration interface, connect to EFT and click the Server tab.
-
On the Server tab, click the Site you want to configure.
-
In the right pane, click the Web tab.
-
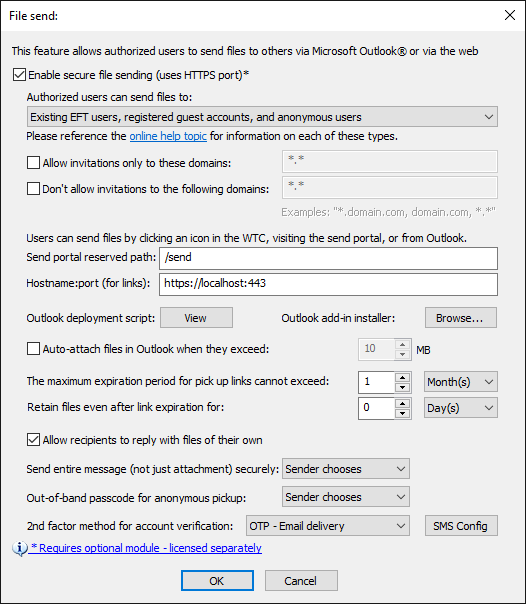
Next to Send Portal, click Configure. The File send dialog box appears.
-
Select the Enable secure file sending check box. This requires the HTTPS port to be configured and available.
-
Under Authorizedusers can send files to, select one of the following options:
-
Existing EFT users only (most restrictive) - Allows EFT users to send files via Workspaces for Outlook only to other users with an EFT account
-
Existing EFT user and registered guest accounts - Allows EFT users to send files via Workspaces for Outlook to other EFT user accounts and registered guest accounts
-
Existing EFT users, registered guest accounts, and anonymous users - Allows EFT users to send files via Workspaces for Outlook to other EFT user accounts, registered guest accounts, and non-EFT user accounts. Non-EFT user accounts do not require credentials, making it easy for the recipient to pick up files, but makes the system less secure. To reduce this risk, the sender can make the pickup link "single use."
-
In the Send portal reserved path box, specify the path for the Send portal. The default is /send.
-
In the Hostname:port box, specify the URL for file pick up. By default, this box will contain the same IP as the Domain box on the Site > Connections tab, but you can change it to an external-facing hostname, if needed (and if so configured in your network). Links that are sent for Workspaces invitations and file sharing will have this URL.
-
For using the Outlook deployment script or Add-In installer, refer to Deploy Outlook Add-In on End-User's Computers.
-
To require the use of Outlook for large files, select the Auto-attach files in Outlook when they exceed check box, and then specify a size.
-
Specify the maximum expiration period for pickup links. The default is 1 month.
-
Specify the length of time to Retain files after link expiration. The default is 0 days.
-
This value indicates the length of time between Workspace expiration and file removal, and cannot exceed maximum expiration period, above. On expiration, a "Workspace expired" Event is triggered and the Workspace becomes invisible to the administrator, owner, and participants, but the directory and files remain alive. At the end of the retention period, a "Workspace removed" Event is triggered, the Workspace information is wiped from EFT configuration, and the directory is physically removed from the file system. For example, if a transactional (guest user) Workspace is created to expire in 10 days and retain file for 10 days, if the Workspace expired on October 1, it will then be removed from disk on October 11.
-
Select the Allow recipients to reply with files of their own check box to allow people that you send file to reply with files of their own. Then you must enable the Request file page to specify the Reply path.
-
-
Always secure - Always send message and attachment securely
-
Never secure - Never send message and attachment securely
-
Sender chooses - Sender can choose whether to send message and attachment securely
-
For anonymous recipients: Next to Out-of-band passcode for anonymous pick up, specify whether a recipient requires a passcode to pick up files. Click the drop-down list and then click Required (sender must require a passcode), Not required (sender does not have to require a passcode), or Sender chooses (whether to require a passcode). (The sender's authentication options appear in the Options dialog in Workspaces.) When an out-of-band passcode is required, the passcode will appear for the sender after the message is sent. The sender then must provide the recipient the passcode via a non-Workspaces method (for example, phone, email, SMS, or message app).
-
Next to 2nd factor method for account verification, click the list to choose one of the methods of delivery for the OTP:
-
OTP - Email delivery - EFT does not verify SMTP server configuration
-
OTP - SMS delivery - If no mobile number is available for the user, SMS delivery will fail.
-
OTP - try SMS then Email - EFT first looks for mobile number in the user details. If no mobile number is defined, the email address is used.
-
Click OK, then click Apply on the Web tab.
Transactional Workspaces folders in the VFS that are shared with unregistered users will have an exclamation point on the anonymous-access folder.
After a recipient has received a message sent through Workspaces, the recipient can reply to the email in the Workspaces Reply Portal (if so configured) and send files back to the sender. If you do not want to allow that functionality, you can disable replies. Disabling the Reply portal removes the request files functionality from the Web Transfer Client interface.
Refer to Enable Multifactor Authentication for details of configuring SMS options, such as Twilio.
Related Topics