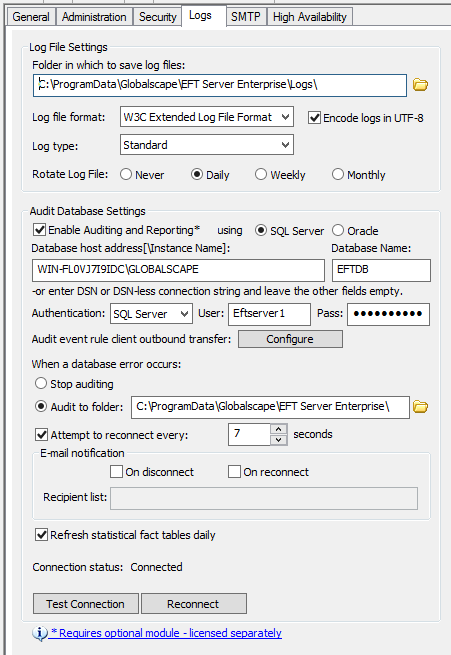
Audit Database Settings
When you run the Server Setup wizard, you are offered the opportunity to enable auditing and reporting and configure the connection information. If you chose to do that later or if you want to edit the database information, you can do so on the Logs tab in the Audit Database Settings area.
To enable and configure auditing and reporting
-
In the administration interface, connect to EFT and click the Server tab.
-
On the Server tab, click the Server node you want to configure.
-
In the right pane, click the Logs tab.
-
In the Audit Database Settings area, select the Enable Auditing and Reporting check box to enable communication with the database; clear the check box to disable auditing and reporting.
-
In the Database type area, select SQL Server or Oracle.
-
In the Database host address[\Instance Name] box, specify the host or database instance name of the database to which you want EFT to connect, or provide a DSN or DSN-less connection string. Refer to Establishing a System Data Source Name (DSN) or Using a DSN-Less Connection with ODBC Authentication, if you are using Audit Database Settings for your Site.
-
In the Database Name box, provide the name of the database or leave the box empty if you provided a connection string in the Database host address[\Instance Name] box.
-
For SQL Server databases, in the Authentication box, specify whether the database is to use Windows Authentication or SQL Server Authentication.
-
In the Database username and Password boxes, provide the username and password needed to connect to the database or leave the box empty if you provided a connection string in the Database host address[\Instance Name] box or if you are using Windows Authentication.
-
Next to Audit event rule client outbound transfer, click Configure, then specify whether to save Event Rule transfer failures to the database. Refer to Audit Database Settings for details.
-
In the When a database error occurs area, specify whether you want to audit database errors to a folder:
-
If you do want to audit errors, or to stop it temporarily, click Stop auditing.
-
To Audit to folder, click the option, then specify the path to the folder in the box.
-
-
To automatically try to reconnect after an error occurs, select the Attempt to reconnect every check box and specify the frequency in seconds, from once every 7 seconds to once every 86,400 seconds (once per day).
-
In the email notification area, select the On disconnect check box and/or the On reconnect check box, and then in Recipient list specify one or more email addresses that you want EFT to send error notifications to in case of database failure. Multiple email addresses must be separated by semicolons ; . When auditing is enabled, this email is sent any time that EFT cannot reach the database.
-
Select or clear the Refresh statistical FACT tables daily check box to indicate whether you want to refresh the FACT tables every night. Refer to Audit Database Settings for more information.
-
If you make any changes to the database audit settings, click Apply to save the changes on EFT.
-
To verify the connection information, click Test Connection. The status of the database connection appears above the Reconnect button. If the database is not connected, click Reconnect to reconnect to the database.
-
Test Connection - EFT attempts a connection using the supplied parameters without applying the changes.
-
Reconnect - EFT applies the settings (a prompt appears if you made changes and did not click Apply) and attempts to connect to ARM with the new settings.