Controlling Access to the Site by IP Address
By default, all IP addresses are granted access to EFT. EFT allows you to grant access to only one specific IP address or a range of IP addresses, or deny access to one specific address or a range of addresses. EFT controls access on the Server, Site, Settings Template, and user account.
The IP access/ban list consists of a multiple, prioritized list of IP addresses, with each IP address designated as either allowed (whitelisted) or denied (blacklisted):
-
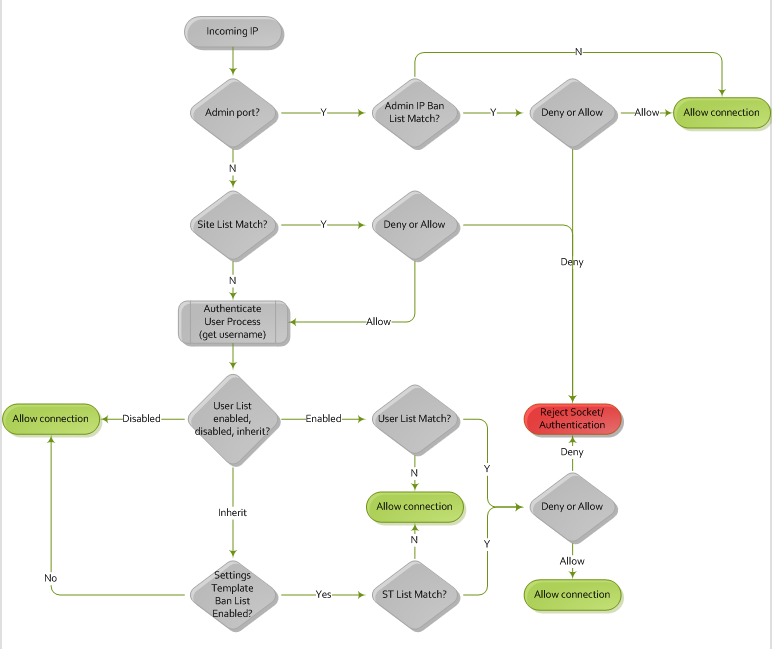
EFT filters incoming IP addresses based on the IP address entries in the list, in order of precedence. The first "Deny" match on the list causes the filtering to cease Rule matching/parsing. If there is no match or no "Deny" for the Site list, the Rule will process against either the user list (if explicitly enabled) or against the Settings Template list (if user list is set to inherit).
-
Any IP address allowed access is parsed against the Settings Template or user account IP address access/ban list upon user authentication.
-
If the user list is disabled, then no checking occurs.
-
If the user list is inherited, then the IP address is checked against the Settings Template list.
-
If the user list is enabled, then the IP address is checked against the user list only. See diagram below.
-
All automatically banned IP addresses are maintained in a separate list, for both purposes of readability and for easier prioritization of all automatically banned IP addresses relevant to manually whitelisted or blacklisted IP addresses.
-
You can unban more than one IP address at a time and search for specific IP addresses in the list.
-
The IP Auto-Ban dialog box displays when and why an IP address was banned.
The diagram below provides a logic flow of EFT's IP address ban process.
IP address policy changes are propagated to the DMZ Gateway whenever the policy is modified in the administration interface or by the auto-ban logic.
To grant/deny access by IP Address on a Site
-
In the administration interface, connect to EFT and click the Server tab.
-
On the Server tab, click the Site, Settings Template, or user account, and then click the Connections tab.
-
In the Network Usage and Security Settings area, next to IP access/ban list, click Configure. The IP Access Rules dialog box appears.
-
To add an IP address to the Rules, click Add. Specify the IP address or mask, click whether to Allow or Deny the address, a Reason (optional), and then click OK. You can also specify a range of addresses. CIDR notation is supported for both IPv4 and IPv6 literals. For example: 001:cdba:9abc:5678::/64 for blocking an IPv6 LAN or 192.168.29.0/24 for an IPv4 network.
-
To remove a Rule, click it in the list, and then click Remove. A confirmation prompt appears. Click Yes.
-
To edit a Rule, click it in the list, and then click Edit. Edit the address, then click OK to save your edits.
-
To test whether an IP address is banned or allowed, click Test IP. The Test IP Connection dialog box appears.
-
Provide an IP address to test, and then click OK. The Result (Allowed or Denied) and the Reason the IP is allowed or denied appear in the dialog box. Click OK to close the dialog box.
-
To view the list of banned IPs, click Autoban List. (On the Site only) The IP Auto-ban dialog box appears.
-
To find an IP in the list, type it in the Search box.
-
To sort the list, click a column header.
-
To remove an IP from the list, click it, and then click Remove Selected.
-
The Date Added column displays the date and time the IP was added to the Autoban List, in MM/DD/YYYY hh:mm:ss AM/PM format.
-
The Reason column displays the reason the IP address was banned (DoS/Flood prevention temporary ban, DoS/Flood prevention permanent ban, Invalid password attempts exceeded, Invalid username attempts exceeded, Too many consecutive invalid commands).
-
Click OK to close the dialog box. The IP address/mask appears in the exceptions list.
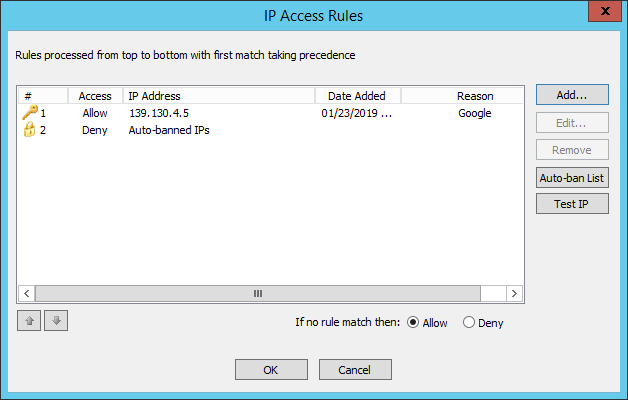

The Auto-banned IPs Rule is defined by default. Any IP address that is banned automatically by the system is denied access, until an administrator removes it from the Auto-ban List.
-
-
Click OK to close the IP Access Rules dialog box.
-
Click Apply to save the changes on EFT.
For more information about how IP addresses are banned, refer to the topics below.
Related Topics
-
Disconnecting Users after a Defined Number of Invalid Commands
-
Banning an IP Address that Uses an Invalid AccountControlling IP Access for Remote administration
-
Flooding and Denial of Service Prevention (Auto-ban)