Creating a User Account
This procedure provides instructions for creating a user account on Sites that use Globalscape Authentication.
- For the procedure for creating an EFT administrator account, refer to Configuring Server administrators.
- See Password Security Settings for password-related settings that are configured on the Site's Security tab for all users.
- For information about creating anonymous accounts, refer to Anonymous User Accounts.
- An administrator is able to edit account details fields regardless of the modifiable or enabled field attributes set in the User Account Details Template.
To create a user account on Globalscape Authenticated Sites
- After you have completed the Site Setup wizard, you can continue directly to the New User Creation wizard. Otherwise, in the EFT administration interface, connect to EFT and click the Server tab.
- Do one of the following:
- On the main menu, click Configuration, then click New User.
- Right-click the Server node or any node within it, and then click New User.
- On the toolbar, click the New
user icon
 .
.
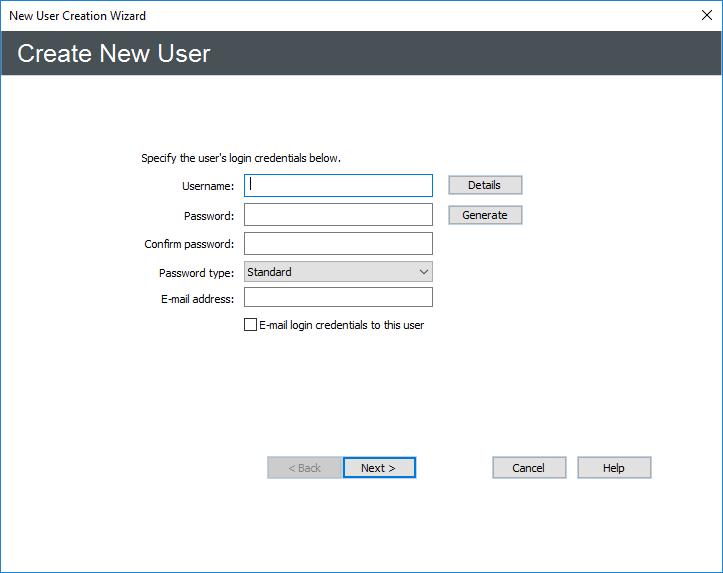
- In the Username
box, provide the logon name. The following characters are NOT supported:
{ } | [ ] \ < > / : ; " ' * + =
Username length is limited to 149 characters. (If the path to the user's home folder happens to exceed the maximum number of characters allowed by the Windows operating system, the VFS home folder name will be truncated. The default path is in the Site root /Usr/%USER.LOGIN%.) - (Optional) Click Details. The New User Account Details dialog box appears.
- Provide the user account Name, Description, Phone, Fax, email, and/or Pager information. In the Custom 1, Custom 2, Custom 3, and Comments boxes, you can provide other phone numbers, office numbers, mail box number, location, and so on. The email address box cannot contain more than 255 characters. You can specify multiple email addresses, separated by semicolons.
- Click OK to return to the wizard. (The email address format is validated when you click OK. If the email address contains invalid characters or does not contain the @ symbol, an error message appears. Click OK to dismiss the error message, then correct the address.)
-
In the Password and Confirm password boxes, provide the account password or click Generate to generate a complex password. If you click Generate, the password appears in the box so that you can provide it to the user. (If the passwords do not match, an error message appears when you click Next.)
- In the Password Type drop-down list, click one of the following:
-
Standard - A plain text password is required.
-
Anonymous - Any password, including nothing, allows an anonymous connection. (See note below, and Anonymous User Accounts for more information about anonymous passwords.)
-
If RADIUS is enabled on the Site (requires AAMM), the Enable RADIUS check box appears under the Generate button. The check box is set to inherit the Settings Template/Site setting by default. If the check box is selected, the Password, Confirm password, Generate, Password type, and the email check box are disabled. If you do not want to enable RADIUS for this account, clear the check box. When the user is created, the account is assigned an auto-generated password based on the password complexity Rules for the assigned Settings Template. Doing so avoids the possibility of a user account with a blank password if RADIUS is disabled.
-
(Optional) In the email address box, provide the user's email address. If you do not provide an email address for the user, the user icon is identified as such in the tree, and the account will not be available for multi-user editing. You can specify multiple email addresses, separated by semicolons. The email address box cannot contain more than 255 characters. (If you provided an email address in the New User Account Details dialog box in step 4 above, the address is copied to this email address box.)
-
(Optional) Select the email login credentials to this user check box. The username and password are sent to the email address provided. Refer to emailing Users' Login Credentials for details, if necessary.
-
Click Next.
-
In the Site drop-down list, click the list to select the Site to which you want to add the user. If only one Site is defined, or if you clicked in a Site tree before clicking New User, the Site's name is displayed in the list box.
-
Click the Settings Template list and click the Settings Template to apply to the new user. All new users are automatically members of the Default Settings Template. You can move the user to a different template later if you have not yet defined a custom Settings Template.
- In the Home folder box, type or click the
folder icon
 to browse
for and select a path (from the relative Site root) to the user's
home folder. The default path is in the Site root /Usr/%USER.LOGIN%.
You can also add the variables %USER.FULL_NAME%
and %USER.EMAIL%
to the path. No verification
is performed to determine whether the path is valid.
to browse
for and select a path (from the relative Site root) to the user's
home folder. The default path is in the Site root /Usr/%USER.LOGIN%.
You can also add the variables %USER.FULL_NAME%
and %USER.EMAIL%
to the path. No verification
is performed to determine whether the path is valid. -
The Make the home folder the default root folder for this user check box setting is inherited from the User Settings Template/Site, but you can override the setting. If you do not want the user to have a home folder, clear this check box. Select the check box to make the home folder the user's default root folder. Template Settings administrators cannot change this setting when creating a new user. The user inherits the setting from the Settings Template.
-
Select the Grant the user full permissions in their home folder check box if you want the user to have full permissions to their home folder.
-
Next to Assign group membership, click Groups. The Group Membership dialog box appears.
-
Permission Groups are used in the Virtual Folder system to assign permissions to users. Each user is assigned to the All Users group. To assign the user to one or more other Groups, double-click the Group or click the Group and use the arrows to move the Group between the Member of and Not a member of boxes, and then click OK.
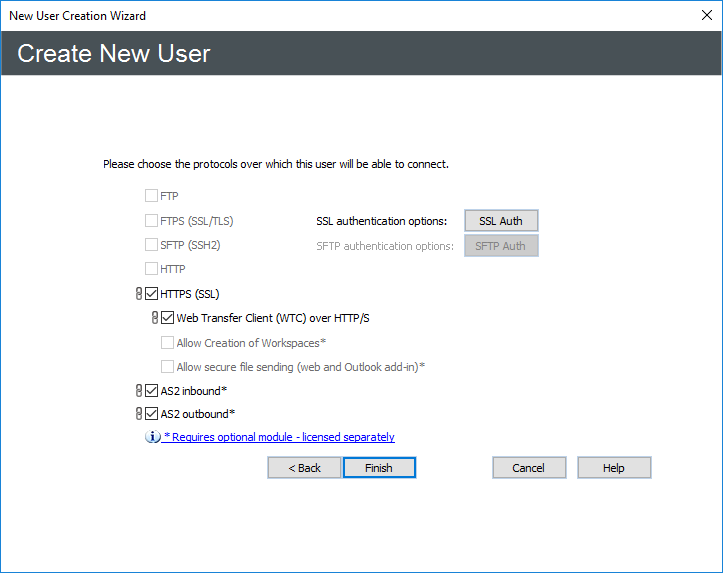
- Click Next. The protocols page appears.
- Select one or more check boxes next to the protocols on which the user is allowed to connect to EFT. (At least one check box must be selected.) Icons next to the check boxes indicate inherited settings from the Settings Template and Site. Clear the check boxes next to the protocols on which the user is not allowed to connect to EFT. If the text next to the protocol is also appears dimmed, the protocol has not been enabled for the Site and is not available.
- If you selected any SSL protocol check boxes, click SSL Auth to configure SSL authentication options for this user, if different from the Site/Settings Template.
-
If you selected the SFTP check box, click SFTP Auth to configure SFTP authentication options for this user, if different from the Site/Settings Template. After specifying an SSH key for a user, new user accounts will have the same SSH key preselected.
-
WTC, Workspaces, and secure file sending can be inherited from the Settings Template or specified on the user account.
-
AS2 must be configured on the Site to enable it on the user account. On the user account, You can configure inbound only, outbound only, or both.
- Click Finished.
-
If you selected the AS2 check boxes, a prompt appears regarding configuring this partner's AS2 settings. Click OK.
(On Active Directory Sites, if an invalid domain was created, the New User option is disabled.)
The New User Creation wizard appears.

MFA over SMS can adversely affect Workspaces invitations and ad hoc file send operations when the recipient's phone number is unknown to the sender or Workspace owner. Furthermore, Outlook add-in operations will fail if a recipient doesn't have a phone number associated with the user account.
PCI DSS requires that you should not use group, shared, or generic accounts and passwords. To address this requirement, EFT hides the Anonymous password types for Sites defined using the "strict security settings" anywhere that the password type is selectable.
PCI DSS requires that you should communicate password procedures and policies to all users who have access. You can edit the default text of the email that is sent when you create a new user (CredentialsTemplate.txt) to include your organization's password policies and procedures. This file is stored in EFT's Application Data folder (by default, C:\ProgramData\Globalscape\EFT Server).

If you use /Usr/ as the account's home folder (and remove the default %USER.LOGIN%) and clear the Grant FULL permissions to user in this folder check box, the account will inherit the permissions of the /Usr/ folder, which are Show this folder in parent list and Show files and folder in list. The account will not have permission to upload, download, and so on. Refer to Setting VFS Folder Permissions for details of setting permissions on individual accounts.
If you do not grant users full permissions to their home folders, they will inherit their Group's permissions.
The user account appears in the tree and is selected. To create more users, repeat the procedure above starting with step 2.
Related Topics