Script: Advanced Workflow - Adding a Workflow Action to an Event Rule
(Requires the Advanced Workflow module.) With Advanced Workflow Actions, EFT does not wait for a reply before returning control to the Event Rule thread, unless an "if failed" Action was specified, such as Stop Processing this Rule, in which case the Action waits for a return message indicating success or failure from the invoked process.
The workflows created for use in Event Rules are executed using the EFT server administrator credentials, unless you specify otherwise. If a resource cannot be accessed using the credentials under which the EFT service is running, you need to include the optional credentials for the destination server.
-
Think of "Local Transfer" as an operation (offload or download) with a remote server.
-
Think of "Optional credentials override" as "credentials to access remote server."
-
For download action, it is "credentials for source folder."
-
For copy/move (offload ), it is "credentials for destination folder."
-
-
"Credentials to access local folder" ("source" for offload and "dest" for download) is Event Rule execution context (EFT account, or Folder Monitor account for FM rules, or Connected Client account for client-originated rules on an AD site):
-
Offload: local (EFT) => remote ("override credentials")
-
TEST1: Offloads file from "local" Share A (access as EFT account, i.e., X) to "remote" folder B (access as Y) => Fails, as X has no permissions on A.
-
TEST2: Downloads file from "remote" Share A (access as Y) to "local" folder B (access as EFT account, i.e., X) => Succeeds, as Y has permissions on A and X has permissions on B.
-
To add a Workflow to an Event Rule
-
In the Actions list, double-click Script: Advanced Workflow. The Action is added to the Rule.
-
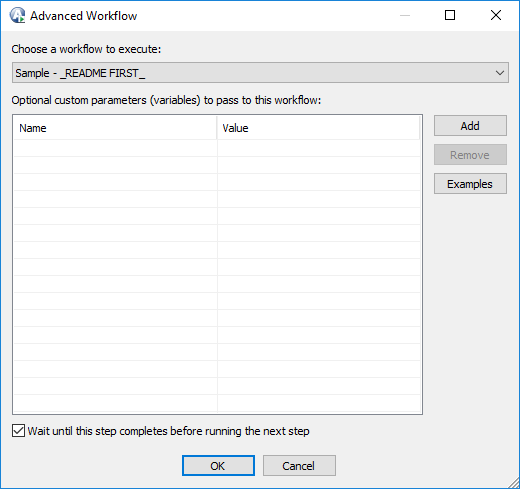
In the Rule Builder, click the Advanced Workflow link. The Advanced Workflow dialog box appears.
-
The defined Workflows appear in alphabetical order in the Choose a workflow to execute list (at the top of the Advanced Workflow dialog box). Click the down arrow to select a Workflow.
-
(Optional) Specify custom parameters to pass to the Workflow in the Name and Value columns, and then click Add.
-
(Optional) The Wait until this step completes before running the next step check box is selected by default. When the check box is selected, you can select the "If failed" action, and populate it with actions to run in case the rule fails.
To allow the next step to run before this action completes, clear the check box. If check box is not selected, a prompt appears to confirm: "This step will be executed asynchronously (non-blocking), which means EFT won't wait for this step to be completed before running the next step. This could yield undesirable results if the next step depends on the output or outcome of this one. Are you sure you want to make this action asynchronous?" (All actions in the IF FAILED section are lost if the parent action is switched from async to sync mode.) -
Click OK. The Advanced Workflow link in the Rule Builder updates with the name of the Workflow.
-
Add other Actions as needed, and then click Apply to save the changes on EFT.