Defining Event Rules
To define Event Rules in the administration interface, you begin with an Event you want to use as a trigger for the Event Rule. The Event could be when someone uploads a file, when a user quota is exceeded, when a change is detected in a folder, or many other Event triggers. Then you specify an Action to be taken when the Event occurs. The Action could be sending an email to someone, encrypting a file, moving a file, or all three together. Optionally, you can then define Conditions that must be met for the Action to be taken. You can even branch the Actions and define one Action to be taken if specified criteria are met. You do this using standard If>Else logic.
-
While you can have two administrators working on Event Rules at the same time, if they are working on the same Rule at the same time, when they save their Rule, the second administrator to save will get a notice that the changes could not be saved because changes have been made by someone else. They then need to refresh to see the other changes, and then make their changes to the Rule again.
-
The EFT log will display an error message when a file larger than 30 MB is attached to a Send notification email Action in an Event Rule.
To define an Event Rule
-
In the administration interface, connect to EFT and click the Server tab.
-
-
Right-click on the Server tab, and then click New Event Rule.
-
On the Server tab, expand the Site you want to configure, and then click Event Rules. In the right pane, click New.
-
On the main menu, click Configuration >New Event Rule.
The Create New Event Rule dialog box appears.

-
-
In the Event Rule name box, type a descriptive name for the Rule. This name will appear in the Event Rules node and in reports and logs. Therefore, name it something you will recognize, rather than something generic such as "Rule #24."
-
In the Description box, provide any notes about the Rule, such as "Periodically move and delete accounting files." You can edit these notes later in the Comment area for the Rule, if necessary.
-
In the Select event trigger box, click the Event you want to use as the basis of the Event Rule, such as Folder Monitor. For a description of the available Event triggers, refer to Events and Available Variables.
-
Click Create. The Create Event New Rule dialog box closes and the Rule Builder appears.
-
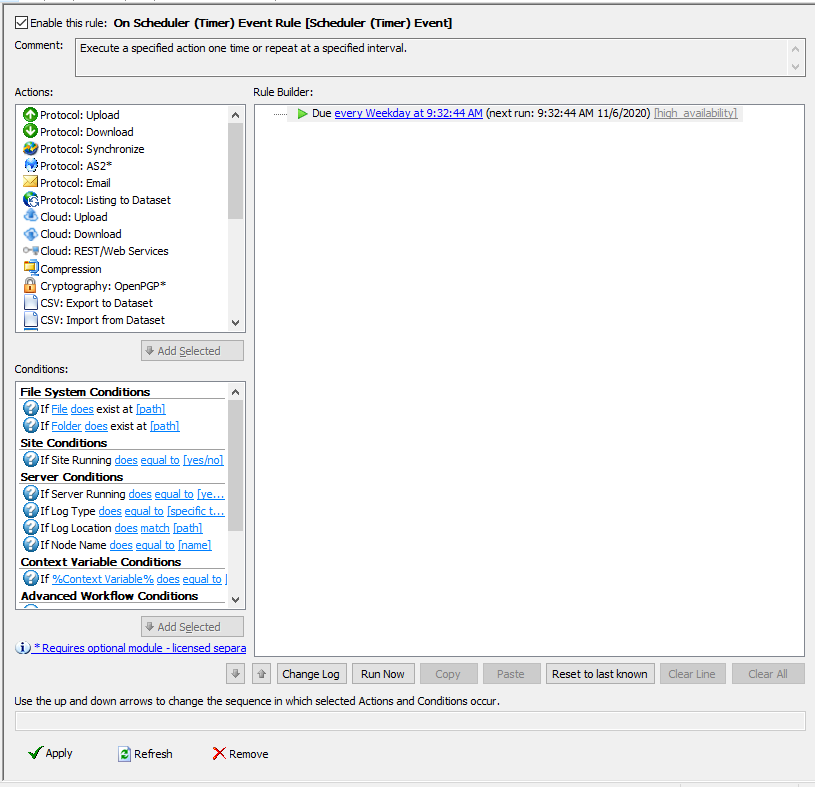
Actions and Conditions available for the specified event appear on the left of the Rule Builder. Conditions are optional. When applicable to the Event Rule, the Else option also appears. To add a Condition to the Rule, double-click the Condition, or click to select it, and then click Add Condition. Not all Conditions that EFT supports are available for every Event. To learn more about available Conditions, refer to Event Rule Conditions.
-
To add an Action to the Rule, double-click it or click the Action in the list, and then click Add Action. To learn more about Actions, refer to Event Rule Actions.
As you add Conditions and Actions, they appear in the Rule Builder.

-
In the Rule Builder, click the underlined text to specify the parameters used in the definition of the Event Rule. You can also reorder the sequence of the Rule logic using the blue up/down arrows, or by clicking the Action or Condition and dragging it to the new location.
-
Click Apply to save the changes on EFT. EFT will not save the Rule unless it is adequately defined. Links displayed in the Rule box are parameters that must be defined before you can save and apply the Rule.
-
After the Rule is defined, click the Event Rules node in the Server tree in the left pane. In the right pane, each of the Rules defined on the Site appear.
-
In the right pane, in the Rule List, click a Rule. Comments for the Rule appear beneath the Rule List in the Comment box and the definition of the Rule (the Conditions and Actions defined) appears in the Rule overview box.
-
To edit the notes in the Comment box, click in the box and type or paste the changes.
-
To manage the Rules (edit, delete, clone, reorder), click the controls on the right. Refer to Managing Event Rules for details.
-
-
To delete a Rule, click to select it in the Event Rules node, and then click
 Remove
at the bottom of the right pane or on the toolbar. A confirmation
message appears. Click Yes
to confirm or click No or
Cancel to not delete the Rule.
If clicking Remove doesn't
work (because you were in the process of creating or changing the
rule), then click Refresh.
Remove
at the bottom of the right pane or on the toolbar. A confirmation
message appears. Click Yes
to confirm or click No or
Cancel to not delete the Rule.
If clicking Remove doesn't
work (because you were in the process of creating or changing the
rule), then click Refresh.
Related Topics