Cryptography: OpenPGP Action
You can configure EFT’s OpenPGP Event Rule Action to do things like encrypt, sign, and decrypt, even on files larger than 2GB. The OpenPGP Action is available with Server Events (the On Timer and On Rotate Log events), certain File Server Events (File Upload, File Move, and File Rename), and a User Event (User Logout). To use this Action, the Site must be configured for OpenPGP and the appropriate OpenPGP keys must be generated.
Using the OpenPGP Action in Event Rules
When OpenPGP is used with a Folder Monitor Rule, OpenPGP operations will result in the creation of new files that will trigger the Folder Monitor Rule a second time. Although EFT provides an implicit filter that will ignore .pgp, .sig, .asc or .gpg file extensions for encrypt operations, you should still add an Event Rule Condition that provides an explicit exclusion next to the “If File Change does equal to added” Condition that is created by default when the Folder Monitor Rule is first created.
-
When encrypting a file: "If File Name does not match *.pgp"
-
When decrypting a file: "If File Name does match *.pgp"
-
When verifying the signature: "If File Name does match *.sig"
-
When verifying signature only: "If File Name does match *.pgp"
-
When signing: "If File Name does not match *.pgp"

One limitation is that you cannot "Encrypt and Sign" and then "Verify Only"; that will fail. The scenarios below are valid:
|
OpenPGP Source |
OpenPGP Receiver |
|
Encrypt+Sign |
Decrypt+Verify |
|
Encrypt+Sign |
Decrypt |
|
Sign Only |
Verify Only |
To set up EFT to use OpenPGP for particular Event Rules
-
Follow the procedure in Creating Event Rules or select the Rule to which you want to add the Action.
-
In the right pane, in the Actions list, double-click Cryptography: OpenPGP. The Action appears in the Event in the Rule Builder.
-
In the Rule Builder, select either of the underlined elements (links). The OpenPGP dialog box appears.
-
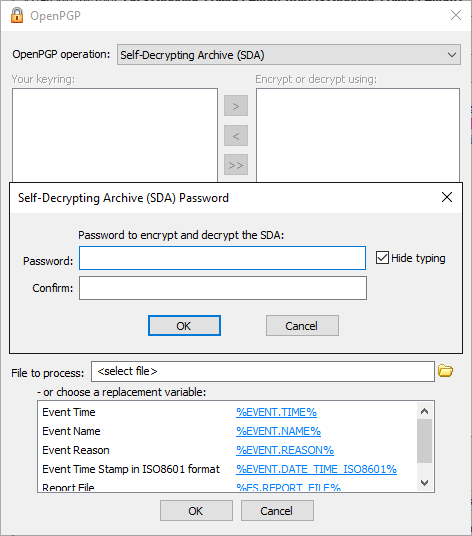
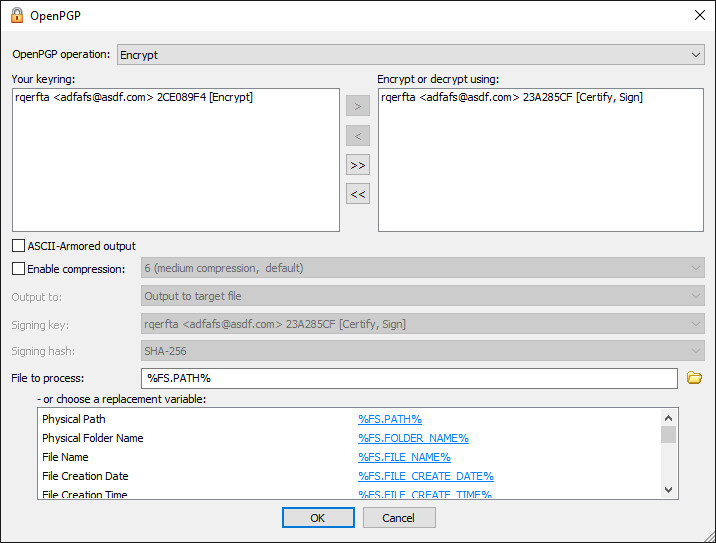
Specify the OpenPGP operation (Encrypt, Encrypt and Sign, Sign Only, Self-Decrypting Archive (SDA), Decrypt, Decrypt and Verify Signature, Verify Signature Only).
-
The options that appear in the dialog box depend on what you select in the OpenPGP operation box:
- If you designated a default key for the Site, that key is displayed in the Encrypt or decrypt using (right) pane. If there is no default key, the right pane will be blank. Use the arrow icons to add or remove keys between the Your keyring pane and the Encrypt or decrypt using pane, or double-click the key in the list.
-
You have a report containing sensitive data in PDF format. You want to encrypt and send that report to three people. In this case you would configure the "Encrypt" or "Encrypt and Sign" Action with all three public keys that correspond to those individuals. You can then send a copy of that one file to each of the recipients, and they can each decrypt the file with their private key in order to view the report in their PDF reader.
-
You are required to keep an archived copy of all outbound files, including any encrypted files. If you encrypt with only the intended recipient's key, then the resulting encrypted file will not be acceptable for archival since you will not be able to decrypt it later. Therefore, you encrypt the file with not only the public key of the intended recipient but also the public key to which you have the corresponding private key. Not only will the recipient be able to decrypt the file as usual, but you will also be able to decrypt the archived copy of that file, if needed.
-
To specify ASCII-Armored output, select the check box.
-
Select the Enable compression check box, and then click the down arrow to specify a level of compression, from 1 (least compression, fastest) to 9 (max compression, slowest). The default is 6 (medium compression, default).
-
In the Output To box, click the down arrow to specify an option: Output signature to target file (.pgp), Output signature to target file ASCII armored (*asc), Output signature to separate file (*.sig), Output signature to separate file ASCII armored (*.asc).
-
In the Signing key box, click the down arrow to specify the signing key.
-
In the Signing hash box, click the down arrow to specify a hash: Use default (MD5 or SHA-256), MD5, SHA-1, RIPEMD160, SHA-256, SHA-384, or SHA-1512. The default value depends on the version of the key used to sign the message. For version 3 keys (RSA Legacy keys), MD5 is used as default value. For all other keys, SHA-256 is used. The encryption method and compression method are both chosen by the ciphers that are used/chosen when the key was created. These ciphers are stored in the metadata of the key. EFT reads this metadata and uses that cipher for encryption/compression process.
-
In the File to process box, specify the file or folder to process. The default target file is selected. Alternatively, click a variable to add it to the File to process box or use actual file/folder names. Use the folder icon
 to browse to a file or folder.
If you would like to encrypt a single file such that multiple recipients will be capable of decrypting it, add the individual keys of the intended recipients to the list of keys to use for the encryption Action to the Encrypt or decrypt using (right) pane. This prevents you from having to create multiple copies of a file and then encrypt and manage each file separately for each intended recipient.
Example Use Cases:
-
Click OK to close the dialog box and apply the parameters.
-
Click Apply to save the changes on EFT.
When Self-Decrypting Archive is selected, none of the encryption settings are available. The SDA Class uses a Deflate algorithm specified in RFC 1951 for compression, and then creates a self-decrypting executable archive. It doesn’t use encryption in the standard sense like AES, etc. Therefore, it is not considered secure when matched up against OpenPGP. After you click OK, a password dialog box appears. Create and confirm a password, click OK, then send the password to the recipient. Use a different OpenPGP operation if you want to use encryption.