Protocol: AS2 Action - Sending Files to an AS2 Partner via Event Rules
(Requires AS2 module) You can send files via AS2 to a partner for whom you have not previously provisioned an outbound profile by manually specifying that partner’s profile in the AS2 Send File Event Rule Action. Alternatively, if the AS2 partner has an outbound profile defined, you can select that profile when you define the AS2 Send File options.
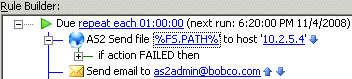
For example, you could define a Rule with a Timer Event so that every Monday at 8 a.m., all files in a certain folder are sent either to a partner that already has a profile defined on the Server or to a partner that you will define "on the fly" in the AS2 Send File dialog box.
The AS2 Send File to host Action can be used for Folder Monitor, Timer, and all file-based Events.
UTF-8 filenames/non-ASCII characters are not supported over the AS2 protocol. It is the responsibility of the trading partners to determine the file-naming limits imposed by their trading environments. Refer to RFC 2183, section 2.3 for details of filename parameters.
When triggered, the AS2 Send File to host Action offloads one or more user-defined files or one or more context files. Depending on the AS2 Send File to host Action’s retry configuration, the Action fails if any error occurs when attempting to send the AS2 payload. Those errors may include any connection, authentication, transport, or navigation errors; receipting errors or failures; payload errors, including transfer errors or integrity mismatch errors or failures; server communicated errors; and unknown or undefined errors, such as:
-
No receipt was provided
-
The receipt was not signed
-
The MIC value returned did not match the original file/message MIC
-
EFT was unable to:
-
verify the receipt signature
-
establish a connection to the remote host
-
upload the file to the remote host
-
send an the receipt asynchronously
-
send the receipt synchronously
To send files using the AS2 Send File to host Action
-
Create a new Event Rule, such as a Scheduler (Timer) Event. (Refer to Creating Event Rules for details of creating Event Rules, if necessary.)
-
Click one of the underlined text links. The AS2 Send File dialog box appears.
-
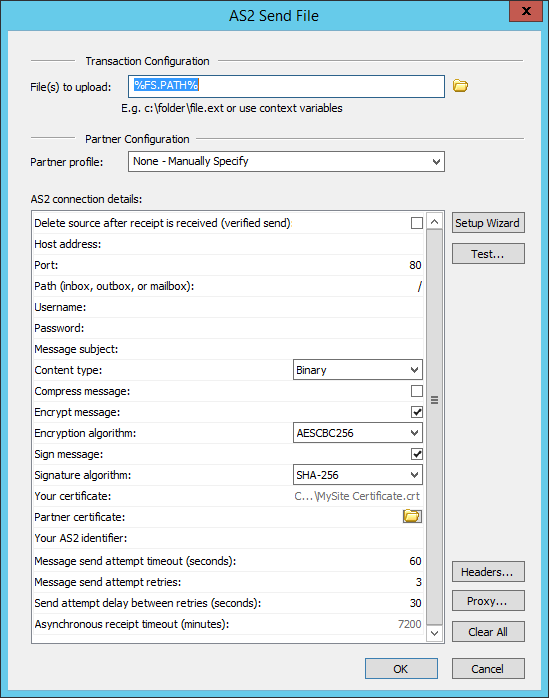
In the File(s) to upload box, type the path or click the folder icon
 to specify the file to send to this partner. Include the entire path
to the file. You can also use
File
System context variables such as %FS.PATH% or wildcard masks.
For example, to send all files in a folder, type the folder path and *.*. (The files will not be
sent all at once; each file will have a unique message ID.)
to specify the file to send to this partner. Include the entire path
to the file. You can also use
File
System context variables such as %FS.PATH% or wildcard masks.
For example, to send all files in a folder, type the folder path and *.*. (The files will not be
sent all at once; each file will have a unique message ID.) -
In the Partner Configuration area, specify the AS2 Partner profile using one of the following methods:
-
In the Partner profile box, select a defined AS2 outbound partner profile. The fields in the AS2 connection details area is completed automatically.
-
Provide the connection details in the AS2 connection details area. (Refer to AS2 Send File Dialog Box Fields below for details of each field.)
-
Click Setup Wizard to use the wizard to set up the profile.
-
(Optional) Click Headers to add a custom header. The purpose of custom HTTP headers is to pass additional or required information to the recipient's server. The Name and Value fields can each contain up to 255 characters. The Value field can use context variables.
-
To add the header, click Add, then provide the name and value in the table, as shown in the examples in the dialog box.
-
To configure a proxy server for this partner, click Proxy.
-
To clear all of the partner connection details and start over, click Clear All.
-
Click OK to save the AS2 Partner profile in the Event Rule.
-
Add other Conditions and/or Actions, as needed (for example, add an email notification).
-
Click Apply to save the Event Rule on EFT.

The Partner profile box is linked to the selected profile configuration. If you are using Globalscape authentication, if the profile is updated, the information in the AS2 Send File dialog box is updated also; if a referenced profile is deleted, disabled, or not allowed to use AS2, any Event Rule using the profile will fail.
When you use AD, LDAP, or ODBC authenticated accounts as AS2 partners, if the account in the external database is changed, deleted, or disabled, any Event Rule or Command that references the account will fail. For example, if an AD user SSmith is renamed SJones, you will have to update any Event Rule or Command manually to reflect the new name of the account.
![]()
AS2 Send File Dialog Box Fields
The AS2 Send File dialog box can be used in Folder Monitor, Timer, and file-based Event Rules. The table below describes each field in the AS2 Send File dialog box.
The following fields are used to determine whether a message send attempt has failed due to a timeout, error, synchronous MDN receipt failure, or other error, after which EFT will attempt to resend the same message at regular intervals, if specified.
| Field | Required/Optional | Description |
|---|---|---|
| Message send attempt timeout (seconds) | Optional | Specifies the timeout after which a message send attempt is considered a failure if no response or errors are received from the remote server. Range: 0-600, 60 by default, 0 means no timeout |
| Message send attempt retries | Optional | Number of times to reattempt to send the message. Range: 0 (no retry) to 999, 10 is the default. Retries do not include the initial attempt. That is, 3 retries means 3 in addition to the first attempt (4 total). |
| Send attempt delay between retries | Optional | Specifies the time to wait between retries if the send attempt was unsuccessful, in seconds. 30 seconds is the default. |
| Asynchronous receipt timeout | Optional | Specifies the time to wait for receipt before timing out, in minutes. The default is 7200 minutes (2 hours). |