Message Console - Alerts view
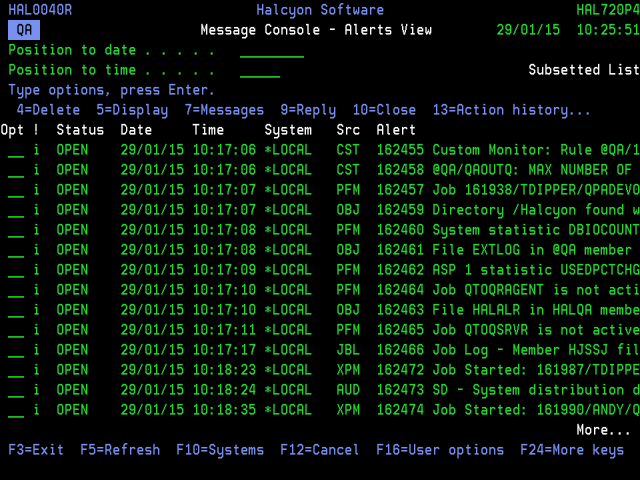
The Alerts view of the Message Console lists the alerts that have been sent to this Console. Alerts appear when they are sent via a ‘Console’ action or by the Send Console Message (SNDCONMSG) command. These actions and commands can be run within the current environment, in another environment in the same system or on a remote system or partition. Alerts remain on the Console display until they are closed by any system or manually deleted.

Parameters on the Message Console - Alerts View display
The following parameters are shown on the Message Console - Alerts View display.
Alert type (!)
Indicates the type of alert by displaying one of the following symbols/characters:
| A | Any alert that has been acknowledged |
| ! | Critical alert |
| X | Error alert |
| W | Warning alert |
| ? | Low severity inquiry alert |
| * | Completion alert |
| i | Informational alert |
The ‘A’, ‘!’, ‘X’, and ‘W’ codes may be suffixed with ‘?’ to indicate inquiry message alerts. The ‘+’ suffix indicates an alert that requires a comment to be entered when the alert is closed.
Date
Displays the date on which the alert was received by the Message Console.
Time
Displays the time at which the alert was received by the Message Console.
System
Displays the name of the system, as defined in Work with Remote Locations, that sent the alert. If *LOCAL is displayed the alert was generated by the same product environment as the one in which the Message Console is operating.
Source (Src)
Displays the source of the alert.
| ADH | Indicates that the alert was generated by the Send Console Message (SNDCONMSG) command |
| CON | Indicates that the alert was generated by the Message Console to warn of a connectivity problem |
All other Source entries indicate the monitor that raised the alert and ran a ‘Console’ action. (OUT=Output Queue Monitor and so on).
Alert
If applicable, the entry in this column displays the alert ID, which is unique to the system that raised the alert.
Message
Displays the first level text of the alert message. If the message is truncated use option 5=Display to show the full message text.
Using the Message Console - Alerts view
The following options are available when working with the Message Console - Alerts view. Type the option number in the Opt column against the required selection.
Delete
Use option 4=Delete to open the Confirm Delete of Console Messages display. Press Enter to delete the selected Console messages.
Display
Use option 5=Display to open the Display Message Detail display which shows additional information for the message. This option is useful if the first level text of the alert on the main console display is truncated.
Messages (Local Alerts only)
Use option 7=Messages to open the Display Message Log display. This is subsetted to show any messages relating to the handling of this alert or any of its actions. This option only applies to alerts originating on the local system.
Reply (Inquiry Alerts only)
Use option 9=Reply to open the Reply to Inquiry Message display which shows additional information for the selected message and allows a reply to be entered.
When a reply is entered, it is passed to the system that originated the alert. If that system is able to successfully reply to the inquiry message using the details entered, the alert is closed and is removed from the Message Console display. If the reply is not valid, the alert remains. The response, whether it is success or failure, is recorded in the Display Message Log functionality. Use Work with Administrator Alert Criteria to audit replies to remote inquiry alerts that have been sent from the local system. The response message is HAL1134.
Close
Use option 10=Close to open the Confirm Close of Alerts display. Press Enter to close the selected Console messages.
Action History (Local Alerts only)
Use option 13=Action History to open the Display Action Log display. This is subsetted to show the actions invoked by the selected alert. This option only is only available for alerts originating on the local system.
Acknowledge
Use option 18=Acknowledge to open the Confirm Acknowledge of Alerts display. Press Enter on this display to acknowledge the selected alerts, or press F12 to cancel.
Acknowledging an alert cancels all outstanding actions for the alert and changes the alert status to ACKNOWL. You can acknowledge alerts with a status of Open or Acknowledge.
Acknowledging an alert that has already been acknowledged, performs no action but is not an error. You cannot acknowledge a closed alert.
The acknowledging of alerts is optional, but is useful if you need to send an SMS message to acknowledge that the alert has been received but leaving it open pending further investigation. You can still close an open alert thereby entirely omitting the acknowledged status.
If you acknowledge an alert, the rule is suspended for the amount of time specified in the system default HAL/ACKNSUSPTIME. If the rule accepts variable conditions, such as generic names or has variable types, the suspension only applies to the specific values of the alert.
The following functions are available when working with the Message Console - Alerts view:
F3=Exit
Use F3=Exit to close the current display and return to the main menu.
F5=Refresh
Use F5=Refresh to refresh the display with current information.
F10=Systems
Use F10=Systems to switch the Console view from Alerts to Systems.
F12=Cancel
Use F12=Cancel to close and current display and return to the previous display.
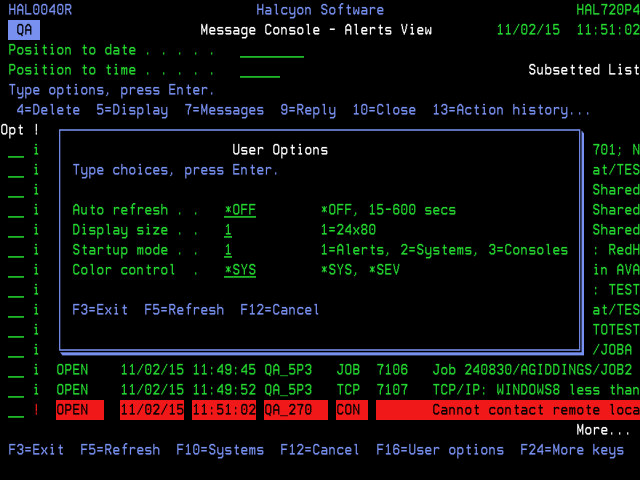
F16=User options
Use F16=User options to open the User Options display which allows user preferences to be set.

Auto-refresh
Specifies the automatic refresh interval of the Message Console display.
| *OFF | Automatic screen refresh is disabled |
| 15-600 | Specify the interval, in seconds, between each automatic screen refresh |
Display size
Specifies the preferred display size:
| 1 | Display size is 24x80 |
| 2 | Display size is 27x132 (if supported by your display device) |
Startup mode
Specifies the initial view when the Message Console is displayed.
| 1 | Alerts view |
| 2 | Systems view |
| 3 | Consoles view |
Color control
Specifies the method of color control used on the Message Console - Alerts view display.
| *SYS | Color is controlled by system. The color scheme can be modified by using option 2=System Attributes on Message Console - Systems View |
| *SEV |
Color is controlled by message severity. The color scheme can be modified by using option F22=Alert Attributes on Message Console - Alerts view |
F17=Subset
Use F17=Subset to display the Subset Message Console display which allows you to set or clear filter messages that restrict the messages shown on the display.

System
Enter the name of the system from which you want alerts to be displayed. Use F4=Prompt to display a list of valid systems from which a selection can be made.
| *ALL | Alerts from all systems are displayed |
| *LOCAL | Alerts from the *LOCAL system only are displayed |
| system | Only alerts from this named system are displayed |
Console
Enter the name of the console from which you want the alerts to be displayed. Use F4=Prompt to display a list of valid consoles from which a selection can be made.
| *ALL | Alerts from all consoles are displayed |
| system | Only alerts from this named console are displayed |
Source
Enter the name of the source from which you want the messages to be displayed.
| *ALL | Messages from all sources are displayed |
| ADH | Only ad-hoc messages sent using the Send Console Message (SNDCONMSG) command are displayed |
| CON | Only messages generated by the Halcyon Message Console are displayed |
| Name | Only alerts from the named monitor code are displayed |
Status
Enter the status of the alerts that you want to display.
| OPEN | Only open alerts are displayed |
| CLOSED | Only closed alerts are displayed |
| *ALL | Both open and closed alerts are displayed |
F18=Bottom
Use F18=Bottom to reposition the display at the bottom of the messages so that the most recent alerts are displayed.
F20=Work with User Defined Options
Use F20=Work with User Defined Options to open the Work with User Defined Options display. This display allows you to create user defined options which can be run by typing the option code in the Opt column. See Work with User Defined Options for more information.
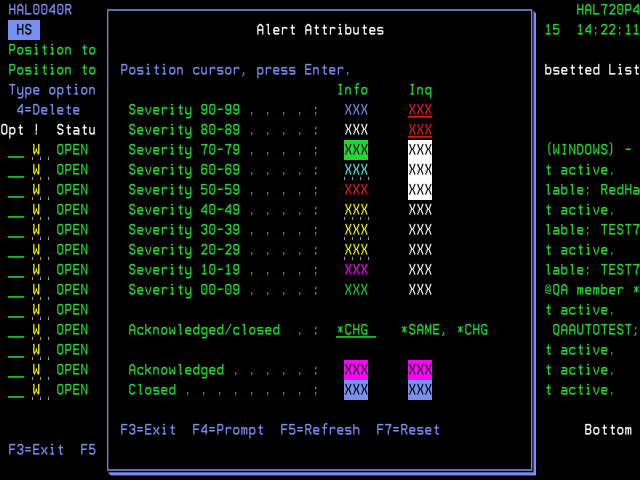
F22=Alert attributes
Use F22=Alert attributes to open the alert attributes window. This allows you to define the display options used for all users of the Message Severity color control scheme.

Severity
Shows the color in which both informational and inquiry alerts are displayed for each severity level within the Message Console. To change any of the current display attributes, position the cursor in the required line/column combination and press Enter or F4. The Select Display Attribute is displayed. Position the cursor on the new color attribute selection and press Enter.
Acknowledged/Closed
Specifies whether acknowledged and closed alerts should be controlled separately.
| *SAME | Acknowledged and closed alerts are controlled by the severity settings and the independent controls for each alert type are ignored |
| *CHG | Acknowledged and closed alerts are controlled separately by the Acknowledged and Closed parameters |
Acknowledged
Controls how acknowledged alerts are displayed when the Acknowledged/Closed parameter is set to *CHG. To change the current attribute, position the cursor of the attribute that you want to change and press F4. The Select Display Attribute is displayed. Position the cursor on the new color attribute selection and press Enter.
Closed
Controls how closed alerts are displayed when the Acknowledged/Closed parameter is set to *CHG. To change the current attribute, position the cursor of the attribute that you want to change and press F4. The Select Display Attribute is displayed. Position the cursor on the new color attribute selection and press Enter.
F24=More keys
Use F24=More Keys to display more function key options.