SNMP Monitoring
Simple Network Management Protocol (SNMP) is an ‘Internet-standard’ protocol for managing devices on IP networks. Devices that typically support SNMP include routers, switches, servers, workstations, printers and so on.
Each SNMP device is capable of sending ‘traps’, pockets of information that provide details of current operating status. For example, a network router may send a message that an invalid logon has been attempted or a printer may send a message that it is out of paper or that a ink cartridge needs replacing.
Network Server Suite is capable of monitoring these messages and sending an alert whenever an issue arises. SNMP versions 1, 2c and 3 are supported.
System Requirements:
- A license to use SNMP Traps must be included within the license code applied to the system on which SNMP Traps are being monitored.
- Devices to be monitored must exist within Device Manager.
Setting up the SNMP Device in Device Manager
- Open the Device Manager component of Network Server Suite and add the device details. See Adding a Device for more information on how to do this.
- Once the basic system details have been entered, select SNMP from side-navigation panel on the Add Device dialog.
- Click Device Is A Trap Target to register this device as being able to send and receive SNMP Trap information.
- Leave the Trap Port set to 162. Only change this value if required by your operating environment.
- Click OK to add the SNMP Device.
Making a Device a SNMP Trap Target
In order that SNMP traps may be received correctly, a device must be identified as being able to handle the incoming information and process it into meaningful data. For this purpose, the Enterprise Server running on the local device must be defined as a Trap Target.
Defining the local Enterprise Server as a SNMP Trap Target
- From within Device Manager, double-click on the local device hosting the Enterprise Server. This is normally the machine on which all of the Network Server Suite components are installed. The Edit Device dialog is displayed.
- Select the SNMP tab. In the options page, if not already enabled for this device, click SNMP Capable. The Traps page is now available
- Click Device Is A Trap Target so that it is enabled.
- Unless required by your operating environment, leave the remaining fields on this page set to their default settings.
- Click OK to set this device as a SNMP Trap Target.
- Close Device Manager.
This accepts the changes made in Device Manager so that they are recognized within Enterprise Console.
Defining SNMP Settings on the SNMP Device
Nearly all SNMP devices, and it varies by device, have a SNMP Settings menu option within their web-interface configuration options. From within these SNMP Settings, the IP Address of the Enterprise Server, previously set-up in Device Manager, can be identified as the Trap Target Device.
Configuring Trap Receiver Send Intervals
By default, the Trap Receiver sends information every 60 seconds or when the batch size reaches 50 traps, whichever occurs first.
These settings can be manually reconfigured to suit specific operating requirements.
To reconfigure Trap Receiver Send Intervals (32-bit Default Install Path):
- Open Windows Explorer or use Windows Start | Computer.
- Navigate to:
C:\Program Files\Halcyon\Trap Receiver\TrapReceiver.exe.config
- Double-click on this file to open it ready for editing (normally opens in Notepad but may open in Microsoft Visual Studio Tools for Applications if these are installed).
To reconfigure Trap Receiver Send Intervals (64bit Default Install Path):
- Open Windows Explorer or use Windows Start | Computer.
- Navigate to:
C:\Program Files(x86)\Halcyon\Trap Receiver\TrapReceiver.exe.config
- Double-click on this file to open it ready for editing (normally opens in Notepad but may open in Microsoft Visual Studio Tools for Applications if these are installed).
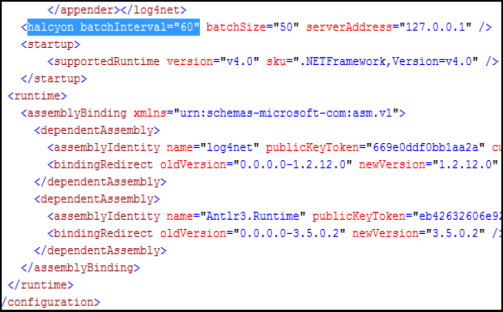
- Use Edit | Find to locate ‘halcyon batchInterval=”60”’. The following should now be displayed:

- Edit the ‘halcyon batchInterval’ and ‘batchSize’ fields to the new required settings.
- Select File | Save to save the file with the new configuration settings.
Adding MIB information
Network Server Suite comes pre-supplied with MIB files; files that contain a set of definitions for each managed object. They define the data type of the object, as well as the current validity of the object.
In Network Server Suite, MIB files are used to provide detailed information regarding the SNMP Trap from which they were sent. This information is available in the details panel of any SNMP Trap alert received at the Enterprise Console for which MIB details exist.
Additional MIB files can be added to the existing database so that they build into a comprehensive knowledge base.
To add a MIB file to the existing database:
- Select Windows Start | Control Panel | Administrative Tools | Services
- Stop the Halcyon Trap Receiver service.
- Open Windows Explorer or use Windows Start | Computer.
- Navigate to:
- Add any additional MIB files to this directory from the location on the network where they are currently stored.
- Restart the Halcyon Trap Receiver service.