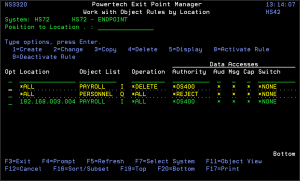
How to Get There
From the Exit Point Manager Main Menu, select option 4 to display the Work with Security by Object panel. Select option 3 to display the Work with Object Rules by Location panel.
What it Does
The work with Object Rules by Location panels allow you to create, modify, and delete Object Rules. Object Rules can be active or inactive. On this panel, the inactive rules are colored yellow and the active rules are colored green.
Options
1=Create
Enter a 1 in the Opt column at the top of the list to open the Create Object Rule by Location panel where you can create an Object Rule linking a Location to an Object List. When you've defined your rule, press Enter to display the Select Target Server Functions for Object Rule panel.
2=Change
Enter a 2 next to an object rule to display the Change Object Rule by Location panel, where you can modify an Object Rule's attributes. Enter the changes you want to make and press Enter to display the Select Target Server Functions for Object Rule panel. See Object Rules for more information.
3=Copy
Enter a 3 next an object rule to display the Copy Object Rule by Location panel where you can create a new Object Rule using an existing rule as the basis for the new rule. You can enter a new user name and make other changes to the values specified in the rule. Press Enter to display the Select Target Server Functions for Object Rule panel. See Object Rules for more information
4=Delete
Enter a 4 next to an object rule to delete it. A confirmation panel displays asking you to confirm the deletion.
5=Display
Enter a 5 next to a rule to display the Display Object Rule by User panel. You cannot make any changes on this panel, it is information only.
8=Activate Rule
Enter an 8 next to a rule to activate it if it is inactive. A confirmation panel displays asking you to confirm the activation request. The Select Target Server Functions for Object Rule panels display allowing you to define a new filter rule.
9=Deactivate Rule
Enter a 9 next to a rule to deactivate it. A confirmation panel displays asking you to confirm the deactivation request. If the rule is the last active rule for the location, the Specify Filter Rule Options panel displays so you can so you can specify how you want Exit Point Manager to handle any *MEMOBJ filter rules that exist for the object rule. See Deleting an Object Rule for more information on *MEMOBJ filter rules.
Field Descriptions
Location
Location represents the source of a transaction. Location can hold an IP Address, an IP Address Group or the name of an SNA Communications Device. The special value *ALL, when used on a rule, means that the rule applies to any rule means that the rule applies to any Location lacking a specific rule. when used as a subset or selection parameter, *ALL generally means to select all such rules for display or printing.
Object List
The Object List name is a short name you assign to a list of objects to help you identify the list. This name is required to be a valid OS name. The Object List name is immediately followed by its type, which can be one of the following values:
Operation
The operation to which the rule applies.
Data Accesses/Object Accesses
Data Accesses define access rights by location to the data contained in the objects in the Object List. Object Accesses define access rights by location to the actual objects in the Object List. Press F11 to switch the view between the two types of access.
Authority
Authority represents the action to be taken when a rule is found that matches the data present on a transaction. This Authority value pertains to Data Accesses.
The valid values are:
Aud (Audit Transactions)
The Audit transactions flag controls the logging of transactions to the Log Journal set up on the work with Exit Point Manager System Values panel. This Aud flag pertains to Data Accesses.
The valid values are:
Msg (Send Messages)
The Send messages flag controls the sending of messages to the Log Message Queue set up on the work with Exit Point Manager System Values panel. This Msg flag pertains to Data Accesses.
The valid values are:
Cap (Capture Transactions)
The Capture transactions flag controls whether transactions are remembered in Exit Point Manager for later memorization. Once captured, transactions can become Memorized Transactions which can act as rules. This Cap flag pertains to Data Accesses.
The valid values are:
Switch Profile
The Switch profile holds the name of a user profile whose authority is used to process the transaction instead of the authority of the User initiating the transaction. The transaction is executed as, and uses the authority of, this Switch profile.
The job that processes the transaction continues to run under this switch profile until Exit Point Manager processes another transaction request for that job.
Switch profile is allowed only when Authority contains *SWITCH or *MEMSWITCH, if *MEMSWITCH is allowed. Otherwise it must contain *NONE. This Switch pertains to Data Accesses.
Command Keys
F3 (Exit): Exit the panel without processing any pending changes.
F4 (Prompt): Displays a list of possible values from which you may select one.
F5 (Refresh): Refreshes the panel and resets all available text fields.
F7 (Select System):Use this command key to work with data from a different System.
F11 (Object View): Changes the displayed detail columns to those that control Object Accesses.
F12 (Cancel): Exit the panel without processing any pending changes.
F16 (Sort/Subset): Allows you to sort and subset information by location, Object List, and/or operation.
F17 (Print): Prompts the PRTOBJL command to print the list of Object Lists using your current sort/subset criteria.
F19 (Top): Positions the panel list at the first record.
F20 (Bottom): Positions the panel list at the last record.
