Creating Probe Groups
Overview
Use a probe group to include multiple probes targeting the same IP address into a single icon on a map. A probe group shows the worst status among the probes in the group. A probe group counts as a single device against your license count.
About the Control Probe
Each probe group can contain a control probe. Setting a control probe affects the probe group as follows:
- When a control probe is defined, no notifications for the other probes in the group are sent if the control probe is down.
- The group's interfaces match those of the control probe.
When you create a group containing an SNMP probe, a control probe is automatically determined for the group. This is the first SNMP probe detected and can be changed. If there are no SNMP probes in the group, no control probe is defined. For more information, see Setting a probe group's control probe (Pg. 1) .
How Grouped Devices are Probed
The following is how devices are probed after grouping:
- Each member probe is polled at its own rate, with its own settings. The settings in place when the device is added to a probe group are used, including poll rate, attached notifiers, and probe parameters. You can edit the settings for any probe. For more information on editing these settings, see Editing Settings for a Probe Within a Probe Group.
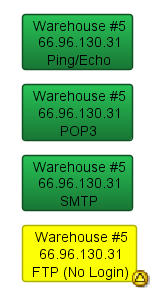
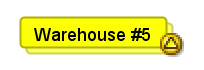
- The device icon's state reflects the most serious condition of its member probes. When the state of a member probes becomes the most serious state, the device icon's state changes to reflect it.
- By attaching a notifier to the device, you can get notifications whenever any probe in the group has a problem.
- By attaching a notifier to a member of the group, you can get notifications when that member probe has a problem.
- If the control probe is down, no notifications are sent for any other member of the group.
- Interface information is shown based on the selected control probe.
Use the Group command to create a probe group from a set of selected devices.
|
To create a probe group:
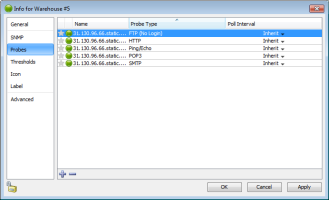
When you double-click the resulting device icon, the grouped probes appear in a list in the group Info window.
|
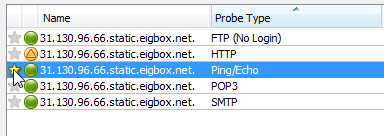
Before grouping
After grouping |
|
NOTE: When you group probes, the resulting group uses the first line of the first device as its label. You can change the label before or after grouping.
|
Creating One or More Empty Probe Groups
You can create an empty probe group and add probes to the group as needed.
To create an empty probe group:
- From the Insert menu, select Empty Probe Group. The Add Probe Group(s) dialog is displayed.
- For each probe group you want to add, type or paste a host name or IP address.
- Click Add. A probe group icon is displayed for each entered host name or address.
Adding Devices to Probe Groups
You can add probes to a group by doing the following:
- Add an existing device to a group.
- Add a new device to a group.
- From the list view, drag and drop a device into a group.
To add an existing device to a probe group:
- Select the group and the devices you want to add to it.
- From the Insert menu, select Group. If all selected devices use the same IP address or host name, the selected devices are added to the existing probe group.
To add a new device to a probe group:
- From the probe group Info window, click the plus sign (+). The Set Probe window is displayed.
- Select the probe you want to use, set its parameters, and click OK. The probe is added to the group.
To remove probes from a group:
- Double-click a probe group. The probe group's Info window is displayed.
- From the Info window, select the probes you want to remove from the group. Shift-click to add contiguous probes to your selection or Ctrl-click to add or remove discontiguous probes from your selection.
- Click the minus sign ( - ). The selected probes are removed from the probe group and appear as separate devices in the map.
From the List view, you can also drag a probe out of a probe group.
Editing Settings for a Probe Within a Probe Group
Each probe in a probe group can be polled at its own rate, have its own settings, and can be edited while part of the group.
To edit a probe's setting within a group:
- Double-click the probe group device icon. The Info window is displayed, showing the list of probes in the group.
- Double-click to open the Info window for the selected probe, or Right-click or Ctrl-click the probe, and select an option from the Context menu.
Setting a Probe Group Control Probe
You can set the control probe for a probe group. If the control probe is down, no notifications are sent for any other member of the group and the group's interfaces match those of the control probe.
To set the control probe for a group:
- With the map editable, double-click the probe group icon. The Info window is displayed.
- From the left panel, click Probes. The probes in the group is displayed.
- From the left column of the probe list, click the star icon for the probe you want to use as the control probe. The color of the star changes to indicate that the probe is the control probe.