Icons and Images on Maps
Intermapper can display devices on a map in one of several shapes. The default shape is a rectangle, with the device Label inside. Intermapper can also display an oval, a wire (a straight line), a cloud, a text object which can be used as a legend on a map, or an icon.
A large number of built-in icons are provided with Intermapper. It is also very straightforward to import your own icons.
Setting an Object's Icon
To set an icon, select one or more items on the map then click Format > Icon. This opens the Select an Icon window. This window includes the following components:
![]()
- A menu lists collections of icons called Icon Sets. There are several built-in icon sets, including Traditional and Default icons sets and various Cisco-themed icon sets..
- A scrolling list on the left shows icons from the
selected icon set. These icons appear at a uniform size in the list.
Click one of these icons to use it for the selected devices on the
map. Grayscale custom icons appear shaded with the color of
a device when it is in the UP state (the default is green).
- A preview pane of the icon, showing the selected icon in the size it will appear on the map.
- Color preview buttons. The green, yellow, orange, and red buttons correspond to the different device states. Click a colored button to preview the icon appearance when it is in the indicated state.
![]()
- Below Reload is Information about the icon (filename, dimensions, and file size).
- Click Refresh (as shown) to force Intermapper to reload the image, perhaps after modification in an image editing program.
- Click Import (as shown) to import an icon or a folder of icons into Intermapper. These icons are sent to the InterMapper Settings > Custom Icons folder on the Intermapper server.
- Click Refresh to refresh the list of icons.
- Drag an image file to the window to import it into the current icon-set.
- Drag a folder of image files to the window to create a new icon-set, importing the image files in the folder to the new icon-set.
- If the Icon Size slider appears, use it to select the icon's size.
Icon Coloring According to the Device Status
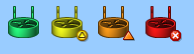
Intermapper colors the icon depending on its status. When in the Up status, the icon retains its normal color. (Grayscale icons are tinted green.) If the icon goes to a warning, alarm, or down status (yellow, orange, or red, respectively) Intermapper shows a grayscale version, tinted to match the device's state.
Clicking the color preview buttons changes the color to show how the icon appears on the map in a given status.
Creating Custom Icon Files
Icons files can be saved in one of several common graphic formats:
- Portable Network Graphics (PNG) - (Recommended) works with all operating systems and platforms.
- Joint Photographic Experts Group (JPEG) - Works with all operating systems and platforms.
- Graphic Interchange Format (GIF) - Works with all operating systems and platforms.
Other graphics file formats can work for you, but are not guaranteed to appear properly on all platforms.
The recommended file format is a PNG file, saved at 72 pixels per inch with 256 colors. You should use transparency for the area surrounding the icon, so the background color shows through properly.
If the icon filename has a suffix of _## where ## is the size in pixels, the icons are grouped automatically, and the icon size slider is displayed.
Placing Arbitrary Icons and Images in Maps
Any icon or image can be placed in a map. Before you can place an image in a map, you must import it as an icon.
To place an image or icon in a map:
- If the image is not imported as an icon, import it now.
- From the Insert menu, select Icon. The Select an Icon window is displayed.
- Select an icon or image you want to insert and click OK. The icon or image is displayed in the map.
- Move the icon or image to a desired location on the map.