Attaching a Notifier to a Device or Interface
Attaching a Notifier to a Device
You can attach one or more notifiers to any device. For each notifier, you can specify which states trigger a notification. For example, a device might have a notifier send an email when a device goes down, but can have a second notifier that plays sounds when the same device goes down, comes up, or enters an alarm state. You can also send an email to an on-site system administrator during the day and to a different administrator outside business hours.
To attach a notifier to a device:
- Select one or more devices.
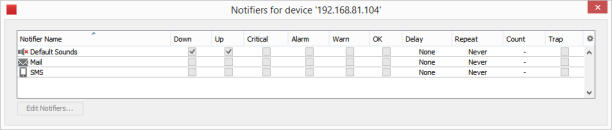
- From the Monitor menu, select Device Notifiers or right-click a device in the Map List or Device List view of the Map window. The Notifiers for device(s) window is displayed, showing which notifiers are currently attached to the selected items as shown below.
- In each notifier row, select or clear the check boxes for the device states you
want to trigger. A notification is sent when the device's state
changes to any of the selected states for that notifier.
- Configure a notifier - Click a row to select a notifier and click Edit Notifiers. The Configure Notifier window is displayed.
- Attach all notifiers to selected devices, Alt-click or Cmd-click (Mac) . All check boxes in the column are toggled to the same state. Alt-click or Cmd-click (Mac) a Delay or Repeat menu and specify a value to set all rows to that value.
Attaching a Notifier to an Interface
You can also attach notifiers to a device's interfaces, so that alerts are sent for a link when that link goes down.
To attach a notifier to one or more interfaces:
- Select the device containing the interfaces you want to attach notifiers to.
- View the Interfaces window, either from the Monitor menu's Interfaces submenu, or from the device's context menu's Interfaces submenu. The Interfaces window is displayed, showing the device's interfaces .
- Select the interfaces you want to attach notifiers to, using Click, Shift-click, and Ctrl-click. Type Ctrl-A to select all of the device interfaces.
- Right-click or Ctrl-click (Mac) one of the selected interfaces and select Notifiers Window from the context menu Interfaces submenu. The Notifiers for link window is displayed, showing the notifiers and the status they use to attach to the selected interfaces.
-
Select or clear the check boxes for the device states. Set Delay, Repeat, and Count values as needed. A notification is sent when any of the interface states change to one of the selected states.
NOTE:You can also attach notifiers to interfaces from the Link Notifiers list view of the Map window.
Resetting Devices or Links to the Default Notifier Set
If you change the default device or link notifier set after attaching it to all devices or links, you can reset all devices or links in a map to use the default notifier set.
To reset all devices or links in a map to use the default notifier set:
- With the map window open, select Map Settings from the Edit menu. The Map Settings window is displayed.
- From the left pane, click Default Notifiers. A list of notifiers is displayed, showing the default attachment settings used when a new device is added.
- Do one of the following:
- Click Reset All Devices to attach the default notifier set to all devices in your system.
- Click Reset All Links to attach the default notifier set to all the links in your system.
- Click OK. All devices or links on the map are set to the default notifier set.
Using Delay, Repeat, and Count Parameters
For each notifier, you can specify Delay, Repeat, and Count parameters. These parameters can control how quickly and how frequently notifications are sent. For example, to avoid unnecessary pages, you can configure a notifier to wait until a device is down for two minutes before sending the first page. You can also re-send a notifier every 10 minutes indefinitely. Notifications are sent until the count is reached or until the device is acknowledged.
How Delayed Notifiers work
Intermapper maintains a queue of notifications to be sent. When a DOWN, WARN, ALARM, or CRITICAL event happens, Intermapper places a notification in the queue and sets its time to be sent according to the delay. (UP, OK, and Trap notifications are never delayed.)
When an UP or OK event occurs, Intermapper first searches the notification queue for the corresponding down, warn, or alarm notification. If it is there, Intermapper removes both the DOWN (or Warn or Alarm) notification and UP (OK) event and will not send either one. If not, Intermapper sends the UP/OK notification immediately.
Notification Escalation
You can use notifiers to implement a problem escalation system by creating two or more notifiers for a device. The first notifier can alert someone immediately. A second notifier can be delayed for a period of time, perhaps 30 minutes or an hour, before notifying a second person. If the problem remains when the second notifier's delay time is reached, the second notification is sent. As soon as a problem is acknowledged, no further notifications are sent, even if the outage lasts a long time.