SSL Certificates
Intermapper's web and remote servers can employ a certificate to encrypt the data going between the server and clients. This assures that the client connected to the actual server and not another server acting as an impostor.
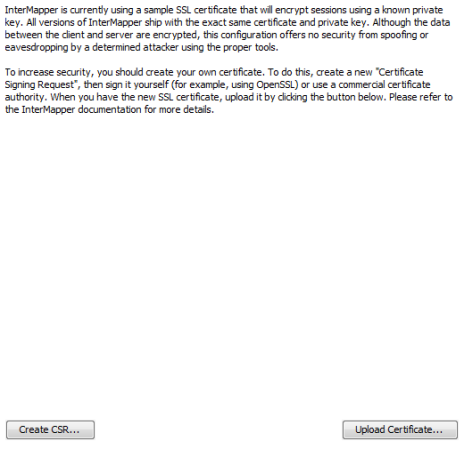
Intermapper ships with a certificate signed by Fortra. The data is encrypted. but does not use a strong encryption (it is easily broken) and web browsers using HTTPS connections give a warning that there is a problem with the certificate and that data might be intercepted in transit.
Creating a Signed SSL Certificate
To create SSL Certificates:
Do one of the following:
- Create a certificate signed by a Trusted Authority. This is the recommended method for production servers.
-
Create a self-signed certificate.
WARNING: Self-signed certificates are not appropriate for use on public-facing servers. The only time they should be used is on a local intranet or on a development server when developing or testing an application.
Creating a Certificate From a Trusted Authority
To achieve stronger encryption and verification that the server is authentic, you can create and install your own SSL certificate.
Certificate Workflow Summary
-
Intermapper creates a private key and a CSR.
-
You send the CSR to your Certificate Authority (CA).
-
The CA signs the CSR and returns a certificate plus any intermediates.
-
You upload the signed certificate (as a PEM bundle) into Intermapper.
-
The private key always remains on the Intermapper server.
To create and install your own SSL certificate:
- Create a Certificate Signing Request (CSR). The CSR contains all the information needed to identify the computer. Intermapper includes a built-in function for collecting this information and building the certificate.
- Sign the CSR. Signing is a process where an authority verifies the information in the certificate.
- Upload the signed certificate into Intermapper to make it operational.
In either case, you must first create a Certificate Signing Request (CSR), which is a file that you can create using Intermapper. Then you need to sign the CSR yourself or send it to a commercial Certificate Authority to sign.
Use the SSL Certificate panel, available from the Server Configuration section of the Server Settings window, to create a Certificate Signing Request and to upload a signed certificate to the Intermapper server.
Required PEM Bundle Structure for Intermapper
Intermapper requires a single PEM file containing the following items in this exact order:
-
The private key (Pending.key).
-
The server certificate (leaf).
-
Intermediate CA certificate(s).
-
Root CA certificate (optional but recommended).
Step 1: Create a Certificate Signing Request
- From the Edit menu, select Server Settings. The Server Settings window is displayed.
- From the Server Configuration section, click SSL Certificate. The SSL Certificate panel is displayed.
- Click Create new CSR. The Certificate Signing Request window is displayed.
-
Enter the required information as described below, and click OK. Intermapper generates a 2048‑bit RSA private key when you click Create new CSR. Use 2048‑bit or stronger keys for all production certificates. The key and a copy of the CSR are saved in the Intermapper Settings:Certificates folder and a standard Save File dialog is displayed.
You are asked to save a copy of the CSR (with a filename of the FullyQualifiedDomainName.csr) on your disk. Fortra recommends that you save this on the desktop so you can find it when you create a signed certificate. After you request a signed certificate, you can discard this file.
- Click Save. The new certificate is saved in the specified location.
Enter the following information for your Certificate Signing Request:
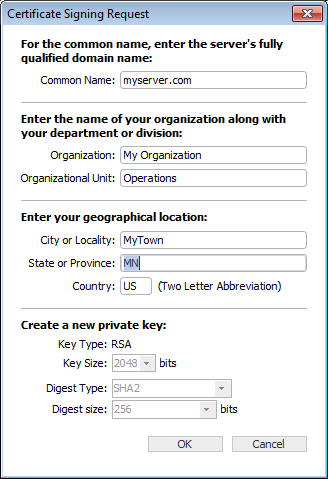
-
The full DNS name or IP address of you server. If possible, it should include your domain name.
-
Organization
The name of your organization.
-
If applicable, the name of an organizational unit within your organization, such as a department or division name.
-
Country
The two-letter abbreviation for your country
-
The state or province name or abbreviation
-
The descriptive location of the server.
-
Make new private key
The first time you generate a CSR, this box is dimmed. On subsequent uses, select this check box to create a new private key. Leave it unchecked to use the same private key.
-
Key Size
1024 or 2048 bits.
-
Digest Type
SHA1 or SHA2. SHA1 is the default value.
-
Digest Size
If you select SHA2, select 256 or 512 bits.
When you click OK, Intermapper generates a private key for your system and uses the information entered above to create the Certificate Signing Request. Intermapper saves following files in the InterMapper Settings:Certificates folder:
- SSLCertificateKeyFile - Contains your private key
- Pending.csr - The Certificate Signing Request (CSR) file
You are also asked to save another copy of the CSR (with a filename of the FullyQualifiedDomainName.csr) on your disk. Fortra recommends that you save this on the desktop so you can find it when you are ready to create a signed certificate. You can discard this file after you request a signed certificate.
Step 2: Sign the Certificate
After you have a CSR file, you must have it signed. The file can be signed in one of the following ways:
- Use the OpenSSL software (available from http://www.openssl.org) or the Windows CA to sign the CSR. This creates a self-signed certificate that you can easily use within your own organization.
- Send the CSR to any of several commercial certificate authorities, such as InstantSSL (http://www.instantssl.com),
Verisign (http://www.verisign.com/products/site/index.html),
or Thawte
(http://www.thawte.com). These companies return a signed certificate that is globally-recognizable as authentic.
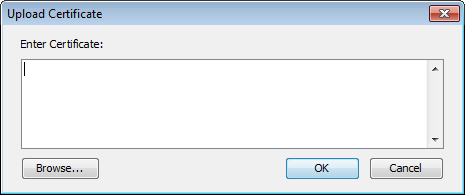
Step 3: Uploading the Signed Certificate
After the certificate is signed, click Upload new Certificate. Either copy and paste the text of the certificate into this window, or click Browse and locate the certificate file on your hard drive.
At the conclusion of this, the InterMapper Settings:Certificates folder contains the following files:
- SSLCertificateKeyFile - Contains your private key.
- SSLCertificateFile - Contains your signed certificate (the
file from Verisign, InstantSSL, or OpenSSL). Remove any
suffix (such as .pem) from the file name.
- SSLCACertificateFile - Contains the public certificate chain
of the signing CAs (in order).
Stop and restart the affected server from the Server Settings window. These certificates are used for HTTPS and Intermapper Remote client connections if the SSL/TLS boxes are selected in the respective server settings.
Using an Externally Generated CSR and Private Key
If you use a different application than Intermapper to create your Certificate Signing Request (CSR), Intermapper does not have access to the private key used to create the CSR. To upload your certificate with the private key, create a text file containing the signed certificate, the private key, and the CA's public certificate chain (if included). Click Upload new certificate to upload this combined file.
Creating a Self-Signed Certificate
You can create your own self-signed certificate in order to use an encrypted connection. This is only recommended for intranets and development servers. You should never use a self-signed certificate for a production server.
To create and use a simple self-signed certificate with Intermapper:
- Create the certificate and its private key.
- Create a version of the key and certificate suitable for use in Microsoft Windows.
- Import the certificate and key into Intermapper.
- Import the certificate and key into Microsoft Windows.
Configuring SSL Protocols, Cipher Selections, and Options
After you set up your OpenSSL certificate, you can configure the operation of the OpenSSL-based services provided by the Intermapper server to conform to your local security policy. For information on how to configure the operation, see the description of the ssl.conf file in Intermapper Server Settings Folder.
Technical Notes
The design for this scheme is based on the SSL section of the Apache Mod-SSL httpd.conf file.
- For InstantSSL, the SSLCACertificateFile is the same as
the ca-bundle file, described in http://www.instantssl.com/ssl-certificate-support/cert_installation/.
- If there is no SSLCertificateKeyFile, Intermapper looks
for the private key in SSLCertificateFile.
- Intermapper always loads additional CA certificates,
if they exist, from SSLCertificateFile first, then it checks to see if SSLCACertificateFile
exists.
- You can set up the configuration so
one file, named SSLCertificateFile, contains everything. The file must contain a key, certification, and trust chain in that order, or the certificate is not imported properly.
- Intermapper converts CRs to LFs in the file data before loading it. There is no need to worry about CR-LF translation issues.